Building Envelope Protection: Implementing the Crawl Space Vapor Barrier

Source:https://www.halifaxcrawlspace.ca

Did you know that up to 50% of the air you breathe on the first floor of your home originates directly from your crawl space?

A few years ago, I inspected a home in South Carolina where the owner complained of bouncy hardwood floors and a persistent, musty smell that no air purifier could fix. Crawling underneath the floor joists with a flashlight, I found a nightmare scenario: heavy droplets of condensation hanging off sagging fiberglass insulation, subfloor plywood rotting at the seams, and dark mold creeping across the joists. The cause wasn’t a plumbing leak or a flooded yard—it was raw, unsealed earth constantly breathing moisture upward into the home.

We cleared out the ruined insulation, laid a heavy-duty continuous liner, and sealed every seam tight. Within a week, the indoor humidity dropped dramatically, the musty odor vanished, and the floor structure was stabilized.

Over my 10+ years as a home improvement contractor, I have seen unmanaged crawl space moisture quietly destroy structural timbers and compromise indoor air quality. Installing a proper crawl space vapor barrier is one of the single most effective ways to protect your home’s building envelope and safeguard your family’s health.

The Stack Effect: How Your House Breathes Moisture

To understand why a crawl space liner is so critical, you have to understand a fundamental principle of building science called the Stack Effect.

Think of your home like a giant vertical chimney. As warm air rises and escapes through your attic vents and upper-floor windows, it creates a negative pressure vacuum at the bottom of the house. This vacuum aggressively sucks air—and everything floating in it—upward through every unsealed gap, pipe penetration, and floorboard seam in your crawl space.

If your crawl space consists of exposed dirt, ground moisture evaporates continuously into that enclosed subfloor cavity. That high relative humidity (often exceeding 80–90%) feeds wood-destroying fungi, rots floor joists, ruins insulation, and drifts directly up into your living rooms.

+--------------------------+-----------------------+-----------------------+-------------------------+
| Barrier Material / Thickness| Tear Resistance    | Puncture Protection   | Perm Rating (Permeability)|
+--------------------------+-----------------------+-----------------------+-------------------------+
| 6-Mil Clear Polyethylene | Extremely Low         | Poor (Tears Easily)   | ~ 0.06 Perms            |
| 10-Mil String-Reinforced | Moderate              | Good                  | ~ 0.03 Perms            |
| 12-Mil Virgin Polyolefin | High                  | Exceptional           | ~ 0.018 Perms           |
| 20-Mil Commercial Liner  | Industrial Grade      | Maximum               | < 0.01 Perms            |
+--------------------------+-----------------------+-----------------------+-------------------------+

Material Selection: Why 6-Mil Plastic Just Won’t Cut It

A common mistake I see budget-conscious homeowners make is running to the local hardware store and buying cheap 6-mil clear plastic sheeting meant for painting drop cloths.

6-mil clear polyethylene breaks down quickly in damp crawl space environments. It tears the moment you crawl over it to inspect plumbing, off-gasses bad odors, and turns brittle within a couple of years.

The Superiority of Heavy-Duty Polyolefin

For true long-term crawl space vapor protection, you should install a 12-mil to 20-mil string-reinforced polyolefin membrane.

  • High-density virgin polyolefins are engineered specifically to resist puncture damage from rocks or gravel.

  • String reinforcement (scrim layer) stops small tears from ripping open across the entire floor.

  • A low perm rating (under 0.02) ensures that ground water vapor cannot diffuse through the material over decades of service.

Encapsulation vs. Basic Ground Covering

When upgrading your crawl space, you need to decide whether a basic ground cover or a full system encapsulation fits your climate and budget.

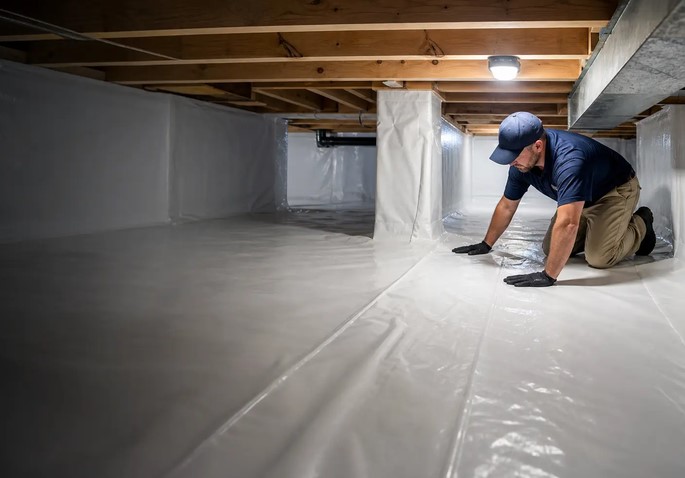
  • Class 1 Vapor Retarder (Ground Cover Only): Covering 100% of the exposed dirt floor with a plastic membrane, overlapping seams by 12 inches, and taping them tight. This blocks raw ground moisture from evaporating but leaves wall vents open to outside air.

  • Full Crawl Space Encapsulation: Covering the dirt floor, extending the membrane all the way up the foundation walls (stopping 3 inches short of the sill plate for termite inspection access), sealing external wall vents shut, and installing a dedicated crawl space dehumidifier or supply-air fan.

For humid regions or homes with chronic moisture issues, full encapsulation is the absolute gold standard for building envelope protection.

Step-by-Step Installation Protocol for Pro-Grade Protection

Laying a durable crawl space vapor barrier requires meticulous preparation. Skimping on floor prep or seam sealing will compromise the entire barrier’s effectiveness.

1.Debris Removal and Grading:Clear sharp debris.

Rake the dirt floor completely smooth. Remove sharp rocks, root snags, construction debris, and glass that could puncture the plastic liner when walked on.

2.Roll Out and Position the Membrane:12-inch minimum overlap.

Unroll your heavy-duty membrane starting at the farthest corner. Overlap all adjacent sheets by at least 12 inches to prevent moisture from escaping between seams.

3.Seal Seams and Penetrations:Use high-tack acrylic tape.

Wipe down seam edges to remove dust, then join all overlaps using heavy-duty, waterproof polyethylene seam tape. Seal tightly around support piers, plumbing drains, and electrical conduits.

4.Anchor to Foundation Walls:Mechanical wall attachment.

Extend the liner up the masonry foundation walls at least 12 to 18 inches above outside grade. Secure the top edge using foundation termination bars, masonry anchors, and polyurethane sealant caulk.


Expert Advice: Pro Tips and Hidden Traps

⚠️ The Termite Inspection Gap

Never run a vapor barrier membrane all the way up to touch the wooden sill plate or band joist on your foundation walls! Termites love building mud tubes hidden behind plastic liners to reach your home’s framing undetected. Always leave a 3-inch to 4-inch exposed concrete gap at the top of the foundation wall as an inspection strip for pest control professionals.

Addressing Standing Water First

A vapor liner blocks ground moisture evaporation, but it is not a substitute for primary waterproofing.

If water actively puddles in your crawl space after heavy rains from high groundwater or exterior drainage issues, you must resolve that water intrusion first. Install a perimeter French drain and a heavy-duty sump pump system underneath or beside your vapor liner before sealing the space.

💡 Pro Tip from the Field

Before rolling out your heavy 12-mil or 20-mil membrane over rough, sharp gravel or rocky ground, lay down a low-cost, non-woven geotextile fabric underlayment first. This cushions the liner from below, making crawling over it comfortable and ensuring zero punctures.

Take Control of Your Home’s Foundation Health

Protecting your crawl space isn’t just about preserving floor joists—it’s about creating a healthy, energy-efficient, and structurally sound home from the ground up. By installing a high-grade crawl space vapor barrier, sealing seams meticulously, and controlling subfloor relative humidity, you eliminate mold hazards, safeguard air quality, and save big on heating and cooling bills.

Have you checked the condition of your home’s crawl space lately? What challenges are you facing with subfloor humidity or musty odors in your house? Leave a comment below with your questions or share photos of your crawl space setup—I’d love to help you build a dry, durable foundation!
Maximizing Thermal ROI: The Impact of Attic Foil Insulation on Utility Costs

Source:https://www.absoluteairflow.com

It was mid-July in 2017, and I was standing in a client’s attic in Houston. The thermostat downstairs was set to 72°F, but the AC unit was screaming like a jet engine, unable to keep up. When I stepped onto the joists, my infrared thermometer clocked the attic floor at a blistering 145°F.

That homeowner was effectively living inside an oven, with only a thin layer of fiberglass “fluff” preventing the heat from baking their living room. Most people think more “fuzz” (traditional insulation) is the only answer to high bills. But that day, we didn’t add more bulk; we added a thin, shiny layer of Attic Foil Insulation. Within 48 hours, their AC run-time dropped by nearly 25%.

After a decade of crawling through tight spaces, I’ve learned that heat isn’t just something you “block”—it’s something you have to outsmart.

The Science of Radiance: Why Your Attic is an Oven

To understand why Attic Foil Insulation (technically known as a Radiant Barrier) is a game-changer, you have to understand that heat travels in three ways: conduction, convection, and radiation.

Traditional insulation like fiberglass or cellulose is great at stopping conduction—the heat that “crawls” through solid materials. However, on a hot summer day, your roof shingles absorb massive amounts of solar energy and blast it downward into your attic as radiant heat.

Fiberglass is like a thick wool sweater. It’s great at keeping you warm in the winter, but if you stand under a heat lamp in a sweater, you’re still going to overheat. Attic Foil Insulation is like a space blanket or a reflective shield; it reflects that radiant energy back out toward the roof before it ever touches your floor.

How Attic Foil Insulation Actually Saves You Money

The “Thermal ROI” (Return on Investment) of foil insulation comes from its ability to lower the Delta T (the temperature difference) between your attic and your living space.

When your attic is 140°F and your house is 70°F, your AC has to fight a 70-degree uphill battle. By installing a radiant barrier, you can often drop that attic temperature by 20°F to 30°F. This drastically reduces the “heat load” on your ductwork.

In many homes, the AC ducts run through the attic. If those ducts are sitting in 140°F air, the cold air inside them warms up before it even reaches your vents. Foil insulation ensures your AC isn’t cooling the attic air before it cools your bedroom.

The Two Most Effective Installation Methods

In my years on the job, I’ve seen two main ways to deploy Attic Foil Insulation. Each has its merits depending on your climate and budget.

1. The Radiant Barrier Decking (New Construction)

This is foil factory-laminated to the underside of the roof sheathing. If you’re building a new home or re-roofing, this is the gold standard. It’s “set it and forget it” protection that starts working the moment the plywood goes down.

2. The Retrofit Staple-Up Method

For most of us with existing homes, this is the DIY path. You take rolls of perforated foil and staple them to the underside of the roof rafters.

  • Pro Insight: You must leave a gap at the soffit (the bottom) and the ridge (the top). This creates a “chimney effect” where air flows behind the foil, carrying the reflected heat out of the ridge vents. Without this airflow, you risk overheating your shingles.

Debunking the Dust Myth

A common question I get is: “Can I just lay the foil flat on top of my existing insulation?”

While this is technically possible and often easier, it comes with a major caveat: Dust. Radiant barriers require an air space to function. If you lay foil flat on the attic floor, dust eventually settles on it.

Once that shiny surface is covered in a layer of grey attic dust, it loses its ability to reflect heat. This is why I almost always recommend the rafter-staple method. It keeps the foil vertical or angled, preventing dust buildup and preserving your ROI for decades.

Technical LSI Keywords Every Homeowner Should Know

When you’re shopping for materials, don’t just look for “shiny paper.” You need to look for specific technical specs to ensure you aren’t buying a fire hazard:

  • Emissivity: This is the measure of how much heat a surface “radiates.” You want a rating of 0.05 or lower (meaning it reflects 95% of heat).

  • ASTM E84 Fire Rating: Never put anything in your attic that isn’t Class A/Class 1 fire-rated.

  • Breathability (Perforations): Ensure the foil is perforated with tiny holes. This allows moisture and water vapor to pass through, preventing mold and rot in your roof deck.

  • R-Value vs. Reflectivity: Remember, foil has almost zero R-value. It doesn’t “insulate” in the traditional sense; it “reflects.”

Expert Advice: The “Hidden Trap” of Foil Installation

Tips Pro: If you have a cell phone signal that is already weak in your house, be aware that wrapping your attic in industrial-grade foil can turn your home into a “Faraday Cage.” It may slightly dampen your signal. If you rely on an attic-mounted TV antenna, the foil will likely block your reception entirely. Plan to move your antenna to the roof before you finish the installation!

Is Attic Foil Insulation Right for Your Climate?

While foil is a superstar in the “Sun Belt” (Texas, Florida, Arizona), its impact in the North is different.

In cold climates, the goal is to keep heat inside the house. While foil can help reflect some heat back down, it is far less effective than simply increasing your Fiberglass R-Value or using Spray Foam Insulation.

If you live in a region where your summer cooling bills are higher than your winter heating bills, Attic Foil Insulation is your best friend. If you live in Maine, put your money into more blown-in cellulose instead.

Step-By-Step ROI: What to Expect

  1. Year 1: Expect a 5% to 15% reduction in cooling costs depending on your current insulation levels.

  2. Year 5: Most homeowners find the material costs ($300–$800 for a standard home) have paid for themselves entirely.

  3. Long Term: By reducing the heat load, you extend the lifespan of your AC compressor, which can save you $5,000+ in premature replacement costs.

Conclusion: Stop Fighting the Heat and Start Reflecting It

We spend so much time trying to “seal” our homes that we forget about the massive amount of energy hitting our roofs every single day. Attic Foil Insulation is a low-tech, high-impact solution that addresses the root cause of summer discomfort.

I’ve seen it transform “un-coolable” upstairs bedrooms into comfortable sanctuaries. It’s not magic; it’s just smart physics applied to your utility bill.

Are you ready to turn your attic from a heat trap into a thermal shield? Drop a comment below with your city and your current attic setup—I’d love to help you figure out if a radiant barrier is the right move for your specific home!

Would you like me to walk you through a specific tool list for a DIY staple-up installation?