Hardening Access Points: Ensuring Structural Security with the Door Strike Plate

Source:https://doorsforpros.com

It takes less than four seconds for an average-sized intruder to kick down a standard residential exterior door. Most people invest hundreds of dollars in high-tech smart locks, heavy-duty deadbolts, and security cameras, believing their entryway is an impenetrable fortress. Yet, the shocking truth is that when a door gets kicked in, it’s almost never the lock that fails.

Instead, the flimsy piece of decorative pine wood framing your door—known as the jamb—shatters into splinters. The deadbolt remains perfectly intact, but it tears right out of the wall because it was held in place by tiny, half-inch screws anchored into nothing but soft finish wood.

During my ten-plus years in the home improvement industry, I’ve repaired dozens of kicked-in doors, and nearly every single one shared the exact same structural flaw: a weak, under-engineered Door Strike Plate. Upgrading this single component is the cheapest, most effective way to harden your home’s physical access points. Let’s dig into the technical mechanics of door security and walk through the protocol to dramatically reinforce your perimeter.

The Hidden Mechanics of Entryway Failure

To understand why a door is vulnerable, you have to look at how a standard lock transfers energy. When you lock your deadbolt, the solid metal bolt extends out from the edge of your door slab and rests inside a small hole in the adjacent wall frame. Covering that hole is a small piece of metal called the strike plate.

The Paperclip vs. Anchor Analogy

Imagine trying to hold a heavy boat in place during a storm. If you tie your massive steel anchor chain to a tiny plastic deck cleat secured with Elmer’s glue, the strength of the chain doesn’t matter at all; the cleat will tear away instantly.

[Standard Setup]: Deadbolt ---> Standard Strike Plate ---> Half-Inch Screws ---> Flimsy Door Jamb (Fails Instantly)
[Hardened Setup]: Deadbolt ---> Heavy-Duty Strike Plate ---> Three-Inch Screws ---> Solid Wall Studs (Impenetrable)

Your heavy-duty deadbolt is that steel chain, and a standard, factory-issued Door Strike Plate is that weak plastic cleat. When a physical force is applied to the outside of the door, all that kinetic energy concentrates directly onto the two tiny screws holding the strike plate to the wooden frame. To achieve true structural security, we must bypass the fragile decorative jamb and anchor our hardware deeply into the actual structural framing of the house.

Anatomical Upgrades: Selecting a Heavy-Duty Door Strike Plate

When you head to the hardware store, you’ll find that standard strike plates are roughly two inches long and made of thin, stamped brass or aluminum. To truly harden an entry point, you need to swap those out for a dedicated security Door Strike Plate or a full jamb reinforcement plate.

1. Enhanced Length and Gauge

A proper security plate is typically 8 to 11 inches long and stamped from heavy-gauge solid steel or brass. This extra length distributes the force of an impact across a much larger surface area, making it incredibly difficult for the wood frame to split under pressure.

2. Staggered Screw Hole Geometry

Look for plates that feature a staggered or offset screw hole pattern. If all the screw holes line up perfectly in a straight line, driving multiple large screws into the wood can act like a wedge, splitting the wood grain right down the middle. Staggered holes keep the structural integrity of the wood intact.

The 3-Inch Screw Rule: The Ultimate Pro Secret

If you take only one piece of advice away from my decade of field experience, let it be this: throw away the screws that come inside the lock box.

Manufacturers pack cheap, short, half-inch or one-inch screws into standard locksets because they are easy to drive into any frame. But those short screws only penetrate the thin, decorative trim board.

To achieve real structural security, a Door Strike Plate must be secured using three-inch, heavy-duty wood screws. A three-inch screw completely passes through the weatherstripping, punches through the hollow gap behind the trim, breaks past the door jamb, and bites deeply into the double 2×4 structural wall studs framing the rough opening of your home. You are essentially anchoring your door directly to the skeleton of your house.

Step-by-Step Protocol: Installing a Reinforced Strike Plate

Upgrading your strike plates is an incredibly accessible project for beginners and intermediate DIYers alike. It requires minimal tools but yields massive defensive dividends.

Core Tools Required:

  • Multi-bit screwdriver

  • Power drill with a 1/8-inch drill bit extension

  • Two or four 3-inch premium construction screws

  • Wood chisel and hammer (optional, if swapping to a larger plate size)

1.Remove the Existing Hardware:Removal Phase.

Open your door and locate the strike plate aligned with your deadbolt. Unscrew the short factory screws and remove the old plate. Take note of how deep the existing metal sits inside the wood pocket (the mortise).

2.Align the New Security Plate:Alignment Check.

Place your new, heavy-gauge Door Strike Plate over the existing latch hole. Ensure that the opening lines up perfectly with the path of your deadbolt. Mark the new, extended screw holes onto the wood frame using a sharp pencil.

3.Bore Deep Pilot Holes:Drilling Protocol.

Using your power drill equipped with a 1/8-inch wood drill bit, drill straight through your pencil marks. Angle the drill slightly inward toward the center of the wall framing. Drill to a full depth of three inches to clear a clean path for the heavy hardware.

4.Drive the 3-Inch Structural Screws:Anchoring Execution.

Insert your three-inch construction screws through the plate and drive them manually or with your drill on a low-torque setting. Ensure the screws pull the metal plate completely flush against the wood. If the plate is too thick and prevents the door from closing properly, use a sharp hand chisel to lightly deepen the wood pocket.

5.Test the Lock Alignment:Functional Test.

Close the door slowly and throw the deadbolt. The bolt should slide effortlessly into the strike box without binding, scraping, or forcing you to push or pull on the door handle. If it rubs, loosen the screws slightly, realign, and retighten.

The “Hollow Frame” Alignment Trap

When you start driving massive three-inch screws into a door frame, the immense pulling force can easily pull the decorative door jamb backward into the rough wall opening if there are no shims filling the gap behind it. If you over-tighten the screws, you might accidentally bow your entire door frame, causing your door to stick or misalign. Tighten the screws until they are snug and flush—do not try to violently crank them down past the surface of the plate.

Final Thoughts: Affordable Peace of Mind

Home improvement is often associated with high-dollar kitchen remodels or complex landscaping overhauls, but the projects that matter most are the ones that quietly protect the people you love. Upgrading to a reinforced Door Strike Plate takes less than twenty minutes and costs virtually nothing, yet it completely eliminates the most common physical vulnerability found in modern homes. It’s a simple, high-yield upgrade that turns a fragile entryway into a formidable barrier.

Take a close look at your front, back, and garage side doors this weekend. Back out one of the screws holding your strike plates in place. If it’s shorter than your thumb, it’s time for an update.

What kind of lock hardware are you currently running on your main entryway? Have you ever had to deal with a sticking or misaligned door after a season shift? Let me know in the comments below—I read every single one and am always happy to help troubleshoot your workshop projects. Stay safe, stay secure, and keep building!

Advanced Security Integration: Implementing the Pet Friendly Sensor Protocol

Source:https://www.roombanker.com

It is 3:00 AM, and your phone is screaming. The home security app is flashing red: “Intrusion Detected: Living Room.” Your heart races as you grab a flashlight, only to find your 60-pound Golden Retriever, Cooper, staring at you sheepishly from the couch. He just wanted a midnight snack. This “false alarm fatigue” is the number one reason homeowners eventually disable their security systems entirely, leaving them truly vulnerable when it matters most.

In my twelve years of designing smart home infrastructures, I’ve seen more homeowners defeated by their own pets than by actual burglars. We want safety, but we also want our furry family members to roam free. Achieving this balance requires a shift from basic motion detection to a specialized Pet Friendly Sensor protocol. This isn’t just about turning down the sensitivity; it’s about understanding the physics of how a home “sees” movement.

The Infrared Filter: How Modern Sensors “Think”

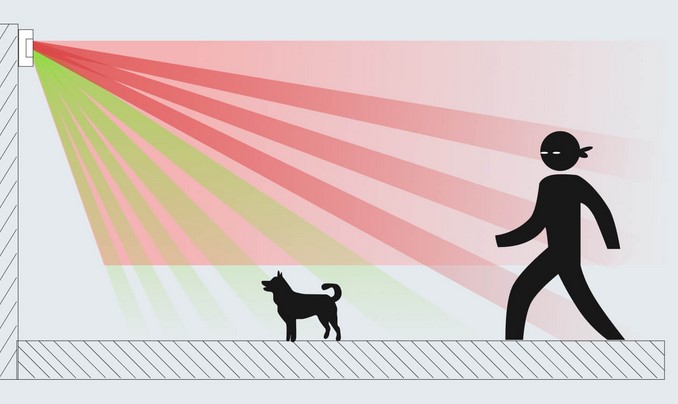
To understand a Pet Friendly Sensor, you have to understand Passive Infrared (PIR) technology. These sensors don’t actually “look” at the room like a camera; they monitor changes in heat signatures. When a human walks by, they represent a large, vertical block of heat moving across the sensor’s field of view.

Think of it like a high-speed camera at a race track. A standard sensor is looking for any movement across the finish line. A pet-friendly version, however, is like a “height and weight” gate. It is programmed to ignore heat signatures that fall below a certain mass—typically 40 to 80 pounds—and stay within a specific distance from the floor.

The Weight Gap Delusion

Early in my career, I made the mistake of trusting the box. A client bought a sensor rated for “up to 50 lbs,” but their 20-pound cat kept triggering it. Why? Because the cat jumped on the back of the sofa, right in front of the lens. To the sensor, that cat looked like a 200-pound giant because it was so close. This taught me that a Pet Friendly Sensor is only as good as its placement strategy.

Engineering the Shield: Strategic Placement Protocols

When we implement a pet-immune system, we aren’t just slapping devices on a wall. We are creating a “Security Envelope.” Here is the mechanical workflow I use for every professional installation.

1. The “Dead Zone” Calibration

A professional Pet Friendly Sensor often utilizes a “Look Down” creep zone. However, for pet owners, we actually want to disable this. We aim to create a horizontal “blind spot” from the floor up to about 3 or 4 feet.

Pro Tip: Mount your sensors at exactly 7.5 feet. This height allows the PIR beams to fan out over the heads of your dogs while still capturing the midsection of any upright human intruder.

2. Dual-Technology Integration (PIR + Microwave)

If you have a particularly active pet—like a bird that flies or a cat that climbs—a single PIR sensor won’t cut it. I always recommend “Dual-Tech” sensors. These require both an infrared heat change and a microwave pulse (which detects physical mass displacement) to trigger the alarm. This drastically reduces false positives from heat vents or small pets.

3. Masking and Fresnel Lens Adjustments

Some high-end sensors allow you to physically “mask” certain zones. If you know your cat spends all day on a specific bookshelf, we can apply an internal mask to the lens that essentially blinds the sensor to that specific square foot of space without compromising the rest of the room.

Technical LSI Vocabulary: Mastering the Spec Sheet

Before you purchase your next Pet Friendly Sensor, look for these technical specifications to ensure you are getting more than just a marketing label:

  • Animal Immunity Level: Usually measured in kilograms or pounds (e.g., 20kg/40lb or 40kg/80lb).

  • Pulse Count Logic: This determines how many “steps” a heat signature must take across the beams before the alarm triggers. Higher pulse counts are better for homes with high pet activity.

  • Temperature Compensation: This ensures the sensor remains accurate when the room temperature is close to human body temperature (98.6°F), preventing “thermal blindness.”

  • RFI/EMI Protection: High-quality sensors are shielded against Radio Frequency Interference, which can be caused by your Wi-Fi router or microwave.

Expert Advice: The “Climber” Warning

Here is an insight that caught me off guard during a renovation project in 2018: Thermal mass is cumulative.

If you have three 15-pound dogs playing together, their combined heat signature can exceed the 40-pound limit of your Pet Friendly Sensor. If they huddle together or chase each other in a tight circle, the sensor sees one “large” heat source.

Expert Advice: If you have multiple pets, always “over-spec” your sensors. If your dogs total 45 pounds combined, buy an 80-pound rated sensor. It’s better to have a higher threshold than to deal with a false alarm at 3:00 AM.

Never point a motion sensor directly at a window or a heat vent. For a pet-friendly setup, the sun hitting a rug or a blast of hot air from the floor vent can mimic the movement of a living creature, causing the system to trip even if your pets are asleep.

The Analogy: The Security Bouncer

Think of a standard motion sensor like a bouncer who kicks out anyone wearing a red shirt. If your dog has a red collar, he’s out.

A Pet Friendly Sensor is like a bouncer with a guest list and a height chart. He says, “Okay, if you’re under 3 feet tall and don’t weigh much, you’re clearly not the guy I’m looking for. You can stay.” By adding Dual-Tech (Microwave), you’re giving that bouncer a second set of eyes to confirm that the person in the red shirt is also a human-sized mass before taking action.

Maintaining the Infrastructure

A security system is “set and forget” until it fails. To maintain Advanced Security Integration, you must perform a “Walk Test” every six months.

  1. Put your system in “Test Mode.”

  2. Let your pets roam the room as they normally would.

  3. Walk through the room yourself in an upright position.

  4. Check the log: Did it ignore the pets? Did it catch you?

If the sensor is missing you, or catching the pets, you need to adjust the Sensitivity Jumper located inside the sensor housing. Most professional units have a small pin or switch that allows you to toggle between “High,” “Medium,” and “Low” pet immunity.

Conclusion: Peace of Mind for the Whole Family

Integrating a Pet Friendly Sensor protocol isn’t about compromising your home’s security; it’s about refining it. When you eliminate false alarms, you restore your trust in the system. When that alarm goes off, you’ll know it’s because of a real threat, not because Cooper decided to jump on the sofa.

Does your current security system “overreact” to your pets? Or have you found a specific mounting trick that finally silenced the false alarms? Drop a comment below—I’d love to hear your experiences with balancing home tech and pet life!

Safe and Sound: Elevating Your Home Security Measures

Safe and Sound: Elevating Your Home Security Measures is a comprehensive guide to understanding and implementing the latest home security measures. It provides readers with the knowledge and tools to make their homes safer and more secure. This guide covers topics such as home security systems, locks, alarms, cameras, and other security measures. It also provides tips on how to protect your home from intruders, burglars, and other threats. With this guide, readers can learn how to make their homes safer and more secure, and protect their families and possessions.

How to Upgrade Your Home Security System: Tips for Installing the Latest Technology

Upgrading your home security system is an important step in protecting your family and property. With the latest technology, you can ensure that your home is safe and secure. Here are some tips for installing the latest security system technology in your home.

1. Research the latest security system technology. Before you purchase a security system, it is important to research the latest technology available. Look for features such as motion sensors, cameras, and remote access. Make sure the system you choose is compatible with your home’s existing wiring and other components.

2. Hire a professional. Installing a security system can be complicated and time-consuming. It is best to hire a professional to ensure that the system is installed correctly and that all components are working properly.

3. Choose the right system for your home. Consider the size of your home and the type of security you need. If you have a large home, you may need a more comprehensive system with multiple cameras and sensors. If you have a smaller home, you may only need a basic system with a few sensors.

4. Install the system correctly. Make sure that all components are installed correctly and that all wiring is secure. If you are not comfortable with the installation process, it is best to hire a professional.

5. Test the system. Once the system is installed, test it to make sure it is working properly. Make sure all sensors and cameras are working and that the system is connected to your home’s Wi-Fi network.

By following these tips, you can ensure that your home is secure and protected with the latest security system technology. With the right system in place, you can rest assured that your family and property are safe.

The Benefits of Smart Home Security: How Automation Can Help Keep Your Home Safe and Sound

Smart home security is becoming increasingly popular as homeowners look for ways to keep their homes safe and secure. Automation is a key component of smart home security, as it allows homeowners to monitor and control their home security systems remotely. Automation can also help to reduce the risk of home invasions, burglaries, and other security threats. In this article, we will discuss the benefits of smart home security and how automation can help keep your home safe and sound.

One of the primary benefits of smart home security is the ability to monitor and control your home security system remotely. With automation, you can access your security system from anywhere in the world, allowing you to check in on your home while you’re away. You can also set up automated alerts that will notify you if there is any suspicious activity detected in your home. This can help to deter potential intruders and give you peace of mind when you’re away from home.

Another benefit of smart home security is the ability to customize your system to meet your specific needs. Automation allows you to set up motion sensors, cameras, and other security devices to monitor your home. You can also set up automated lights and locks to make your home more secure. Automation also allows you to control your security system from your smartphone or tablet, giving you the ability to check in on your home from anywhere.

Finally, automation can help to reduce the risk of home invasions and burglaries. Automated security systems can detect suspicious activity and alert you or the authorities if necessary. Automated locks can also help to deter potential intruders, as they are more difficult to pick than traditional locks. Automated lights can also help to deter intruders, as they can be set to turn on and off at certain times of the day.

In conclusion, smart home security is a great way to keep your home safe and secure. Automation can help to reduce the risk of home invasions and burglaries, as well as give you the ability to monitor and control your security system remotely. Automation can also help to customize your security system to meet your specific needs. If you’re looking for a way to keep your home safe and sound, consider investing in a smart home security system.

Conclusion

Safe and Sound: Elevating Your Home Security Measures is an invaluable resource for anyone looking to increase their home security. It provides a comprehensive overview of the various security measures available, from basic locks and alarms to more advanced technologies such as surveillance cameras and motion sensors. It also offers practical advice on how to choose the right security measures for your home and how to implement them effectively. With the right security measures in place, you can rest assured that your home and family are safe and sound.

What Are Your Options When You’re Locked Out of Your House?

We’d all like to believe that we’re always going to be incredibly self-aware, and will always remember every single detail of our daily routines. If not that, we’d at least remember to keep our keys on us all the time, it’s not that hard, right? Well, sure. However, with how incredibly busy everyone’s lives have gotten, and how hard it can be to manage everything in the limited hours we have, it’s pretty easy to forget the “little things”, like keeping your keys on you. That leads to a lot of people finding themselves tired from a long day of work, trapped outside their own home. If that sounds like what you’re going through, or you’d just like to be prepared in case this ever does happen to you, don’t worry! We’ve created a list of options that you’d have that you can use to get back in!

#1: Find your spare key

This is the first thing you need to do. As soon as you’ve figured out that your key is lost, look for your spare key. You should ideally have the key on the property hidden somewhere, with a neighbour or someone trusted that can hold on to it for you. This should let you in immediately. However, if you don’t have a spare key, or have lost that too, this option won’t apply to you.

#2: Call the other occupants of the house for help

If you live with other people in the same home, even if you’ve lost the key, chances are that someone else still has theirs, and can open the door for you. Call them up and see if they can use their key. Better yet, if they’re home, they’ll just be able to open the door from inside for you!

#3: Check for alternate entry points

If you don’t have a spare key, or a housemate, neither of the above options will work for you. At this point, it’s smart to start looking around to check if you can find alternative entry points. This can be you hopping the fence and making your way to the (hopefully unlocked) back door, or an open window on any of the floors. Although caution, this one requires a little bit of maneuvering to get done. If you’re not an avid “lock all the doors and windows before leaving” type of person, there’s a high chance that this will work for you.

#4: Try to break open the lock

If you’ve tried all the alternative entry points and have found them all to be locked too, it’s time to try to open the lock without a key. You should try to find the lock that you think may be the weakest, and try wiggling it open. You can even use an old credit card or improvise with some tools to break your way in. However, this does mean that you could potentially damage your locks, and there’s still no guarantee that you’ll break it in the correct way that’ll let you open the door. So don’t attempt this one unless you’re certain that you want to risk it.

#5 : Call a locksmith

If you decide against breaking your lock, want it to open up but don’t want to damage the lock, there’s a way to do that too! Call Locksmith NYC, or a recommended emergency locksmith in your local area to come and unlock your doors for you! They’ll be able to unlock your door by disassembling it, or use other unlocking methods to make sure that your lock is safe, but you can gain entry to your home! The best thing is that they can also make a spare key for you so that you never find yourself locked out of your home ever again!