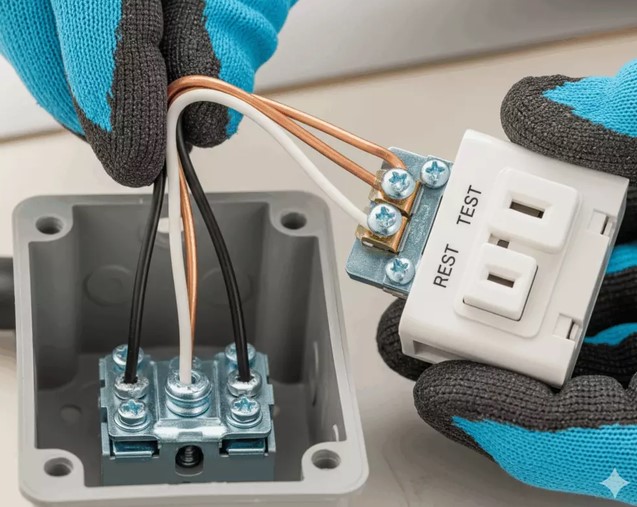
Critical Life Safety Upgrades: Implementing the GFCI Outlet Install Protocol

Source:https://expertce-dd6081df2a0cf7b4bf59-endpoint.azureedge.net

It takes less than one-tenth of an Ampere of electricity to put a human heart into fatal fibrillation. To put that in perspective, a standard hair dryer pulls about 15 Amps. That means the electrical current powering your morning routine carries enough raw energy to be fatal many times over if it takes a detour through your body.

Years ago, during my early days doing residential remodeling, I got a call from a frantic homeowner whose kitchen remodel had been done by a “handyman friend.” While wiping down a damp countertop, she plugged in a blender and felt a massive, muscle-locking shock that threw her backward. When I pulled that receptacle out of the wall, my jaw dropped. It was a standard outlet sitting less than two feet from the kitchen sink—a direct, blatant code violation.

That close call could have been completely avoided with a proper GFCI Outlet Install. Ground Fault Circuit Interrupters (GFCIs) are not just arbitrary code requirements; they are your home’s frontline defensive shield against electrocution. Let’s break down how these life-saving devices work, where you absolutely need them, and how to execute the install protocol like a seasoned pro.

The Invisible Watchman: How a GFCI Actually Works

Most people think a standard circuit breaker protects them from getting shocked. That is a dangerous misconception. A standard breaker is designed to protect your house from burning down; it trips when wires get too hot from carrying too much current. It doesn’t care if that current is traveling through a copper wire or your right arm.

The Balancing Scale Analogy

To understand a GFCI, imagine a perfectly balanced old-school scale. On one side, you have the electrical current flowing out through the hot wire (the black wire). On the other side, you have the current returning in through the neutral wire (the white wire).

[Hot Wire: 5.00 Amps]  --->  [Appliance]  --->  [Neutral Wire: 5.00 Amps]  == BALANCE (Safe)
[Hot Wire: 5.00 Amps]  --->  [Fault/You]   --->  [Neutral Wire: 4.95 Amps]  == IMBALANCE (GFCI Trips!)

A GFCI acts as an incredibly sensitive internal monitor that constantly measures these two sides. If even a tiny fraction of current—as little as 4 to 6 milliamperes—leaks out (a “ground fault”), the scale tips. The GFCI detects this missing current in less than one-thirtieth of a second and instantly snaps the power shut before the electricity can cause your heart to stop.

Mapping Your Home: Where You Must Prioritize a GFCI Outlet Install

The National Electrical Code (NEC) updates its guidelines constantly, but the golden rule for GFCIs has remained steady: anywhere electricity and moisture can shake hands, a GFCI must be present.

If you live in an older home built before the late 1970s, chances are your wet areas are still rocking standard, unprotected outlets. Here is where you need to upgrade immediately:

  • Kitchens: All receptacles serving countertop surfaces, especially those within 6 feet of the sink.

  • Bathrooms: Every single outlet, no exceptions.

  • Basements and Crawl Spaces: Unfinished basements are notorious for damp concrete floors, which ground your body and increase shock hazards.

  • Outdoors and Garages: Exterior outlets face rain, snow, and morning dew, making them high-risk zones.

Line vs. Load: The Critical Technical Trap That Trips Up DIYers

In my ten-plus years of home improvement, the single biggest mistake I see intermediate DIYers make during a GFCI Outlet Install is mixing up the Line and Load terminals.

When you unbox a new GFCI receptacle, you will notice four screw terminals on the back, usually hidden under a yellow piece of warning tape.

The Difference Matters

  • The LINE Terminals: This is where your incoming raw power connects. These wires come directly from your electrical panel breaker.

  • The LOAD Terminals: This side is used to pass GFCI protection down the line to “downstream” standard outlets on the same circuit.

If you accidentally connect your incoming hot and neutral wires to the Load terminals instead of the Line terminals, the outlet face might still power your devices, but the internal safety trip mechanism will not function. You will have zero shock protection. Always read the stamps on the back of the device plastic carefully before stripping your wires.

Step-by-Step Blueprint: Executing the GFCI Outlet Install Protocol

Working with residential electricity requires absolute discipline. If you feel hesitant at any stage of this protocol, stop and call a licensed electrician. But if you have a solid grasp of basic hand tools and safety measures, here is how to upgrade your outlet safely.

Prerequisite Tools:

  • Non-contact voltage tester

  • Wire strippers/cutters

  • Insulated screwdrivers (Phillips and Flathead)

  • New GFCI receptacle (Ensure it matches your circuit: 15-Amp or 20-Amp)

1.De-energize the Circuit:Safety Priority #1.

Go to your main electrical panel. Locate the breaker controlling the outlet you want to replace and flip it completely to the OFF position.

2.Verify Power is Dead:Double-Check Verification.

Unscrew the outlet faceplate. Before touching any screws with your hands, insert your non-contact voltage tester directly into the outlet slots, and then hold it right next to the side terminals. The tester must remain completely silent and dark.

3.Identify and Disconnect Wires:Labeling Phase.

Pull the old outlet out of the wall box. Identify your Hot (usually black or red), Neutral (white), and Ground (bare copper or green). Disconnect them from the old device. If there are multiple wires, use tape to label the pair that brings the actual power into the box (Line).

4.Wire the New GFCI Receptacle:Line Connection focus.

Connect your bare copper ground wire to the green grounding screw. Next, connect your incoming black hot wire to the brass screw marked LINE. Connect your incoming white neutral wire to the silver screw marked LINE.

5.Secure and Test:Final Verification.

Tuck the wires neatly back into the electrical junction box, ensuring no bare wires touch the metal sides. Screw the GFCI into place and attach the faceplate. Turn the main breaker back on, press the RESET button on the face of the GFCI, and use a plug-in tester to confirm correct polarity and trip functionality.


💡 Pro Tip: The “Don’t Over-Buy” Budget Saver

You do not need to buy a separate, expensive GFCI outlet for every single box in a room. Because of the Load terminal feature we talked about earlier, installing just one GFCI outlet at the very beginning of a circuit run will automatically protect every standard, cheap outlet that comes after it. Find the “first” box in the room, install your GFCI there, and run the rest of the room off the Load side!

Safety First: A Professional’s Closing Advice

Upgrading your home’s infrastructure is a journey of small, impactful choices. While remodeling a kitchen layout or painting a living room updates the aesthetics, executing a proper GFCI Outlet Install preserves the lives of the people walking through those spaces. It is a true weekend-warrior project that delivers massive peace of mind for under twenty bucks.

Take a walk through your home this week with a pad of paper. Look under your kitchen cabinets, behind your bathroom vanities, and out on your patio. If you spot standard outlets within splashing distance of water, it’s time to schedule an upgrade.

Have you ever encountered confusing, tangled wiring while trying to swap out an old outlet? Do you have questions about tracking down the “first” outlet on a circuit run? Drop your thoughts, layout questions, or DIY stories in the comments section below—I read and reply to them all! Let’s work together to make our homes safer, one circuit at a time.
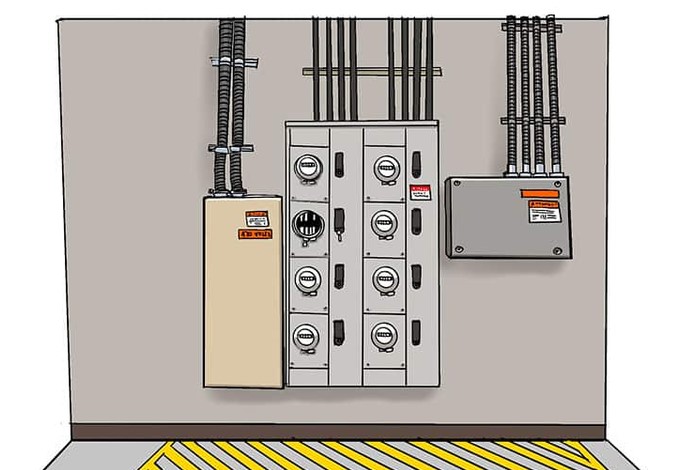

Electrical Infrastructure Safety: Maintaining Compliance with the Panel Blank Plate

Source:https://www.creativesafetysupply.com

Over my ten years of inspecting residential and commercial electrical systems, I’ve seen some hair-raising DIY fixes. But one of the most common—and deceptively dangerous—hazards I encounter isn’t a complex wiring tangle. It’s a simple, gaping hole in the front of a breaker box.

Picture this: you walk into your garage, reach blindly next to the service panel to grab a rake, and your fingers slip right into an open slot where a breaker used to be. You are now exactly one inch away from a live, 240-volt bus bar capable of delivering a fatal shock.

In the trade, we call these open spaces “knockouts.” Leaving them exposed is a major safety violation, but there is a dead-simple, code-compliant solution that costs less than a cup of coffee: the Panel Blank Plate (often called a breaker blank or filler plate). Let’s dive deep into why this tiny piece of plastic or metal is the unsung hero of your home’s electrical safety.

The Anatomy of an Electrical Panel Vulnerability

When an electrical panel is manufactured, the metal cover (the dead front) comes with pre-scored metal tabs. Electricians knock these tabs out as needed to install new circuit breakers.

The problem arises during renovations or electrical upgrades. If a contractor removes an old circuit—say, for an old hot tub you no longer use—they pull the breaker out, leaving behind a rectangular void.

Why an Open Slot is a Ticking Time Bomb

An open breaker slot is an open invitation for disaster. Think of your breaker panel like the hull of a submarine; it is designed to keep the dangerous elements completely contained. When you leave a hole in it, you compromise the entire structural integrity of that safety barrier.

Here is what actually happens when you leave that slot uncovered:

  • The Backyard Rodent Resort: Mice and rats love the warmth generated by electrical panels. An open slot is a five-star entryway. Once inside, they chew on wire insulation, causing massive short circuits and devastating house fires.

  • The Dust and Debris Accumulation: Over time, airborne dust, sawdust from workshop projects, and moisture creep through the gap. This buildup creates a conductive bridge across live components, leading to dangerous electrical arcing.

  • Accidental Human Contact: Whether it’s a curious toddler’s finger or a homeowner reaching into a dark utility closet, an open slot removes the physical barrier between you and lethal current.

Demystifying the Panel Blank Plate: Small Part, Big Job

So, what exactly is a Panel Blank Plate? It is a small, specially molded piece of plastic or steel designed to snap directly into the empty slots of your panel’s dead front cover.

[Standard Breaker Slot] ----> [Snap! Panel Blank Plate Installed] ----> [Safe, Sealed Panel Face]

The Physics of Containment

In my years on the job, I’ve had homeowners ask me, “Can’t I just put a piece of heavy-duty duct tape or cardboard over the hole?” Absolutely not. Your electrical panel is rated to contain a very specific type of emergency: an arc flash. If a catastrophic short circuit occurs inside the panel, temperatures can instantly spike to thousands of degrees.

A proper metal or fire-retardant plastic filler plate is engineered to withstand that intense heat and pressure, keeping the blast contained inside the steel box. Duct tape or cardboard will simply ignite, turning a contained electrical fault into an immediate structure fire.

National Electrical Code (NEC) Compliance: What the Inspectors Look For

If you are planning to sell your home or have a licensed electrician pull permits for a renovation, an exposed panel gap will result in an immediate fail on your inspection report.

Understanding NEC Section 110.12(A)

The National Electrical Code (NEC) is explicit about this issue. Under Section 110.12(A), covering the “Unused Openings” of electrical equipment, the code states that any openings closed by knckouts or removable plugs must be effectively closed to afford protection substantially equivalent to the wall of the equipment.

Expert Insight: When an insurance adjuster investigates a house fire, one of the first things they look at is the electrical panel. If they discover the fire was caused or exacerbated by non-compliant, unsealed panel openings, it could severely complicate your insurance claim payout.

Choosing the Right Filler Plate for Your Panel

You cannot just buy a generic pack of blank plates and expect them to fit perfectly. Electrical panels are brand-specific, and their dimensions vary down to the millimeter.

Panel Manufacturer Compatible Blank Plate Material Installation Type
Square D (Homeline) High-impact Plastic Front Snap-In
Square D (QO Series) Steel / Metal Slide-on Secure
Siemens / Murray Thermoplastic Interior Tab Lock
GE (General Electric) Plastic or Steel Twist-and-Lock

Before heading to your local hardware store, snap a photo of the manufacturer label inside your panel door. You need to match the brand (e.g., Square D, Siemens, Cutler-Hammer) and the specific panel series to ensure the plate seats firmly without falling inward.

Step-by-Step Guide: How to Safely Install a Panel Blank Plate

While working inside an open electrical panel requires a licensed professional, installing a exterior-facing blank plate onto the dead front cover is a task a confident intermediate DIYer can safely handle—provided you follow strict safety protocols.

Step 1: Kill the Main Power

Locate the large main breaker at the top or bottom of your panel (usually rated for 100 to 200 Amps) and flip it to the OFF position.

Step 2: Test for Peace of Mind

Even with the main power off, treat the panel with absolute respect. Use a non-contact voltage tester near the open slot to confirm that no stray voltage is present on the outer face of the panel.

Step 3: Align and Snap

Hold the Panel Blank Plate by its outer edges. Position the locking tabs against the metal edges of the dead front opening. Press firmly until you hear a distinct “click.”

Step 4: Verify the Fit

Gently wiggle the plate. It should feel completely rigid and flush with the surrounding circuit breakers. There should be no gaps visible around its perimeter. Turn your main power back on.

The “Inward Slip” Trap

Never try to force a filler plate into the slot if it feels like it is resisting. If you push too hard on an incorrect or cheaply made plate, it can slip backward inside the live panel. If that piece of plastic or metal falls onto the energized bus bars while the panel is live, it can trigger an instantaneous arc flash explosion. If it doesn’t snap in easily from the outside, stop immediately and call a licensed electrician.

Final Thoughts: A Pro’s Perspective on Home Safety

In the grand scheme of home improvement, buying a $3 plastic part doesn’t give you the same thrill as installing a luxury smart thermostat or a sleek new light fixture. However, true electrical safety is built on these exact micro-details.

Maintaining a fully sealed, compliant electrical infrastructure ensures that your family, your pets, and your property are safe from hidden, preventable electrical hazards. Take five minutes this weekend to walk down to your basement or garage and take a hard look at your breaker box.

Have you noticed any strange gaps, loose breakers, or open knockout holes in your home’s electrical panel? Let me know in the comments below, or share your experiences dealing with old DIY electrical fixes. Let’s keep the conversation going and keep our homes safe!

Strategic Water Quality Infrastructure: Scaling Purity via Water Filter Whole Systems

Source:https://www.mdpi.com

Imagine waking up to a faint, metallic scent in your morning shower, or noticing that your brand-new dishwasher is already sporting ugly, white crusty scales around the jets. You might think it’s just “the way the water is” in your zip code. But then you look at your water heater’s lifespan being cut in half and realize that your home’s plumbing is essentially “clogging its own arteries.”

In my twelve years of crawling through crawlspaces and auditing residential mechanical rooms, I’ve seen thousands of homeowners rely on a single pitcher in the fridge to solve a systemic problem. It’s like trying to put out a house fire with a squirt gun. The real solution—and the one that actually protects your investment—is a Water Filter Whole house system. This isn’t just an appliance; it’s a piece of strategic infrastructure.

The “Gatekeeper” Philosophy: Why Purity Starts at the Main Line

When we talk about a Water Filter Whole system, we are talking about “Point of Entry” (POE) filtration. Most people are used to “Point of Use” (POU), like the filter on your kitchen tap. The problem with POU is that the chlorine, sediment, and heavy metals have already traveled through your entire home’s pipe network before they get filtered.

Think of it like the security at a high-end stadium. POU filtration is like checking tickets at the individual seat sections. A whole-house system is the main security gate at the front entrance. If you stop the contaminants there, they never get the chance to corrode your copper pipes, ruin your skin in the shower, or degrade the rubber seals in your expensive front-load washer.

Scaling the Solution

I once worked on a 1950s ranch house where the owner complained of “itchy skin” every time they bathed. After testing, we found high levels of chlorine and hard minerals. By installing a multi-stage Water Filter Whole system, we didn’t just fix the water they drank; we fixed the water they wore. That’s the “scale” of purity I’m talking about.

Deconstructing the Infrastructure: How It Works

A professional-grade whole-house system is rarely a single “magic” tank. It is usually a series of specialized barriers designed to tackle specific invisible enemies.

1. The Sediment Pre-Filter (The First Responder)

This is typically a 5-micron or 20-micron pleated or spun cartridge. Its job is mechanical: catching sand, silt, and rust. If you don’t have this, your more expensive secondary filters will get “blinded” by dirt within weeks.

2. Kinetic Degradation Fluxion (KDF) and Carbon (The Chemical Neutralizers)

This is where the heavy lifting happens. KDF media uses a copper-zinc redox reaction to pull out heavy metals like lead and mercury. The Activated Carbon stage follows, acting like a chemical sponge to soak up chlorine, VOCs (Volatile Organic Compounds), and that “rotten egg” sulfur smell.

3. The Scale Inhibitor or Softener (The Pipe Protector)

If you live in an area with high “hardness” (calcium and magnesium), this stage is non-negotiable. It prevents “limescale” from bonding to your heating elements.

Technical LSI Vocabulary: Knowing Your Specs

Before you buy a Water Filter Whole system, you need to speak the language of the trade. Don’t let a salesperson dazzle you with jargon; look for these specific metrics:

  • GPM (Gallons Per Minute): This is the flow rate. A typical family of four needs at least 10–15 GPM to ensure that if the shower is running and the dishwasher starts, the water pressure doesn’t drop to a trickle.

  • Micron Rating: This tells you the size of the particles the filter can catch. A human hair is about 70 microns; a good sediment filter should be 5 microns.

  • NSF/ANSI Certifications: Look for Standard 42 (Aesthetic Effects) and Standard 53 (Health Effects). If a system isn’t certified, it’s just a plastic box.

Expert Advice: The “Invisible” Installation Rules

Most DIYers make the mistake of just “clipping” a filter into the line. Here is the Pro Tip that separates a weekend hobbyist from a Master Plumber: Always install a Three-Valve Bypass.

Why? Because filters eventually need maintenance. If your system is hard-plumbed without a bypass, you have to shut off the water to the entire house just to change a cartridge. With a bypass loop, you flip two valves, open the middle one, and your family still has water while you’re cleaning the filter housing.

Hidden Warning: Check your grounding. In many older homes, the metal water pipe acts as the electrical ground for the house. If you cut out a section of copper pipe and replace it with a plastic filter housing, you’ve broken that ground. You must install a “jumper wire” across the filter to maintain electrical safety.

Maintaining the System: Don’t Set It and Forget It

The biggest heartbreak I see is a $2,000 Water Filter Whole system that has become a “bacterial breeding ground” because the owner forgot to change the media.

  • Sediment filters: Every 3–6 months.

  • Carbon tanks: Usually every 5–10 years (or 1,000,000 gallons).

  • UV Sterilizers: If you use a UV stage for bacteria, that bulb needs replacing every 12 months, even if it’s still glowing. The “germ-killing” light spectrum fades long before the visible light does.

Is a Whole House System Right for You?

If you are on city water, your primary concerns are likely Chlorine, Fluoride, and Aging Infrastructure (rust from city pipes). If you are on a private well, your battles are likely Bacteria, Nitrates, and Iron.

A Water Filter Whole system is an investment in your home’s “biological” and “mechanical” health. It stops the damage before it enters the envelope of your living space.

Summary of Benefits

  • Longevity: Extends the life of water heaters, faucets, and appliances by up to 30%.

  • Health: Reduces skin irritation and prevents the inhalation of chlorine vapors in the shower.

  • Economics: No more buying bottled water or expensive POU replacement filters for every single tap.


Does your water have a specific “personality” you’re trying to fix? Whether it’s a strange color, a weird smell, or just a desire for absolute purity, I want to hear about it. Drop a comment below with your water test results or your current setup, and let’s troubleshoot your home’s hydration strategy together!