It is 3:00 AM, and your phone is screaming. The home security app is flashing red: “Intrusion Detected: Living Room.” Your heart races as you grab a flashlight, only to find your 60-pound Golden Retriever, Cooper, staring at you sheepishly from the couch. He just wanted a midnight snack. This “false alarm fatigue” is the number one reason homeowners eventually disable their security systems entirely, leaving them truly vulnerable when it matters most.
In my twelve years of designing smart home infrastructures, I’ve seen more homeowners defeated by their own pets than by actual burglars. We want safety, but we also want our furry family members to roam free. Achieving this balance requires a shift from basic motion detection to a specialized Pet Friendly Sensor protocol. This isn’t just about turning down the sensitivity; it’s about understanding the physics of how a home “sees” movement.
The Infrared Filter: How Modern Sensors “Think”
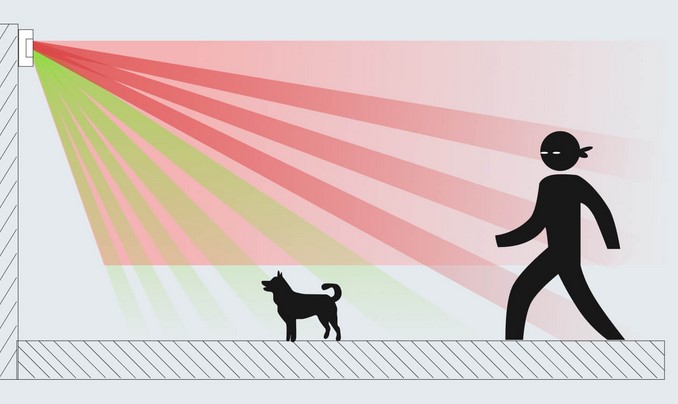
To understand a Pet Friendly Sensor, you have to understand Passive Infrared (PIR) technology. These sensors don’t actually “look” at the room like a camera; they monitor changes in heat signatures. When a human walks by, they represent a large, vertical block of heat moving across the sensor’s field of view.
Think of it like a high-speed camera at a race track. A standard sensor is looking for any movement across the finish line. A pet-friendly version, however, is like a “height and weight” gate. It is programmed to ignore heat signatures that fall below a certain mass—typically 40 to 80 pounds—and stay within a specific distance from the floor.
The Weight Gap Delusion
Early in my career, I made the mistake of trusting the box. A client bought a sensor rated for “up to 50 lbs,” but their 20-pound cat kept triggering it. Why? Because the cat jumped on the back of the sofa, right in front of the lens. To the sensor, that cat looked like a 200-pound giant because it was so close. This taught me that a Pet Friendly Sensor is only as good as its placement strategy.
Engineering the Shield: Strategic Placement Protocols
When we implement a pet-immune system, we aren’t just slapping devices on a wall. We are creating a “Security Envelope.” Here is the mechanical workflow I use for every professional installation.
1. The “Dead Zone” Calibration
A professional Pet Friendly Sensor often utilizes a “Look Down” creep zone. However, for pet owners, we actually want to disable this. We aim to create a horizontal “blind spot” from the floor up to about 3 or 4 feet.
Pro Tip: Mount your sensors at exactly 7.5 feet. This height allows the PIR beams to fan out over the heads of your dogs while still capturing the midsection of any upright human intruder.
2. Dual-Technology Integration (PIR + Microwave)
If you have a particularly active pet—like a bird that flies or a cat that climbs—a single PIR sensor won’t cut it. I always recommend “Dual-Tech” sensors. These require both an infrared heat change and a microwave pulse (which detects physical mass displacement) to trigger the alarm. This drastically reduces false positives from heat vents or small pets.
3. Masking and Fresnel Lens Adjustments
Some high-end sensors allow you to physically “mask” certain zones. If you know your cat spends all day on a specific bookshelf, we can apply an internal mask to the lens that essentially blinds the sensor to that specific square foot of space without compromising the rest of the room.
Technical LSI Vocabulary: Mastering the Spec Sheet
Before you purchase your next Pet Friendly Sensor, look for these technical specifications to ensure you are getting more than just a marketing label:
-
Animal Immunity Level: Usually measured in kilograms or pounds (e.g., 20kg/40lb or 40kg/80lb).
-
Pulse Count Logic: This determines how many “steps” a heat signature must take across the beams before the alarm triggers. Higher pulse counts are better for homes with high pet activity.
-
Temperature Compensation: This ensures the sensor remains accurate when the room temperature is close to human body temperature (98.6°F), preventing “thermal blindness.”
-
RFI/EMI Protection: High-quality sensors are shielded against Radio Frequency Interference, which can be caused by your Wi-Fi router or microwave.
Expert Advice: The “Climber” Warning
Here is an insight that caught me off guard during a renovation project in 2018: Thermal mass is cumulative.
If you have three 15-pound dogs playing together, their combined heat signature can exceed the 40-pound limit of your Pet Friendly Sensor. If they huddle together or chase each other in a tight circle, the sensor sees one “large” heat source.
Expert Advice: If you have multiple pets, always “over-spec” your sensors. If your dogs total 45 pounds combined, buy an 80-pound rated sensor. It’s better to have a higher threshold than to deal with a false alarm at 3:00 AM.
Never point a motion sensor directly at a window or a heat vent. For a pet-friendly setup, the sun hitting a rug or a blast of hot air from the floor vent can mimic the movement of a living creature, causing the system to trip even if your pets are asleep.
The Analogy: The Security Bouncer
Think of a standard motion sensor like a bouncer who kicks out anyone wearing a red shirt. If your dog has a red collar, he’s out.
A Pet Friendly Sensor is like a bouncer with a guest list and a height chart. He says, “Okay, if you’re under 3 feet tall and don’t weigh much, you’re clearly not the guy I’m looking for. You can stay.” By adding Dual-Tech (Microwave), you’re giving that bouncer a second set of eyes to confirm that the person in the red shirt is also a human-sized mass before taking action.
Maintaining the Infrastructure
A security system is “set and forget” until it fails. To maintain Advanced Security Integration, you must perform a “Walk Test” every six months.
-
Put your system in “Test Mode.”
-
Let your pets roam the room as they normally would.
-
Walk through the room yourself in an upright position.
-
Check the log: Did it ignore the pets? Did it catch you?
If the sensor is missing you, or catching the pets, you need to adjust the Sensitivity Jumper located inside the sensor housing. Most professional units have a small pin or switch that allows you to toggle between “High,” “Medium,” and “Low” pet immunity.
Conclusion: Peace of Mind for the Whole Family
Integrating a Pet Friendly Sensor protocol isn’t about compromising your home’s security; it’s about refining it. When you eliminate false alarms, you restore your trust in the system. When that alarm goes off, you’ll know it’s because of a real threat, not because Cooper decided to jump on the sofa.
Does your current security system “overreact” to your pets? Or have you found a specific mounting trick that finally silenced the false alarms? Drop a comment below—I’d love to hear your experiences with balancing home tech and pet life!