 Choosing the right flooring is one of the most impactful decisions homeowners make during a renovation or new build. It influences the look, feel, and functionality of every room. In recent years, one option has steadily risen in popularity across both residential and light commercial spaces. Luxury vinyl flooring has become a preferred choice for modern homes due to its balance of style, durability, and affordability.
If you are exploring flooring options, understanding what luxury vinyl flooring is and why it continues to gain attention can help you make a confident and informed decision.
What Is Luxury Vinyl Flooring
Luxury vinyl flooring is an advanced type of resilient flooring designed to mimic the appearance of natural materials such as hardwood or stone. Unlike traditional vinyl, it is constructed with multiple layers that enhance performance and visual appeal.
These layers typically include a strong backing, a core layer for stability, a printed design layer that replicates natural textures, and a protective wear layer that resists scratches and stains. The result is a product that combines realistic aesthetics with practical benefits suited for everyday living.
Many homeowners researching luxury vinyl plank in Fargo are drawn to how closely it resembles real wood while offering greater resistance to moisture and wear.
Types of Luxury Vinyl Flooring
Luxury vinyl flooring is available in two primary formats, each designed to meet different style preferences and installation needs.
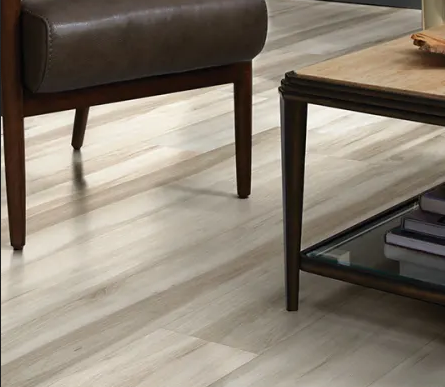
Luxury vinyl plank is shaped to replicate hardwood flooring. It often features wood grain patterns and textured surfaces that create a natural appearance. This option is ideal for living rooms, bedrooms, and hallways where a warm and inviting look is desired.
Luxury vinyl tile is designed to mimic stone or ceramic tile. It is commonly used in kitchens, bathrooms, and laundry areas due to its ability to handle moisture while maintaining an upscale finish.
Both formats provide versatility, allowing homeowners to achieve cohesive designs throughout their homes.
Why Luxury Vinyl Flooring Is Gaining Popularity
The growing demand for luxury vinyl flooring is not accidental. It reflects a shift in how homeowners prioritize performance, maintenance, and style.
One of the main reasons for its popularity is durability. Modern households often include children, pets, and high foot traffic. Luxury vinyl flooring is built to withstand these conditions without showing significant wear over time.
Another factor is water resistance. Unlike traditional hardwood, luxury vinyl can handle spills and humidity, making it suitable for areas where moisture is a concern. This feature alone has made it a top choice for kitchens and bathrooms.
Affordability also plays a role. While it offers the look of premium materials, it typically comes at a lower cost, making it accessible for a wide range of budgets.
Aesthetic Versatility for Modern Homes
Design flexibility is one of the standout features of luxury vinyl flooring. With advancements in printing technology, manufacturers can create highly detailed patterns that replicate natural materials with impressive accuracy.
Homeowners can choose from a wide range of colors, finishes, and textures. Whether you prefer the appearance of rustic wood, sleek modern tones, or classic stone, there is an option to match your vision.
This versatility allows for creative design choices that enhance both traditional and contemporary interiors. It also makes it easier to coordinate flooring with existing furniture and decor.
For those considering luxury vinyl plank in Fargo, the ability to adapt to different design styles is a major advantage.
Ease of Installation and Convenience
Another reason luxury vinyl flooring has become so popular is its ease of installation. Many products are designed with click lock systems that allow planks or tiles to fit together without the need for adhesives.
This feature can reduce installation time and labor costs. Some homeowners even choose to install the flooring themselves, although professional installation is often recommended for the best results.
Searching for luxury vinyl flooring installers near me can connect you with experienced professionals who ensure proper alignment, secure placement, and a polished finish.
Professional installation not only improves the appearance but also helps extend the lifespan of the flooring.
Low Maintenance and Long Term Value
Maintenance is a key consideration for any flooring choice. Luxury vinyl flooring stands out for its simplicity and convenience.
Regular sweeping and occasional mopping are usually enough to keep it clean. The protective wear layer helps resist stains, scratches, and scuffs, reducing the need for intensive upkeep.
This low maintenance requirement makes it especially appealing for busy households. It also contributes to long term value, as the flooring maintains its appearance with minimal effort.
Compared to materials that require refinishing or special treatments, luxury vinyl offers a practical and cost-effective solution.
Comfort and Noise Reduction
Comfort is another factor that influences flooring decisions. Luxury vinyl flooring provides a softer feel underfoot compared to harder surfaces like tile or stone.
Some options include added cushioning layers that enhance comfort and reduce noise. This can be particularly beneficial in multi-level homes or spaces where sound control is important.
The combination of comfort and quiet performance makes it suitable for living areas, bedrooms, and home offices.
Environmental Considerations
As sustainability becomes more important to homeowners, many are looking for eco-friendly options. While vinyl flooring is a synthetic material, improvements in manufacturing processes have led to more environmentally responsible choices.
Some products are designed to meet indoor air quality standards and reduce emissions. Additionally, the durability of luxury vinyl flooring means it does not need to be replaced as frequently, which can help reduce waste over time.
When selecting flooring, it is worth asking about certifications and environmental practices to ensure your choice aligns with your values.
Ideal Applications Throughout the Home
Luxury vinyl flooring is versatile enough to be used in almost every room. Its water resistance makes it suitable for kitchens, bathrooms, and basements, while its aesthetic appeal works well in living rooms and bedrooms.
Entryways and high-traffic areas also benefit from its durability. The ability to maintain a consistent look across different spaces allows for seamless design transitions throughout the home.
For homeowners in regions with varying weather conditions, such as those exploring luxury vinyl plank in Fargo, this adaptability is particularly valuable.
Comparing Luxury Vinyl to Other Flooring Options
When choosing flooring, it is helpful to compare different materials. Luxury vinyl flooring offers several advantages over traditional options.
Compared to hardwood, it provides better resistance to moisture and requires less maintenance. Compared to tile, it offers greater comfort and is often easier to install. Compared to laminate, it typically performs better in wet environments.
These comparisons highlight why luxury vinyl flooring has become a leading choice for modern homes.
Working With Professionals for the Best Results
While luxury vinyl flooring is known for its ease of installation, working with professionals can make a significant difference in the final outcome.
Experienced installers understand how to prepare the subfloor, handle transitions between rooms, and ensure a precise fit. This level of expertise helps prevent issues such as gaps or uneven surfaces.
If you are searching for luxury vinyl flooring installers near me, take the time to review credentials, read customer feedback, and ask about previous projects. Choosing the right installer can enhance both the appearance and performance of your flooring.
Luxury vinyl flooring has transformed the way homeowners approach design and functionality. Its combination of durability, affordability, and visual appeal makes it a practical solution for a wide range of spaces.
Whether you are updating a single room or renovating your entire home, this flooring option offers the flexibility to meet your needs. With proper installation and care, it can provide lasting value and enhance the overall comfort of your living environment.
As more homeowners discover the benefits of luxury vinyl flooring, its popularity is likely to continue growing. By understanding its features and advantages, you can determine whether it is the right choice for your next project.