Picture this: You’re halfway through replacing a kitchen faucet, lying on your back with your head shoved into a dark undersink cabinet. You reach out for your 10-inch adjustable wrench, only to realize you left it on the workbench in the garage. You crawl out, walk to the garage, grab the wrench, head back, and settle back under the sink. Five minutes later, you realize you need the thread seal tape and a flashlight. Sound familiar?
During my first couple of years managing residential renovations, I estimated that my crew lost nearly 45 minutes every single day per person just walking back and forth to retrieve forgotten tools. That wasn’t just wasted motion—it was drained energy and lost revenue.
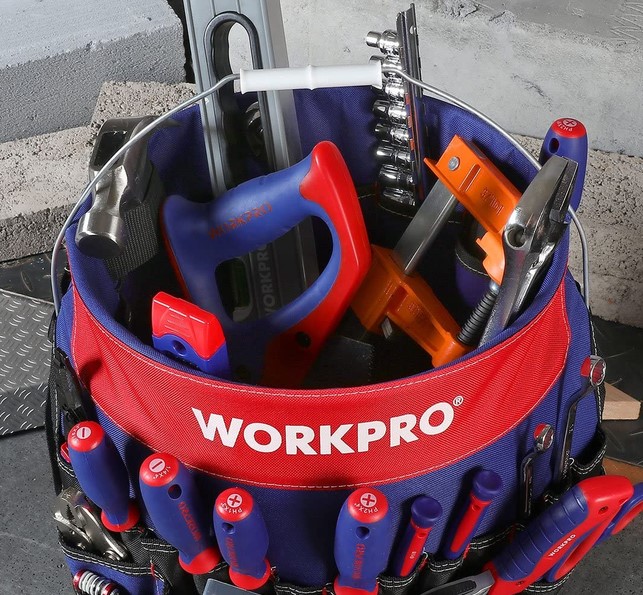
The turning point in our workflow wasn’t a multi-thousand-dollar modular rolling stack. It was a humble 5-gallon plastic bucket fitted with a specialized sleeve. Transforming a standard utility bucket with a high-durability bucket tool organizer remains one of the most cost-effective, high-impact upgrades any DIYer or budding contractor can make.
Why Big Rigid Toolboxes Fail Small Jobs
Most beginners make the mistake of buying a massive, rigid plastic or metal toolbox as their primary mobile storage unit. While heavy hard-cases have their place for long-term shop storage or transporting heavy-duty power tools, they quickly become an obstacle on fast-paced job sites.
A traditional toolbox acts like a deep dark abyss. Small items—wire strippers, utility knives, drill bits, fasteners—naturally migrate to the very bottom, buried under heavier tools like hammers and pipe wrenches. Every time you need something small, you have to dig around like you’re searching through a lucky dip.
+------------------------+--------------------------+------------------------------+
| Logistics Feature      | Traditional Rigid Box    | Bucket Tool Organizer        |
+------------------------+--------------------------+------------------------------+
| Visual Identification  | Poor (Requires digging)  | High (360° perimeter view)   |
| Center Storage Area    | Obstructed by trays      | Wide open (Bulk/Power tools) |
| Vertical Real Estate   | Horizontal bias          | Maximized vertical pockets   |
| Debris / Site Roughness| Can crack/rust           | Indestructible HDPE shell    |
+------------------------+--------------------------+------------------------------+
Using a bucket organizer is like turning your toolbox inside out. It places every hand tool on full visual display around the outer and inner perimeter, leaving the core wide open for heavy gear or job materials.
The Ergonomics and Mechanics of the Bucket Setup
Not all bucket organizers are constructed to withstand the rigors of home improvement projects. Over the last decade, I’ve put dozens of different sleeves through their paces. Here is what separates professional-grade gear from flimsy budget options.
1. Fabric Denier and Tear Resistance
Look for organizer sleeves manufactured from heavy-duty synthetic fabrics, ideally 600D to 1680D (Denier) Ballistic Polyester. Lower-grade materials will quickly puncture when loaded with sharp chisels, screwdrivers, or drywall knives. A rubberized or double-stitched rim band prevents sagging when all pockets are fully loaded.
2. Inner vs. Outer Pocket Distribution
A well-engineered sleeve strikes a balance between interior and exterior storage options:
-
Exterior Pockets: Ideal for frequently accessed hand tools like pliers, drivers, tape measures, and markers.
-
Interior Pockets: Designed to hold slender precision items, drill bit cases, or tools you want to shield from ambient job site dust and moisture.
3. Center Core Capacity
The real magic of the setup lies in the untouched central void of the 5-gallon container. While the perimeter pockets handle 30+ individual hand tools, the center core can comfortably hold larger items:
-
Cordless compact drills and impact drivers
-
Boxes of screws, anchors, or pipe fittings
-
Safety gear, work gloves, and knee pads
-
Extension cords or small paint cans
How to Set Up Your Bucket Tool Organizer for Peak Workflow
Organization is only effective if it matches your natural workflow. Here is the layout strategy I teach all new apprentices to maximize efficiency.
Phase 1: Heavy Equipment in the Base
Place your densest, lowest-frequency tools at the bottom of the open interior bucket void. This includes items like your framing hammer, small sledge, or cordless circular saw. Keeping the heaviest mass near the base Lowers the center of gravity, preventing the bucket from tipping over during transit.
Phase 2: Category Grouping Around the Rim
Group your tools by discipline around the perimeter pockets rather than scattering them randomly:
-
The Measuring Zone: Keep your tape measure, speed square, torpedo level, and carpenter pencils clustered together on one side.
-
The Fastening Zone: Group your multi-bit screwdrivers, nut drivers, and hex keys side by side.
-
The Cutting/Prying Zone: Slot your utility knife, wood chisels, pry bars, and aviation snips into adjacent vertical sleeves.
Pro Tip: Reserve the heavy metal belt clip on the front of your bucket tool organizer exclusively for your primary tape measure. Having a designated, muscle-memory spot for your tape saves up to dozens of micro-delays throughout your working day.
Phase 3: The Bulk Material Dump
Use the open center space above your heavy base tools to hold project-specific materials. If you’re doing electrical work, drop your wire nuts, junction boxes, and Romex spools into the center core. If you’re patching drywall, keep your joint compound tub and sanding blocks centered inside.
Maintenance and Field Insights: Protecting Your Gear
Even the toughest setup requires basic maintenance to ensure it serves you reliably for years to come.
-
Keep It Dry: Standard fabric bucket wraps can hold moisture if left out in the rain or set on wet mud. Always wipe down the bottom outer skirt after working outdoors.
-
Avoid Over-Cramming: Avoid wedging two wide-handled pliers into a single pocket meant for one. This stretches the elastic webbing, causing your tools to slip out when carrying the bucket up ladder runs or stairs.
-
Periodic Cleanout: Turn the bucket upside down and slap the bottom once a month. Sawdust, plaster debris, and loose screws accumulate in the bottom of fabric pockets, acting like sandpaper on your tool handles over time.
Avoid buying cheap bucket organizers that lack an open bottom cut-out inside the main sleeve. If moisture gets trapped between the fabric liner and the inner wall of the plastic bucket, it will create a humid microclimate that can rust high-carbon steel tool heads in under 48 hours.
Final Thoughts: Upgrade Your Workflow Today
Streamlining your project workflow doesn’t require complex storage systems or massive budgets. By deploying a well-structured bucket tool organizer, you eliminate constant trips across the job site, keep your essential hand tools within arm’s reach, and bring professional-grade efficiency to every room in your house.
How do you currently haul your equipment around during weekend projects? Do you use a traditional toolbox, a open tote, or have you already embraced the 5-gallon bucket system? Drop your thoughts, custom setups, or questions in the comments below!