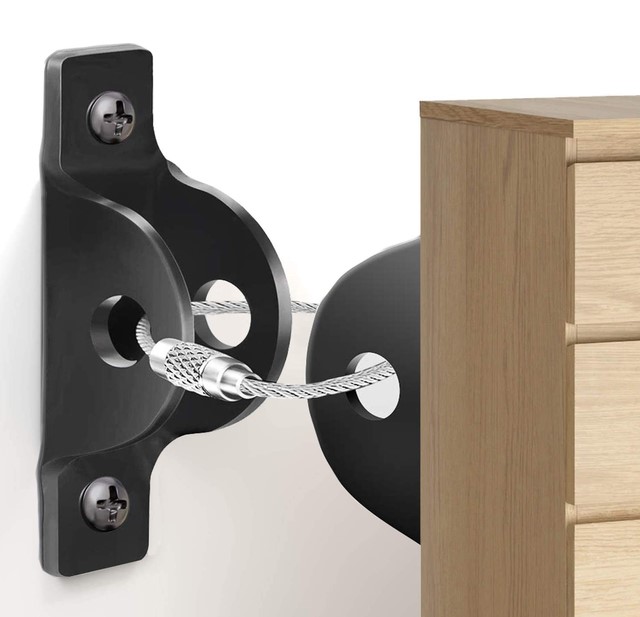
According to emergency management data, non-structural fallen objects cause the majority of injuries and internal property destruction during a major earthquake. Yet, walk into nine out of ten modern homes, and you will see heavy, top-heavy bookcases, tall dressers, and entertainment centers standing completely unanchored against bare drywall.
A few years back, I conducted a post-seismic assessment for a client in San Francisco following a moderate 5.1 magnitude tremor. The house itself suffered zero structural damage—the foundation was solid, and the shear walls held up beautifully.
However, inside the home was absolute chaos. A massive, solid oak bookcase in the home office had tipped forward, spilling hundreds of pounds of books across the floor and crushing an adjacent desk. Had anyone been sitting there, it would have been catastrophic.
My immediate recommendation was simple, inexpensive, and life-saving: anchor every tall piece of furniture directly to the wall studs using a heavy-duty furniture anchor kit.
Over my 10+ years in residential remodeling and structural home improvement, I’ve learned that true home safety isn’t just about what holds your roof up—it’s about controlling what moves inside your living room when the ground starts shaking.
The Physics of Furniture Overturning: Center of Gravity and Seismic Force
To understand why a heavy cabinet falls during a quake, you have to realize that weight does not equal stability. In fact, excessive weight often makes a tipping hazard worse.
Think of a tall dresser like a long lever arm. When seismic ground motion strikes, energy travels upward through your foundation and walls, causing the building to flex back and forth.
As the floor shakes, the high center of gravity of a tall cabinet acts like a pendulum. The higher the unit, the more rotational momentum it generates. Once the center of mass moves past its base of support, gravity takes over, and the entire unit comes crashing down with lethal force.
Using a proper furniture anchor kit changes the physical equation entirely. By tying the top third of the furniture piece directly to the house’s internal framing studs, you transfer those dynamic rotational forces straight into the structural envelope of the building.
+--------------------------+-----------------------+-----------------------+-------------------------+
| Anchor Type              | Weight Capacity (Pair)| Primary Material      | Reliability in Seismic  |
+--------------------------+-----------------------+-----------------------+-------------------------+
| Plastic Nylon Straps     | Low (50 - 100 lbs)    | Woven Nylon / Plastic | Poor (Degrades / Snaps) |
| Adhesive Pad Anchors     | Low to Moderate       | Plastic / VHB Tape    | Fair (Fails on Drywall) |
| Steel Cable Tether       | High (200 - 300 lbs)  | Stainless Steel / Zinc| Exceptional             |
| Heavy Steel L-Brackets   | Maximum (400+ lbs)    | Galvanized Steel      | Ultimate Protection     |
+--------------------------+-----------------------+-----------------------+-------------------------+
Hardware Mechanics: Choosing the Right Furniture Anchor Kit
Not all anchoring systems are created equal. Walking down the hardware aisle, you will encounter several styles, but for true seismic resilience, your material choice matters.
Plastic Straps vs. Steel Cable Tethers
Cheap plastic zip-tie style anchors are common, but they degrade over time due to ambient UV light and indoor temperature swings. Under sudden lateral shock, brittle plastic straps snap instantly.
For reliable protection, always opt for a furniture anchor kit featuring aircraft-grade steel cables or heavy-gauge steel L-brackets paired with solid metal mounting plates.
Dynamic Load Capacities
When choosing an anchor, look for hardware rated for at least 200 to 400 pounds per pair. Remember, when a heavy cabinet tips forward dynamically, the effective pull force on the anchor cable is much higher than the static weight of the furniture itself.
The Golden Rule: Anchoring to Studs vs. Hollow Drywall
I cannot stress this enough: Never anchor heavy furniture into plain sheetrock or drywall using plastic expansion plugs!
Drywall is nothing more than compressed gypsum sandwiched between paper sheets. Under the intense dynamic pulling force of an overturning 150-pound armoire, drywall anchors will tear right out of the wall, leaving large holes and zero protection.
-
Wood Frame Studs: The absolute gold standard. Screw your wall brackets directly into the center of a 2×4 or 2×6 framing stud using 2.5-inch to 3-inch heavy-duty lag screws.
-
Masonry or Brick Walls: Use specialized 3/16-inch or 1/4-inch masonry sleeve anchors or Tapcon screws driven into solid brick or concrete block.
-
Metal Studs: Use heavy-duty spring toggle bolts (like Snaptoggles) that distribute the pulling weight across the interior face of the steel channel.
Step-by-Step Installation Protocol for Seismic Safety
Installing a furniture anchor kit is a straightforward weekend DIY project, but precision matters. A loose or misaligned anchor can fail when you need it most.
Expert Advice: Pro Tips and Hidden Traps
⚠️ The Cheap Backing Panel Trap
The most dangerous mistake people make when installing a furniture anchor kit is screwing the furniture bracket into the thin, flimsy cardboard or veneer back panel of a bookshelf. Under load, that thin panel tears away like paper while the anchor stays perfectly attached to the wall! Always attach brackets directly to the thick, solid wood top rail, side uprights, or internal structural frame.
Managing Weight Distribution Inside Cabinets
Hardware anchors are your primary defense, but smart interior packing acts as your secondary defense:
-
Store your heaviest items—such as encyclopedias, cast iron cookware, or photo albums—on the lowest shelves.
-
Keep lightweight decorative items, linens, or paper goods on the upper shelves to keep the furniture piece’s center of gravity as low as possible.
💡 Pro Tip from the Field
If you are securing furniture on a plush carpeted floor, account for carpet compression! Carpet tack strips and thick padding cause cabinets to naturally tilt slightly forward. Place thin wooden shims under the front legs of the dresser before tensioning your wall anchor cable to ensure the unit rests completely level against the wall.
Secure Your Home Before the Ground Moves
Seismic safety isn’t about living in fear—it’s about taking practical, proactive measures to safeguard your loved ones and your valuable property. Installing a heavy-duty furniture anchor kit takes less than twenty minutes per room, costs very little money, and provides invaluable peace of mind when unexpected tremors strike.
Take a look around your home today: how many tall bookcases or dressers are currently resting unanchored against your walls? Have you already installed seismic anchors in your living spaces? Drop a comment below with your setup questions or share your home safety tips—I’d love to hear your thoughts!