Optimizing Recreational Logistics: Systematic Organization with the Bike Rack

Source:https://sarisinfrastructure.com

You are already running late for a Saturday morning group ride. You hurry into the garage, grab your high-end road bike, and pull. Instantly, a chaotic domino effect ripples through the dark corner: the handlebars hook into your spouse’s commuter bike, which twists and knocks over a stack of heavy plastic storage bins, sending a cascade of loose sports gear across your concrete floor. By the time you untangle the metal mess, your knuckles are scraped, your bike’s derailleur is slightly misaligned, and you’ve completely missed the meetup.

In my ten-plus years of designing high-efficiency residential storage layouts, I have learned that bicycles are the ultimate spatial bullies. Left to themselves, they don’t lean; they take over, consuming precious footprint square footage and turning functional garages into unnavigable obstacle courses.

The fix isn’t complicated or expensive. Integrating a strategically chosen bike rack system is a calculated move in home logistics. It transitions your recreation gear from an unorganized pile into a streamlined, high-access storage asset. Let’s dive deep into the mechanical configurations, weight-bearing physics, and real-world trade secrets needed to master your bike storage infrastructure.

The Spatial Equation: Why Horizontal Storage Fails Your Floor

When homeowners complain about a cramped garage, they almost always point the finger at their vehicles or bulky lawn equipment. But if you measure the true physical footprint of three adult bicycles leaning haphazardly against a wall, you’ll find they occupy roughly the same usable floor space as a compact sedan.

The Footprint Problem

Bicycles are inherently unstable three-dimensional shapes. Because their handlebars protrude at right angles to their frames, storing them side-by-side on their kickstands requires an immense amount of horizontal buffer space to prevent component tangles.

Analogi: The Filing Cabinet Efficiency

Think of your garage or utility room like a digital office. If you print out hundreds of important documents and spread them out flat across your desk, you will run out of working room within ten minutes. To solve this, you use a vertical filing cabinet, sliding those documents into neat, upright folders. Installing an engineered bike rack behaves exactly like that filing cabinet. It rotates or elevates the physical asset, converting dead vertical space into prime organizational real estate.

Selecting Your Rig: Deciphering the Bike Rack Hierarchy

Walk down the organizational aisle of any major home improvement center, and the selection can be overwhelming. To keep your logistics project simple, I categorize these systems into three core mechanical designs based on how they interact with your home’s structural envelope.

+-----------------------------------------------------------------------+
|                       BIKE RACK STORAGE MATRIX                        |
+---------------------------+-------------------------------------------+
| Wall-Mounted Vertical     | Maximizes floor space, micro-footprint,   |
| (Wheel-Hook)              | requires lifting the front tire           |
+---------------------------+-------------------------------------------+
| Wall-Mounted Horizontal   | Showcases the frame like art, zero tire   |
| (Frame-Cradle)            | wall contact, but uses wider wall space   |
+---------------------------+-------------------------------------------+
| Freestanding Floor Track  | Zero wall drilling required, ultra-easy   |
|                           | access, best for kids and heavy e-bikes   |
+---------------------------+-------------------------------------------+

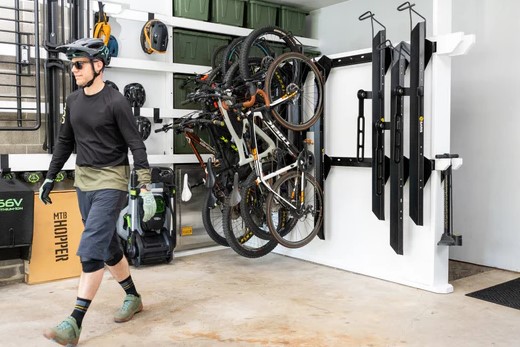
1. Wall-Mounted Vertical Hooks

This is the ultimate space-saving champion for compact single-car or two-car garages. These racks feature a heavy-duty steel hook that cradles your front tire, allowing the bicycle to hang perfectly perpendicular to the ceiling line.

  • The Spatial Win: By hanging bikes vertically, you can easily pack four bicycles into the same wall width that a single bicycle would occupy when parked horizontally.

  • The Hinge Variant: Look for vertical racks that feature a built-in mechanical hinge. This allows you to swing the hanging bikes flat against the wall like pages in a book, compressing the storage profile even further.

2. Wall-Mounted Horizontal Cradles

If you own a beautiful carbon-fiber racing machine or a vintage steel cruiser, you might want to treat it like architectural art. Horizontal racks utilize padded dual-arms that cradle the bicycle’s top tube. This setup keeps the tires completely off your drywall, preserving your paint job while keeping the bike ready to grab at waist height.

3. Freestanding Floor Tracks

If you are renting your property or dealing with brittle masonry walls where drilling is prohibited, a freestanding floor track or gravity tower is your clear path forward. These standalone metal racks feature stabilization slots that capture the rear or front tire securely, stopping the bike from tilting without requiring permanent structural fasteners.

Technical Specifications: Anchoring Against Mechanical Leverage

In my decade of site work, I have repaired dozens of collapsed drywall segments because an enthusiastic DIYer tried to hang a heavy mountain bike using simple plastic drywall anchors. This is a severe calculation error that ignores basic physics.

The Physics of Pull-Out Force

When you hang a 30-pound bicycle on a hook that extends 6 inches out from a wall, that bike isn’t just pulling straight down due to gravity. It is exerting rotational leverage (torque) that actively tries to pry the top screws straight out of the wall board.

            [ WALL DRYWALL LINE ]
         ===========================
           |   | <-- 2.5" Lag Screw (Must hit timber center)
           |   |
         [==]=======[ STEEL HOOK ]
           ||             |
           ||             v (Rotational Leverage Pulling Outward)
         [RACK]
           ||
           v (30+ lbs Gravity Deadweight)

Finding the Meat of the Frame

To guarantee absolute asset protection, your bike rack brackets must be anchored directly into the structural center of your home’s wood wall studs or concrete block substrate.

  • Wood Stud Construction: Use a high-end deep-scanning stud finder to locate the solid timber framing edges. Pre-drill a pilot hole using a bit slightly smaller than your fastener, and secure the rack using heavy-duty, 2.5-inch structural lag screws.

  • Masonry/Concrete Walls: Drill your pilot holes using a specialized carbide-tipped masonry bit and a hammer drill. Drive your mounting hardware into heavy-duty sleeve anchors or Tapcon concrete screws.

Step-by-Step Blueprint for a Seamless Installation

Ready to reclaim your floor space? Grab your safety gear, clear out your working lane, and execute this straightforward building sequence:

  1. Inventory Your Fleet: Measure the widest set of handlebars in your family collection (usually the mountain bikes). This dimension dictates how much clearance distance you need between your vertical wall hooks to prevent the grips from smashing into each other.

  2. Establish Your Vertical Height: If opting for a vertical hook rack, hold your bike upright on its rear wheel against the wall. Mark the exact height where the front rim meets the wall, and mount your hook bracket 2 to 3 inches above that mark to ensure the rear tire floats slightly off the floor line.

  3. Deploy a Tire Defense Pad: Continuous tire contact will leave ugly, black rubber scuff marks on your walls over time. Mount small, adhesive-backed plastic or metal tire plates directly where the front and rear rubber treads meet your drywall.

  4. Confirm Alignment: Before tightening your structural lag screws completely down, use a torpedo level to ensure your multi-bike track system is perfectly level across the horizon line.

The Pitfalls the Packaging Won’t Tell You

The Hydraulic Brake Air Trapping Phenomenon

Many modern mountain bikes and high-end gravel bikes feature hydraulic disc brake systems. These systems rely on a sealed column of mineral oil or DOT fluid to actuate the brake calipers. If you store a hydraulic-equipped bicycle vertically or upside down on a bike rack for months at a time, any microscopic air bubbles present in the master fluid reservoir can migrate straight down into the brake lines. The next time you take the bike down for a ride, your brake levers will feel completely soft and sponge-like, destroying your stopping power until you manually bleed the lines. If your fleet features hydraulic brakes, always store them on a horizontal cradle or a traditional floor track to keep the reservoirs elevated.

  • Mind the Rim Depths: If you ride a modern aero road bike equipped with deep-section carbon fiber wheels, ensure the hook on your vertical bike rack is wide enough to clear the full depth of the rim without scratching or applying pinpoint crushing pressure to the fragile carbon weave. Look for hooks lined with thick, soft rubber or dense neoprene sleeves.

  • The E-Bike Weight Threshold: Electric bikes (e-bikes) are magnificent utility vehicles, but their heavy internal motors and battery packs push their total weight anywhere from 50 to 80 pounds. Never attempt to hang a heavy e-bike on a standard vertical wall hook unless you want to pull your lower back muscles out of alignment. Keep these heavy units grounded in an industrial-grade floor track system or utilize a mechanical ceiling hoist.

Conclusion: Take Ultimate Command of Your Space

Systematically organizing your home with a high-performance bike rack completely changes the daily functionality of your property. By moving away from chaotic, leaning clusters and investing in a structurally anchored vertical or horizontal setup, you eliminate component damage, preserve your home’s walls from rubber scuffs, and unlock pristine floor space for your vehicles and workshop projects.

Are you getting ready to overhaul your garage or basement layout to accommodate your family’s bicycles this season? What specific style of rack system fits your interior layout best, and what installation hurdles are you trying to solve? Let me know your project details or equipment questions in the comments section below, and let’s get your gear organized!

sunraysaunas.com All shapes and designs are manufactured to exacting standards. You don’t compromise on style; we never compromise on the quality or security. Our high security doors are certified and tested in German most famous Rossenheim laboratory high security doors We reinforced the walls and fitted high security doors to protect our customer and his antiques collection for an apartment in London. If you live where our engineers are not able to reach you, just guide us, and we will make and ship the door 4 you Durable and lasting, convenient to use. All our security doors are manufactured by especially precise programmed machines Amada, which can process metal with the precision of 0.1 mm, therefore, their construction is precisely accurate and straight. security doors One of the locks installed in security doors must be no lower than 5th security class and protected by a drilling resistant manganese plate. Both locks are installed in protective steel boxes, and a separate protective sleeve secures each pin.

Advanced Security Integration: Implementing the Pet Friendly Sensor Protocol

Source:https://www.roombanker.com

It is 3:00 AM, and your phone is screaming. The home security app is flashing red: “Intrusion Detected: Living Room.” Your heart races as you grab a flashlight, only to find your 60-pound Golden Retriever, Cooper, staring at you sheepishly from the couch. He just wanted a midnight snack. This “false alarm fatigue” is the number one reason homeowners eventually disable their security systems entirely, leaving them truly vulnerable when it matters most.

In my twelve years of designing smart home infrastructures, I’ve seen more homeowners defeated by their own pets than by actual burglars. We want safety, but we also want our furry family members to roam free. Achieving this balance requires a shift from basic motion detection to a specialized Pet Friendly Sensor protocol. This isn’t just about turning down the sensitivity; it’s about understanding the physics of how a home “sees” movement.

The Infrared Filter: How Modern Sensors “Think”

To understand a Pet Friendly Sensor, you have to understand Passive Infrared (PIR) technology. These sensors don’t actually “look” at the room like a camera; they monitor changes in heat signatures. When a human walks by, they represent a large, vertical block of heat moving across the sensor’s field of view.

Think of it like a high-speed camera at a race track. A standard sensor is looking for any movement across the finish line. A pet-friendly version, however, is like a “height and weight” gate. It is programmed to ignore heat signatures that fall below a certain mass—typically 40 to 80 pounds—and stay within a specific distance from the floor.

The Weight Gap Delusion

Early in my career, I made the mistake of trusting the box. A client bought a sensor rated for “up to 50 lbs,” but their 20-pound cat kept triggering it. Why? Because the cat jumped on the back of the sofa, right in front of the lens. To the sensor, that cat looked like a 200-pound giant because it was so close. This taught me that a Pet Friendly Sensor is only as good as its placement strategy.

Engineering the Shield: Strategic Placement Protocols

When we implement a pet-immune system, we aren’t just slapping devices on a wall. We are creating a “Security Envelope.” Here is the mechanical workflow I use for every professional installation.

1. The “Dead Zone” Calibration

A professional Pet Friendly Sensor often utilizes a “Look Down” creep zone. However, for pet owners, we actually want to disable this. We aim to create a horizontal “blind spot” from the floor up to about 3 or 4 feet.

Pro Tip: Mount your sensors at exactly 7.5 feet. This height allows the PIR beams to fan out over the heads of your dogs while still capturing the midsection of any upright human intruder.

2. Dual-Technology Integration (PIR + Microwave)

If you have a particularly active pet—like a bird that flies or a cat that climbs—a single PIR sensor won’t cut it. I always recommend “Dual-Tech” sensors. These require both an infrared heat change and a microwave pulse (which detects physical mass displacement) to trigger the alarm. This drastically reduces false positives from heat vents or small pets.

3. Masking and Fresnel Lens Adjustments

Some high-end sensors allow you to physically “mask” certain zones. If you know your cat spends all day on a specific bookshelf, we can apply an internal mask to the lens that essentially blinds the sensor to that specific square foot of space without compromising the rest of the room.

Technical LSI Vocabulary: Mastering the Spec Sheet

Before you purchase your next Pet Friendly Sensor, look for these technical specifications to ensure you are getting more than just a marketing label:

  • Animal Immunity Level: Usually measured in kilograms or pounds (e.g., 20kg/40lb or 40kg/80lb).

  • Pulse Count Logic: This determines how many “steps” a heat signature must take across the beams before the alarm triggers. Higher pulse counts are better for homes with high pet activity.

  • Temperature Compensation: This ensures the sensor remains accurate when the room temperature is close to human body temperature (98.6°F), preventing “thermal blindness.”

  • RFI/EMI Protection: High-quality sensors are shielded against Radio Frequency Interference, which can be caused by your Wi-Fi router or microwave.

Expert Advice: The “Climber” Warning

Here is an insight that caught me off guard during a renovation project in 2018: Thermal mass is cumulative.

If you have three 15-pound dogs playing together, their combined heat signature can exceed the 40-pound limit of your Pet Friendly Sensor. If they huddle together or chase each other in a tight circle, the sensor sees one “large” heat source.

Expert Advice: If you have multiple pets, always “over-spec” your sensors. If your dogs total 45 pounds combined, buy an 80-pound rated sensor. It’s better to have a higher threshold than to deal with a false alarm at 3:00 AM.

Never point a motion sensor directly at a window or a heat vent. For a pet-friendly setup, the sun hitting a rug or a blast of hot air from the floor vent can mimic the movement of a living creature, causing the system to trip even if your pets are asleep.

The Analogy: The Security Bouncer

Think of a standard motion sensor like a bouncer who kicks out anyone wearing a red shirt. If your dog has a red collar, he’s out.

A Pet Friendly Sensor is like a bouncer with a guest list and a height chart. He says, “Okay, if you’re under 3 feet tall and don’t weigh much, you’re clearly not the guy I’m looking for. You can stay.” By adding Dual-Tech (Microwave), you’re giving that bouncer a second set of eyes to confirm that the person in the red shirt is also a human-sized mass before taking action.

Maintaining the Infrastructure

A security system is “set and forget” until it fails. To maintain Advanced Security Integration, you must perform a “Walk Test” every six months.

  1. Put your system in “Test Mode.”

  2. Let your pets roam the room as they normally would.

  3. Walk through the room yourself in an upright position.

  4. Check the log: Did it ignore the pets? Did it catch you?

If the sensor is missing you, or catching the pets, you need to adjust the Sensitivity Jumper located inside the sensor housing. Most professional units have a small pin or switch that allows you to toggle between “High,” “Medium,” and “Low” pet immunity.

Conclusion: Peace of Mind for the Whole Family

Integrating a Pet Friendly Sensor protocol isn’t about compromising your home’s security; it’s about refining it. When you eliminate false alarms, you restore your trust in the system. When that alarm goes off, you’ll know it’s because of a real threat, not because Cooper decided to jump on the sofa.

Does your current security system “overreact” to your pets? Or have you found a specific mounting trick that finally silenced the false alarms? Drop a comment below—I’d love to hear your experiences with balancing home tech and pet life!

Elevating Your Workspace: The Benefits of Professional Commercial Upholstery in Denver

A well-maintained commercial space communicates professionalism the moment a client or employee walks through the door. While architectural design and wall art often receive the most attention, the furniture—specifically its condition—serves as the true anchor of a room’s aesthetic. Over time, high-traffic areas inevitably suffer from fabric fatigue, cushioning compression, and structural wear. For businesses across the Mile High City, investing in commercial upholstery in Denver is not merely a cosmetic fix; it is a strategic decision to extend the life of high-quality assets and maintain a polished brand image.

Understanding the Lifecycle of Professional Furniture

Commercial environments subject furniture to stress levels that residential pieces never encounter. Conference room chairs, lobby sofas, and restaurant booths undergo thousands of hours of use, leading to inevitable material degradation. When the fabric begins to fray or the internal foam loses its rebound, the piece begins to detract from the professional atmosphere of the office.

Many businesses mistakenly view these signs of wear as a signal to replace their inventory entirely. However, high-quality professional furniture is often built with robust frames that are designed to last for decades. By opting for professional refurbishment, companies can restore these foundations to their original factory standards, often using performance-grade textiles that offer better stain resistance and durability than the original coverings. Choosing to restore existing furniture is also a more sustainable approach, significantly reducing the amount of waste sent to local landfills.

The Strategic Advantage of High-Performance Textiles

When selecting materials for commercial upholstery in Denver, the choice of fabric is paramount. Unlike residential settings, commercial spaces require materials that meet rigorous industry standards for abrasion resistance, fire safety, and colorfastness.

A professional upholsterer will prioritize fabrics classified for heavy-duty commercial use. These textiles often feature:

  • High Double-Rub Counts: This measurement indicates how many times a fabric can be abraded before the threads break. Commercial-grade fabrics are tested to withstand over 100,000 double rubs.
  • Antimicrobial and Soil-Resistant Treatments: Given the high volume of foot traffic in Denver offices and hospitality venues, fabrics treated to repel moisture and inhibit bacterial growth are essential for maintaining hygiene.
  • UV Resistance: Even in interior settings, consistent exposure to the intense Colorado sun can lead to fading. Selecting UV-rated materials ensures that your lobby or lounge areas retain their vibrant color for years.

Refreshing Your Space: The Shift Toward Modern Aesthetics

Sometimes, a business does not necessarily need a repair; it needs a visual evolution. As design trends shift toward cleaner lines, more sustainable materials, and bolder color palettes, older furniture can make a workspace feel dated. Rather than investing in entirely new upholstered furniture in Denver, companies are increasingly choosing to reupholster existing pieces to align with updated branding or interior design schemes.

This process allows for complete customization. You can transform a heavy, traditional executive chair into a sleek, modern piece by selecting a high-performance leather or a textured weave that complements a contemporary office aesthetic. This level of customization is rarely available with mass-produced furniture, providing a unique opportunity to create a cohesive look that reflects the specific culture and identity of your company.

Technical Considerations for Commercial Restoration

A professional upholstery project involves more than just swapping out fabric. It requires a deep understanding of the internal components that make a piece of furniture comfortable and functional.

Cushion Engineering

Compression of the seat foam is often the primary reason furniture feels “worn out,” even if the fabric is pristine. Professional services utilize high-density polyurethane foam or memory foam inserts that provide the necessary support for long meetings or extended lobby waits. Choosing the right density ensures that the furniture maintains its profile and comfort level without sagging over time.

Structural Integrity Inspections

During the reupholstery process, the piece should be completely stripped to its frame. This presents a critical opportunity to inspect the joints, webbing, and springs. In Denver’s dry climate, wood frames can occasionally become brittle or develop loose joints. A thorough restoration addresses these underlying structural issues, ensuring the piece is as sturdy as it is beautiful.

Ergonomic Compliance

For office environments, the ergonomics of seating are non-negotiable. Reupholstering task chairs requires specialized knowledge to ensure that the fabric tension does not interfere with adjustable height, tilt, or lumbar support mechanisms. Professional installers are trained to work around these intricate mechanical parts, ensuring that the furniture remains fully functional and compliant with workplace safety standards post-restoration.

Maintaining Your Investment

Once you have completed a project for commercial upholstery in Denver, implementing a maintenance schedule is essential to maximize the return on your investment. Commercial furniture thrives on routine care.

  1. Scheduled Vacuuming: Dust and grit act as abrasives that break down fibers over time. Weekly vacuuming with a soft-brush attachment prevents these particles from settling into the weave.
  2. Spot Cleaning Protocols: Have a clear plan for liquid spills. Many commercial fabrics are treated for spill resistance, but prompt action with the appropriate cleaning agent is still necessary to prevent permanent staining.
  3. Rotation: If certain chairs receive significantly more use than others, rotating their positions periodically can help ensure even wear across your entire inventory.
  4. Professional Deep Cleaning: Much like carpets, upholstered furniture benefits from an annual deep cleaning by professionals who utilize hot-water extraction or dry-cleaning methods suitable for commercial textiles.

The Long-Term Value of Quality Restoration

Deciding between buying new or refurbishing depends largely on the quality of the current frame. If the frame is made of solid hardwood with high-quality joinery, it is almost always more cost-effective and aesthetically superior to reupholster. When businesses look for new upholstered furniture in Denver, they often encounter long lead times and supply chain delays. Professional reupholstery, by contrast, is often faster and offers a greater degree of flexibility regarding fabric choice and custom finishing details.

By prioritizing the maintenance and aesthetic refreshment of your current inventory, you demonstrate a commitment to both operational efficiency and environmental responsibility. Whether you are aiming to modernize a boardroom, revive a reception area, or upgrade the seating in a breakroom, partnering with skilled professionals ensures that your furniture continues to serve its purpose with both comfort and style.

Ultimately, the atmosphere of your commercial space is a silent ambassador for your business. By keeping your seating in peak condition, you provide a subtle but powerful message that your company values quality, attention to detail, and the comfort of everyone who steps through your doors.

Mechanical Assembly Stability: Ensuring Precision with the Clamp Set Spring

Source:https://www.thome-precision.com

You have spent three hours carefully cutting the miters for a custom picture frame. The wood is expensive, the grain is perfectly matched, and you’ve just applied a fresh layer of wood glue. But as you reach for your heavy-duty bar clamps, the joints begin to slide. The glue acts like a lubricant, and before you can tighten the screw, your perfect 90-degree angle has shifted into a messy, lopsided trapezoid.

In my decade of managing high-stakes home renovations, I’ve seen more projects ruined during the “glue-up” phase than during the actual cutting. We often obsess over the power of the table saw, but we forget that Mechanical Assembly Stability depends entirely on how you hold things together. This is where the Clamp Set Spring becomes your most valuable “silent partner” in the workshop. It’s the tool that provides the instant, one-handed grip that saves your sanity when the clock is ticking and the glue is drying.

The Physics of Tension: Why Springs Matter

To understand the beauty of a Clamp Set Spring, you have to understand the difference between “passive” and “active” pressure. A standard C-clamp or bar clamp provides passive pressure; you screw it down, and it stays where you put it. But wood and other materials are organic—they compress and shift.

A spring clamp provides active, constant tension. Think of it like a high-end suspension system on a mountain bike. While a rigid frame might crack under a sudden bump, the suspension absorbs the movement while keeping the tires (or in our case, the wood joints) in constant contact with the ground. When you use a Clamp Set Spring, the tool is “pushing back” against the material with a predictable, calibrated force that doesn’t let up until you release the handle.

The “Third Hand” Insight

Early in my career, I tried to install crown molding solo. I quickly realized that I lacked the three extra hands required to hold the molding, check the level, and fire the nail gun. I started using heavy-duty spring clamps as “stop-blocks.” By clipping a spring clamp just below my layout line, I created a temporary shelf that held the weight of the lumber. That’s the real-world utility of a Clamp Set Spring: it’s not just for holding things together; it’s for holding things in place so you can work accurately.

Engineering the Grip: Anatomy of a Pro-Grade Clamp

Not all spring clamps are created equal. If you buy the cheap, plastic bins at the checkout counter, you’ll find the springs lose their “memory” after just a few uses. For professional-grade Mechanical Assembly Stability, you need to look at the engineering.

1. High-Carbon Steel Coil

The heart of the Clamp Set Spring is the coil itself. Professional sets use high-carbon tempered steel. This ensures that the “clamping force” remains consistent whether it’s the first time you’ve opened the clamp or the ten-thousandth.

2. Pivoting V-Groove Pads

If your clamp has fixed pads, it will only apply pressure at a single point, often causing the tool to “walk” off the workpiece. I always look for sets with pivoting pads. These allow the clamp to adjust to irregular shapes or angled joints, ensuring the pressure is applied perpendicular to the surface.

3. Ergonomic Lever Ratio

A good spring clamp shouldn’t require a grip-strength trainer to operate. The handle length is engineered as a lever. A well-designed Clamp Set Spring maximizes the “mechanical advantage,” allowing you to exert 30 lbs of pressure at the tips with only a fraction of that effort at your palm.

Technical LSI Vocabulary: The Professional Spec Sheet

When you’re browsing for your next Clamp Set Spring, look for these technical markers to ensure you’re getting industrial-quality tooling:

  • Clamping Force (PSI): Measured in pounds per square inch. For delicate trim, you want 10–15 PSI; for structural glue-ups, you may need 30+ PSI.

  • Thermoplastic Rubber (TPR) Grips: Unlike cheap vinyl, TPR won’t slide when your hands are sweaty or covered in sawdust.

  • Throat Depth: This is the distance from the tip of the pad to the spring. A deeper throat allows you to reach further onto a board for better stability.

  • Corrosion Resistance: Look for zinc-plated or powder-coated steel to prevent the spring from rusting in humid garage environments.

Expert Advice: The “Marring” Warning

Here is a piece of advice you won’t find on the packaging: The stronger the spring, the more dangerous the pad.

I’ve seen beginners ruin a soft pine tabletop because the high-tension Clamp Set Spring left a permanent circular “dent” in the wood. This is called marring.

Pro Tip: If you are working with softwoods like pine, cedar, or poplar, always place a small “caul” (a scrap piece of wood) between the clamp pad and your project. This distributes the pressure over a larger surface area and protects your finish.

Never snap a spring clamp shut when it’s empty. The “dry fire” vibration can eventually cause micro-fractures in the pivot pin, leading to a catastrophic failure where the spring flies out at high velocity. Treat them with the same respect you give your power tools.

Strategic Applications in Home Improvement

The Clamp Set Spring isn’t just for woodworking. In my ten years of field experience, I’ve used them for:

  • Electrical Work: Holding a light fixture in place while I wire the ceiling box.

  • Painting: Clipping drop cloths to the top of a ladder to prevent tripping hazards.

  • Plumbing: Holding a P-trap in place while checking the alignment of the slip-nuts.

  • Automotive: Clipping a work light to the underside of a hood.

Analogy: The Clothespeg on Steroids

Think of a spring clamp like a clothespeg, but engineered by NASA. While a clothespeg can hold a shirt on a line, a Clamp Set Spring is designed to fight the physical warping of wood and the gravity of heavy materials. It is the “temporary glue” that allows you to step back, look at your work from a distance, and ensure everything is level before you make it permanent.

Maintaining Your Arsenal

To keep your Clamp Set Spring performing at peak levels, you must manage the friction at the pivot point. Once a year, I apply a single drop of dry PTFE lubricant to the spring coil and the pivot pin. Avoid using grease, as it will attract sawdust and turn into an abrasive paste that eats away at the metal.

If the pads become slick with dried glue, don’t scrape them with a knife—you’ll ruin the grip. Instead, soak the pads in warm soapy water or use a bit of white vinegar to dissolve the wood glue, restoring that “tacky” surface that prevents the clamp from slipping.

Conclusion: The Foundation of Every Accurate Build

Precision isn’t just about how you cut; it’s about how you hold. By integrating a high-quality Clamp Set Spring into your workflow, you transition from “hoping” your joints stay square to “ensuring” they do. It is the cheapest insurance policy you can buy for your hard work and expensive materials.

What’s the one project that almost fell apart because you didn’t have enough hands to hold it? Have you discovered a “weird” use for a spring clamp that saved the day? Share your stories in the comments below—I’m always looking for new ways to put these versatile tools to work!

Mobile Operational Infrastructure: Enhancing Flexibility with the Mobile Workbench Base

Source:https://stackbin.com

You are halfway through a weekend project, mid-rip on a heavy sheet of plywood, when you realize your table saw is pinned against a stack of storage bins in a cramped garage. To move it, you have to lift, grunt, and pray you don’t throw out your back or misalign the fence. Statistics show that the average DIYer spends nearly 20% of their “shop time” just moving equipment and clearing floor space rather than actually building.

In my twelve years of optimizing workshops—from tight single-car garages to expansive industrial bays—I’ve learned that the most valuable square footage is the space that can change at a moment’s notice. The secret isn’t a bigger room; it’s the Mobile Workbench Base. It is the difference between a static storage unit and a dynamic “battle station” that adapts to your workflow.

The Gravity Problem: Why Static Benches Fail

Early in my career, I built a massive, “bomb-proof” workbench. It was beautiful, heavy, and once it was loaded with tools, it was essentially a permanent structural member of the house. I quickly realized that a static bench is like a desktop computer in a world that needs a laptop.

If you are working on a large-scale project—like a dining table or a bathroom vanity—you need to be able to walk around all four sides of the piece. A Mobile Workbench Base provides that “orbital” access. It transforms your heaviest machinery from a liability into an asset that can be tucked away or brought to center stage in seconds.

The Physics of Mobility

Think of your workshop like a game of Tetris. If the pieces are frozen, the game ends quickly as the space fills up. A mobile base acts like the “rotate” function. By lowering wheels or engaging a lever, you negate the friction of 500 pounds of steel and wood, allowing you to rearrange your “operational infrastructure” with the push of a finger.

Engineering the Foundation: What to Look for in a Mobile Workbench Base

When you are shopping for or building a base, you aren’t just looking for “wheels.” You are looking for a mechanical system that balances two contradictory needs: Mobility and Total Rigidity.

1. Load Capacity and Structural Integrity

A standard workbench can easily exceed 300 lbs once you add a vise, hardwood top, and power tools. Your Mobile Workbench Base must be rated for at least 1.5x your estimated weight. Look for heavy-gauge steel construction and reinforced corner brackets to prevent “racking” (the side-to-side swaying that happens when you’re hand-planing or sanding).

2. The Deployment Mechanism: Step-Down vs. Fixed Swivel

There are two primary styles of mobility:

  • Step-Down Casters: These are my personal favorite. The bench sits on its own solid legs until you step on a foot pedal, which engages the wheels. When you “disengage” them, the bench drops back onto its solid feet.

  • Locking Swivel Casters: The wheels are always in contact with the ground, and you click a small tab to lock them. These are great for lighter carts but can feel “spongy” under a heavy miter saw station.

3. Vibration Dampening and Floor Contact

In the world of home improvement, vibration is the enemy of precision. If your base has even a millimeter of “wobble,” your cuts will be off. A high-quality Mobile Workbench Base should offer adjustable leveling feet so you can compensate for uneven garage floors (which are almost always sloped for drainage).

Technical LSI Vocabulary: Mastering the Spec Sheet

To build a truly professional workshop, you need to look past the marketing fluff. Pay attention to these technical specifications:

  • Polyurethane Treads: Unlike hard plastic or rubber, polyurethane wheels won’t “flat spot” over time if left sitting under a heavy load, and they won’t mar your epoxy floor.

  • Total Locking Casters: This means the wheel doesn’t just stop rolling; it stops swiveling. This is crucial for keeping a workbench from “fishtailing” while you apply lateral pressure.

  • Boring Pattern: The hole alignment on the base that allows it to adapt to different leg sizes (4×4 posts vs. metal frames).

  • Center of Gravity (CoG): A mobile base should keep the tool as low to the ground as possible to prevent tipping during transport.

Expert Advice: The “Invisible” Stability Rules

I’ve seen many beginners install a Mobile Workbench Base only to find their bench shaking like an autumn leaf. Here is the Pro Tip that I give to every one of my clients: “Legs over Casters.”

If you are building a custom base, ensure that the weight of the bench is transferred directly through the vertical legs to the floor, rather than hanging off the side of the casters. This is called “Vertical Load Alignment.” When the wheels are retracted, the bench should feel as solid as the foundation of your house.

Beware of “Universal” bases that use thin, stamped metal. While they claim high weight capacities, they often flex under the torque of a table saw motor starting up. Always prioritize a base with a “triangulated” design for maximum torsional rigidity.

Scaling Your Workspace: The Modular Ecosystem

The ultimate goal of using a Mobile Workbench Base is to create a modular ecosystem. In my shop, my table saw, my outfeed table, and my assembly bench are all on identical-height mobile bases.

This allows me to “link” them together to create a massive 8-foot by 12-foot support surface for huge projects, and then break them apart and park them against the wall when I need to pull the car into the garage. This “Scaling Purity” is what separates a cluttered hobbyist corner from a professional-grade production environment.

The Ergonomics of the Foot Pedal

It sounds minor, but the ergonomics of the deployment lever matter. If you have to bend over or use extreme force to lift the bench onto its wheels, you won’t move it as often as you should. Look for a Mobile Workbench Base with a “high-leverage” foot pedal. It should feel like stepping on a heavy-duty stapler—smooth, mechanical, and satisfyingly tactile.

Maintenance: Keeping the Infrastructure Rolling

A workshop is a dusty place. Sawdust is the natural enemy of ball bearings. To ensure your Mobile Workbench Base lasts a decade:

  • Blow it out: Use compressed air to clear dust from the caster swivels once a month.

  • Lubricate: Use a “dry” PTFE spray. Avoid “wet” oils like WD-40, which actually attract dust and turn into a grinding paste inside your bearings.

  • Check the Nuts: The vibration of power tools can loosen the mounting bolts over time. Give them a turn with a wrench every six months.

Conclusion: Take Your Shop for a Spin

Upgrading to a Mobile Workbench Base isn’t just about moving furniture; it’s about reclaiming your creative freedom. It removes the physical barrier between “having a tool” and “using a tool.” When the effort to set up a project drops to zero, your productivity skyrockets.

What is the “anchor” in your shop that you’re tired of moving by hand? Is it a vintage cast-iron jointer or a massive assembly table? Drop a comment below and let’s talk about how to get your heavy hitters rolling!