I’ve spent the last decade crawling through crawlspaces, framing additions, and renovating kitchens that looked like they hadn’t been touched since the Eisenhower administration. If there is one thing I’ve learned, it’s that a messy job site is a failing job site.
I remember a specific July afternoon on a deck build. I was hunched over a pair of shaky plastic sawhorses, trying to make a precision miter cut. The “table” wobbled, the wood slipped, and I ended up wasting a $50 piece of cedar and nearly losing a finger. That was the day I realized that a work bench portable isn’t just a luxury; it is the backbone of your operational infrastructure.
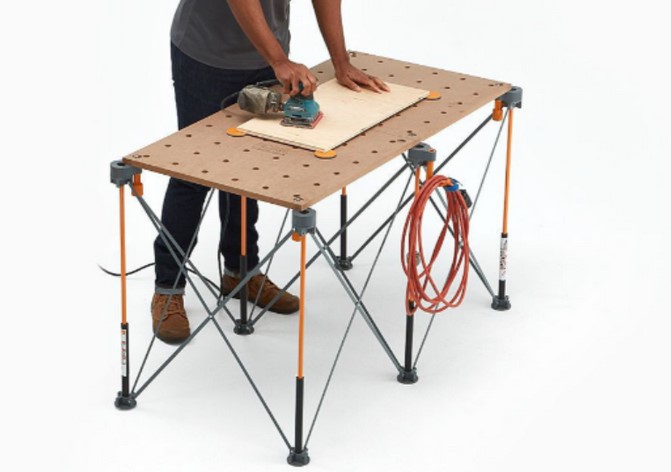
Think of a portable workbench as the “Command Center” of your project. Without it, you’re just a person with a pile of tools on the floor. With it, you have a steady, reliable partner that transforms any chaotic backyard or dusty garage into a professional-grade workshop.
Why Every DIYer Needs a Portable Nerve Center
In the world of home improvement, we often obsess over the “active” tools—the drills, the saws, the impact drivers. But we rarely give credit to the “passive” infrastructure.
A high-quality work bench portable serves as your literal foundation. If your foundation is weak, your measurements will be off, your cuts will be jagged, and your back will be aching by 2:00 PM.
The Anatomy of Stability
What makes a workbench “portable” yet “industrial”? It’s all about the strength-to-weight ratio. Modern units use high-grade steel or reinforced polymers that can support upwards of 1,000 lbs while weighing less than 30 lbs themselves.
Speed of Deployment
In my experience, the biggest barrier to finishing a project is the “setup friction.” If it takes you thirty minutes to lug out a heavy table and set up your gear, you won’t want to do the work. A professional-grade portable bench should deploy in under 15 seconds. It’s the difference between “I’ll do that next weekend” and “I’ll knock that out right now.”
Technical Deep-Dive: Key Features to Look For
When you’re shopping for a work bench portable, don’t just look at the price tag. Look at the mechanical “DNA” of the unit. Here is what I look for after ten years in the dirt:
1. Integrated Clamping Systems
A bench is useless if it can’t hold your workpiece. Look for benches with dog holes (those round holes on the surface) and integrated T-tracks.
Pro Insight: Using “Bench Dogs” (small pegs) allows you to secure odd-shaped objects like circular table tops or chair legs that a standard C-clamp can’t touch.
2. The “Twist” Test
When the bench is unfolded, grab the corners and try to twist it. If it flexes more than a quarter-inch, walk away. Side-to-side stability (lateral shear) is vital when you are hand-planing wood or using a reciprocating saw.
3. Surface Material
Most experts prefer a mix of high-impact resin and metal. Resin is great because it won’t damage your saw blades if you accidentally nick the table, but metal frames provide the “bones” needed for longevity.
Scaling Your Workflow: From Beginner to Pro
For beginners, the work bench portable is a safety device. It keeps your hands away from the blade and your workpiece at waist height. For the intermediate DIYer, it becomes a precision tool.
Using the Bench as a Tool Stand
Many modern portable benches are designed to host a miter saw or a portable table saw. By aligning two benches of the same height, you create an “outfeed” table.
Analogy: Imagine trying to cook a five-course meal on a single cutting board. It’s impossible. Adding a second workbench is like adding a second kitchen counter; suddenly, you have room to breathe, organize, and execute.
The Utility of On-Site Mobility
Unlike a heavy oak workbench bolted to a garage floor, the portable version follows the sun. If you’re sanding a cabinet door, you want to be outside where the dust blows away, not in your enclosed garage. This “operational flexibility” is why even pro contractors with $100,000 shops still keep three or four portable units in their trucks.
Step-by-Step: Setting Up Your Mobile Station
-
Clear the Landing Zone: Ensure the ground is level. Most portable benches have fixed legs, so a rocky backyard will lead to wobbling.
-
Lock the Joints: Always double-check the locking pins. I’ve seen benches collapse because a user forgot to engage the secondary safety latch.
-
Organize the Under-Zone: Use the space beneath the bench for your vacuum or heavy tool bags. This adds “ballast,” making the bench even more stable.
-
Lighting is Key: Position your bench so the light comes from the side, not behind you. You don’t want to be working in your own shadow.
Expert Advice: Maintenance and Longevity
💡 Pro Tip: The Wax Trick
If you have a workbench with a wooden or composite top, rub a bit of paste wax or even an old candle on the surface. This prevents glue drips (from woodworking projects) from sticking to the bench. When the glue dries, it will pop right off with a putty knife!
⚠️ Hidden Warning: The Load Limit Myth
Just because a box says “Supports 1,000 lbs” doesn’t mean you should drop a 1,000-lb engine block on it. That rating is for static weight (weight sitting still). Dynamic weight—like the force of you pushing a saw or hammering a joint—multiplies the stress on the joints. Always aim to stay under 50% of the rated capacity for active work.
Comparison of Bench Types
| Feature | Lightweight Plastic | Heavy-Duty Steel Fold | Professional Work Station |
| Best For | Light Crafting / Painting | General Construction | Precision Woodworking |
| Portability | Excellent | Moderate | Fair |
| Clamping | Limited | Integrated Slideways | T-Tracks & Dog Holes |
| Durability | 1-3 Years | 5-10 Years | Lifetime |
In the end, choosing a high-quality work bench portable is an act of kindness to your future self. It saves your back, it saves your time, and most importantly, it saves the quality of your work. You can have the most expensive drill in the world, but if you’re drilling into a wobbly surface, your hole will be crooked.
Start looking at your workspace as an infrastructure, not just a place to put things. Once you experience the “utility” of a truly stable, mobile command center, you’ll wonder how you ever finished a project without one.
What is the biggest “pain point” in your current workspace? Are you tired of working on the floor, or is your current table just too shaky for the job? Let me know in the comments below, and let’s figure out the best setup for your next project!