Cost-Effective Aesthetic Branding: Modernizing Surfaces with Contact Paper Marble

Source:https://m.media-amazon.com

You’re hosting a dinner party in three days, and every time you look at your scratched, 1990s laminate countertops, you feel a pang of “renovation envy.” You’ve priced out Carrara marble slabs, and the $4,500 quote nearly made you drop your coffee. What if I told you that for less than the cost of that dinner party, you could achieve a high-end stone look that fools 90% of your guests?

In my decade of flipping houses and consulting on low-budget interior branding, I’ve seen homeowners paralyzed by the “all or nothing” mentality. They think if they can’t afford the quarry-mined stone, they have to live with the ugly yellowed plastic. That’s where Contact Paper Marble comes in—it’s the “makeup artist” of the home improvement world.

I remember a studio apartment project in Brooklyn where the kitchen was so depressing it was lowering the rental value by $400 a month. We applied a premium vinyl marble film over a long weekend. The next tenant didn’t just rent the place; they asked which stone yard we sourced the “slabs” from. That’s the power of a well-executed surface modernization.

The Psychology of Surface Branding: Why Marble Wins

Marble is the universal language of luxury. It suggests weight, history, and cleanliness. By using Contact Paper Marble, you aren’t just covering a surface; you are rebranding the “vibe” of your home.

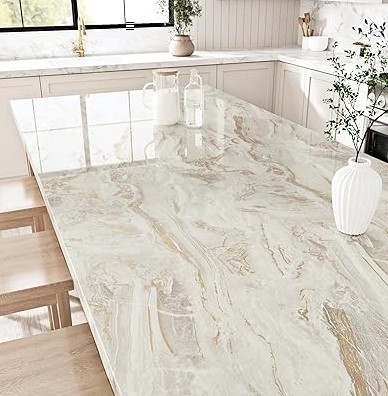
From a technical standpoint, modern contact papers aren’t the thin, floral shelf liners your grandmother used. We are talking about calendered vinyl with high-definition digital printing. The vein patterns are now scanned from real Italian stone, giving you depth and “movement” that looks incredibly authentic under LED kitchen lighting.

Choosing Your Material: Not All Vinyl is Created Equal

If you buy the cheapest roll at a big-box craft store, you’re going to have a bad time. For a professional-grade finish, you need to look at the technical specs of your Contact Paper Marble.

  • Thickness (Mil Gauge): Look for a thickness of at least 4-6 mils. Thinner paper is translucent and will show the “ghost” of your old countertop pattern underneath.

  • Adhesive Type: You want a “repositionable” adhesive. This allows you to pull the paper back up if you get a wrinkle without ruining the entire sheet.

  • Finish: Matte finishes tend to look more like natural honed stone, while high-gloss finishes mimic polished marble but can be more prone to showing scratches.

The DIY Framework: A Masterclass in Application

The difference between a “bubbly mess” and a “seamless slab” is 10% material and 90% technique. Think of applying contact paper like putting a screen protector on a giant smartphone—patience is your only friend.

1. The “Surgical” Clean

If there is a single speck of breadcrumb or a microscopic drop of grease on your counter, the vinyl will highlight it like a neon sign. I use a degreaser (like TSP or heavy-duty dish soap) followed by an isopropyl alcohol wipe-down. Your surface should be so clean it “squeaks” when you run your finger across it.

2. The Dry Run and Overhang

Never cut the paper to the exact size of the counter. Always leave a 2-inch overhang on all sides. This gives you “leash” to pull and tension the paper as you squeegee out the air.

3. Tension and the Heat Gun

This is the secret weapon I tell all my students. A standard hair dryer or a low-setting heat gun makes the vinyl pliable. When you reach the corners, a little heat allows the Contact Paper Marble to stretch slightly, wrapping around the edge without those ugly “dog-ear” folds.

⚠️ Peringatan Tersembunyi (Hidden Warning)

Never use a sharp metal knife to squeegee the air out. Even the “soft” edge of a credit card can micro-scratch high-gloss vinyl. Always use a felt-tipped squeegee. If you don’t have one, wrap a microfiber cloth tightly around your squeegee tool to create a padded buffer.

Tackling the “Tricky” Spots: Sinks and Corners

This is where beginners usually give up. How do you handle a drop-in sink?

The Expert Method: Apply the paper directly over the sink opening as if the sink wasn’t there. Once the surface is smooth, use a fresh X-Acto blade to trace the perimeter of the sink flange.

Because you’ve used heat to tension the paper, the edges will “shrink” slightly into the crevice, creating a water-tight appearance. Then, run a thin bead of clear silicone caulk around the sink edge to prevent water from seeping under the vinyl and killing the adhesive.

Analogy: The Tailored Suit vs. The T-Shirt

Applying contact paper without heat and proper trimming is like wearing an oversized T-shirt—it covers the body, but it looks sloppy. Using heat, a felt squeegee, and precise trimming is like a tailored suit. It hugs every contour and corner of your furniture, making the “fabric” look like it was always part of the structure.

Durability and Maintenance: The Reality Check

Let’s be real—this is vinyl, not metamorphic rock. You cannot chop onions directly on Contact Paper Marble, and you definitely cannot set a hot cast-iron skillet on it.

  • Heat Resistance: Most PVC-based contact papers will melt or “pucker” at temperatures above 150°F. Always use trivets.

  • Cleaning: Avoid abrasive “scrubby” sponges. A simple damp cloth with mild soap is all you need.

  • Longevity: In a high-traffic kitchen, a good application lasts 3-5 years. In a guest bathroom or on a desk, it can last a decade.

ROI: The Branding Math

Let’s look at the numbers. A standard kitchen requires about $60 to $100 in premium Contact Paper Marble and tools.

If you are selling a home or trying to attract high-quality renters, a modern-looking kitchen can increase perceived value by thousands. It’s the highest “Aesthetic ROI” project you can do over a Saturday afternoon.

Tips Pro: The “Wet Method” for Absolute Beginners

If you are terrified of bubbles, use the Wet Method. Lightly mist the countertop with a mixture of water and one drop of dish soap before laying the paper. This “kills” the adhesive temporarily, allowing you to slide the paper around perfectly. Once you squeegee the water out from the center to the edges, the adhesive will re-engage and bond permanently.

You don’t need a sledgehammer and a construction crew to modernize your home. Contact Paper Marble is the ultimate bridge between “boring” and “bespoke.” It allows you to experiment with high-end aesthetics without the permanent financial commitment of real stone.

Whether you’re a renter looking to claim your security deposit back later or a homeowner on a budget, this project is your ticket to a luxury look.

What surface in your home is begging for a marble makeover? Tell me about your project in the comments—I’d love to help you figure out the best layout for your corners!

Maximizing Thermal ROI: The Impact of Attic Foil Insulation on Utility Costs

Source:https://www.absoluteairflow.com

It was mid-July in 2017, and I was standing in a client’s attic in Houston. The thermostat downstairs was set to 72°F, but the AC unit was screaming like a jet engine, unable to keep up. When I stepped onto the joists, my infrared thermometer clocked the attic floor at a blistering 145°F.

That homeowner was effectively living inside an oven, with only a thin layer of fiberglass “fluff” preventing the heat from baking their living room. Most people think more “fuzz” (traditional insulation) is the only answer to high bills. But that day, we didn’t add more bulk; we added a thin, shiny layer of Attic Foil Insulation. Within 48 hours, their AC run-time dropped by nearly 25%.

After a decade of crawling through tight spaces, I’ve learned that heat isn’t just something you “block”—it’s something you have to outsmart.

The Science of Radiance: Why Your Attic is an Oven

To understand why Attic Foil Insulation (technically known as a Radiant Barrier) is a game-changer, you have to understand that heat travels in three ways: conduction, convection, and radiation.

Traditional insulation like fiberglass or cellulose is great at stopping conduction—the heat that “crawls” through solid materials. However, on a hot summer day, your roof shingles absorb massive amounts of solar energy and blast it downward into your attic as radiant heat.

Fiberglass is like a thick wool sweater. It’s great at keeping you warm in the winter, but if you stand under a heat lamp in a sweater, you’re still going to overheat. Attic Foil Insulation is like a space blanket or a reflective shield; it reflects that radiant energy back out toward the roof before it ever touches your floor.

How Attic Foil Insulation Actually Saves You Money

The “Thermal ROI” (Return on Investment) of foil insulation comes from its ability to lower the Delta T (the temperature difference) between your attic and your living space.

When your attic is 140°F and your house is 70°F, your AC has to fight a 70-degree uphill battle. By installing a radiant barrier, you can often drop that attic temperature by 20°F to 30°F. This drastically reduces the “heat load” on your ductwork.

In many homes, the AC ducts run through the attic. If those ducts are sitting in 140°F air, the cold air inside them warms up before it even reaches your vents. Foil insulation ensures your AC isn’t cooling the attic air before it cools your bedroom.

The Two Most Effective Installation Methods

In my years on the job, I’ve seen two main ways to deploy Attic Foil Insulation. Each has its merits depending on your climate and budget.

1. The Radiant Barrier Decking (New Construction)

This is foil factory-laminated to the underside of the roof sheathing. If you’re building a new home or re-roofing, this is the gold standard. It’s “set it and forget it” protection that starts working the moment the plywood goes down.

2. The Retrofit Staple-Up Method

For most of us with existing homes, this is the DIY path. You take rolls of perforated foil and staple them to the underside of the roof rafters.

  • Pro Insight: You must leave a gap at the soffit (the bottom) and the ridge (the top). This creates a “chimney effect” where air flows behind the foil, carrying the reflected heat out of the ridge vents. Without this airflow, you risk overheating your shingles.

Debunking the Dust Myth

A common question I get is: “Can I just lay the foil flat on top of my existing insulation?”

While this is technically possible and often easier, it comes with a major caveat: Dust. Radiant barriers require an air space to function. If you lay foil flat on the attic floor, dust eventually settles on it.

Once that shiny surface is covered in a layer of grey attic dust, it loses its ability to reflect heat. This is why I almost always recommend the rafter-staple method. It keeps the foil vertical or angled, preventing dust buildup and preserving your ROI for decades.

Technical LSI Keywords Every Homeowner Should Know

When you’re shopping for materials, don’t just look for “shiny paper.” You need to look for specific technical specs to ensure you aren’t buying a fire hazard:

  • Emissivity: This is the measure of how much heat a surface “radiates.” You want a rating of 0.05 or lower (meaning it reflects 95% of heat).

  • ASTM E84 Fire Rating: Never put anything in your attic that isn’t Class A/Class 1 fire-rated.

  • Breathability (Perforations): Ensure the foil is perforated with tiny holes. This allows moisture and water vapor to pass through, preventing mold and rot in your roof deck.

  • R-Value vs. Reflectivity: Remember, foil has almost zero R-value. It doesn’t “insulate” in the traditional sense; it “reflects.”

Expert Advice: The “Hidden Trap” of Foil Installation

Tips Pro: If you have a cell phone signal that is already weak in your house, be aware that wrapping your attic in industrial-grade foil can turn your home into a “Faraday Cage.” It may slightly dampen your signal. If you rely on an attic-mounted TV antenna, the foil will likely block your reception entirely. Plan to move your antenna to the roof before you finish the installation!

Is Attic Foil Insulation Right for Your Climate?

While foil is a superstar in the “Sun Belt” (Texas, Florida, Arizona), its impact in the North is different.

In cold climates, the goal is to keep heat inside the house. While foil can help reflect some heat back down, it is far less effective than simply increasing your Fiberglass R-Value or using Spray Foam Insulation.

If you live in a region where your summer cooling bills are higher than your winter heating bills, Attic Foil Insulation is your best friend. If you live in Maine, put your money into more blown-in cellulose instead.

Step-By-Step ROI: What to Expect

  1. Year 1: Expect a 5% to 15% reduction in cooling costs depending on your current insulation levels.

  2. Year 5: Most homeowners find the material costs ($300–$800 for a standard home) have paid for themselves entirely.

  3. Long Term: By reducing the heat load, you extend the lifespan of your AC compressor, which can save you $5,000+ in premature replacement costs.

Conclusion: Stop Fighting the Heat and Start Reflecting It

We spend so much time trying to “seal” our homes that we forget about the massive amount of energy hitting our roofs every single day. Attic Foil Insulation is a low-tech, high-impact solution that addresses the root cause of summer discomfort.

I’ve seen it transform “un-coolable” upstairs bedrooms into comfortable sanctuaries. It’s not magic; it’s just smart physics applied to your utility bill.

Are you ready to turn your attic from a heat trap into a thermal shield? Drop a comment below with your city and your current attic setup—I’d love to help you figure out if a radiant barrier is the right move for your specific home!

Would you like me to walk you through a specific tool list for a DIY staple-up installation?

Architectural Value Addition: Implementing the Shiplap Ceiling DIY Design Framework

Source:https://intdesigners.com

You’re standing in your living room, looking up. What do you see? If you’re like most homeowners, it’s a vast, flat expanse of white drywall—the “forgotten fifth wall.” In my ten years of swinging hammers and managing renovations, I’ve seen people spend $5,000 on a sofa but ignore the 300 square feet of architectural potential hanging right over their heads.

A flat ceiling is a missed opportunity. I remember a project in 2018 where the client was convinced they needed to knock down a wall to “open up” the space. Instead, I persuaded them to install a Shiplap Ceiling DIY project. The result? The horizontal lines drew the eye across the room, creating an optical illusion of width and custom craftsmanship that a gallon of “eggshell white” paint could never achieve.

Why the “Fifth Wall” Matters for Your Home’s ROI

When we talk about “Architectural Value Addition,” we aren’t just using fancy words. Real estate data consistently shows that custom millwork provides one of the highest returns on investment because it’s a “permanent” upgrade.

A Shiplap Ceiling DIY isn’t just a weekend craft; it’s a structural aesthetic choice. It masks imperfections in old plaster, adds a layer of acoustic dampening, and gives a room a “finished” soul. Think of it like this: if your walls are the suit, the ceiling is the silk lining. Nobody sees it first, but everyone notices the quality once they do.

The Anatomy of a Professional Shiplap Ceiling DIY

Before you rush to the lumber yard, you need to understand what you’re actually putting up there. Authentic shiplap features a rabbet joint—a step-shaped notch cut into the edges of the board.

Understanding the Overlap

Unlike Tongue and Groove (T&G), where one board slides into another, shiplap boards rest on top of each other.

  • The Nickel Gap: This is the signature 1/8-inch space between boards.

  • Expansion Room: Wood is a living material. It breathes. The shiplap design allows for natural expansion and contraction without buckling your ceiling.

The Expert Analogy: Think of shiplap like the scales on a fish or shingles on a roof. They overlap to create a continuous shield, allowing for movement while maintaining a tight, visual seal.

Preparation: The Phase Where 90% of Failures Happen

In my experience, the difference between a “Pro” finish and a “DIY Disaster” is about two hours of prep work. If you skip these steps, you’ll be fighting gravity the entire time.

1. Finding the Joists (The “Anchor” Step)

You cannot simply nail shiplap into drywall. Drywall is compressed chalk; it won’t hold the weight of a 12-foot board. You must use a stud finder to locate the ceiling joists.

  • Marking: Snap a chalk line across the entire ceiling where each joist runs.

  • Verification: Drive a small finish nail to ensure you’ve actually hit wood, not just a thick patch of mud.

2. Acclimation: The Hidden Requirement

I once saw a DIYer install shiplap straight from the hardware store’s humid warehouse into a bone-dry, air-conditioned living room. Three weeks later, the boards shrunk so much the gaps looked like canyons.

Pro Tip: Bring your wood into the room where it will be installed. Let it sit for at least 48 to 72 hours. This allows the moisture content of the wood to equalize with your home’s environment.

The DIY Design Framework: A Step-by-Step Execution

Step 1: Layout and Direction

Generally, you want to run your boards perpendicular to the ceiling joists. This ensures you can nail into every single joist for maximum security. If you want the boards to run parallel, you will need to install furring strips (1×3 wood strips) first to provide a nailing surface.

Step 2: The First Board is Everything

Your walls are likely not square. Houses settle and shift. If your first board is crooked, every subsequent board will amplify that error.

  • Measurement: Measure from the wall at several points.

  • The Gap: Leave a small 1/4-inch gap at the edges for expansion; this will be covered by crown molding or trim later.

Step 3: Fastening and Adhesive

For a Shiplap Ceiling DIY, “Nails only” is a risky game. I always recommend a “Belt and Suspenders” approach:

  1. Construction Adhesive: Apply a bead of high-quality adhesive (like Liquid Nails) to the back of the board.

  2. 16-Gauge Finish Nails: Use a pneumatic nail gun to drive nails at an angle through the “face” of the board directly into the joists.

Essential Materials and LSI Keyword Checklist

To pull this off like a contractor, you need the right kit. Don’t try to do this with a hammer and a hand saw unless you want to spend three weeks on a ladder.

  • Miter Saw: For clean, 90-degree cross-cuts.

  • Pneumatic Brad Nailer: To keep the boards in place while the glue dries.

  • Jigsaw: To cut holes for recessed lighting, junction boxes, and HVAC vents.

  • Wood Filler: For hiding nail holes before the final paint pass.

  • Caulk: For the perimeter where the shiplap meets the walls.

Technical Challenges: Lighting and Vents

The most intimidating part for intermediates is dealing with the “obstructions.”

Working Around Recessed Lights

When you hit a pot light, don’t guess.

  1. Hold the board up to the light.

  2. Trace the diameter of the light housing onto the board.

  3. Use a hole saw or jigsaw to cut the circle.

  4. Important: You may need “goof rings” (trim extenders) because your ceiling is now roughly 1/2-inch to 3/4-inch thicker than it was before.

Expert Advice: The “Puckering” Warning

Peringatan Tersembunyi (Hidden Warning): Many people buy “MDF Shiplap” because it’s cheaper and perfectly straight. However, if you are installing this in a bathroom or kitchen, avoid MDF like the plague. MDF acts like a sponge for steam. It will swell, pucker at the seams, and eventually the paint will peel. For high-moisture areas, always use PVC shiplap or solid cedar.

Finishing Touches: To Paint or To Stain?

A Shiplap Ceiling DIY gives you two distinct vibes:

  • White/Light Gray Paint: Creates a coastal, “Farmhouse” or modern airy feel. It makes the room feel taller.

  • Natural Wood Stain: Offers a rustic, lodge, or mid-century modern aesthetic. It makes a room feel “cozy” but can make low ceilings feel even lower.

Expert Insight: If you’re painting, prime the “tongue” or the overlap before you put the boards up. If the wood shrinks later, you won’t see a stripe of raw, unpainted wood peeking through your nickel gaps.

Adding a shiplap ceiling is one of those rare projects that requires more patience than raw muscle. It’s a rhythmic, satisfying process that transforms a room from “standard builder grade” to “architectural custom” in a single weekend.

By following this framework—prioritizing joist location, allowing for wood acclimation, and using the glue-and-nail method—you’ll create a feature that doesn’t just look good on Instagram, but actually adds tangible value to your home’s appraisal.

Preserving High-Value Assets: Industrial Surface Protection with the Canvas Drop Cloth

Source:https://renegadeplastics.com

I still remember my first “big” solo contract back in 2014. It was a historic brownstone restoration with original 19th-century oak floors. I made the amateur mistake of using those cheap, thin plastic liners you find at the dollar store.

Ten minutes into the job, a dropped screwdriver pierced the plastic like butter, and a spilled gallon of “Navajo White” seeped through a seam I thought I’d taped shut. That $5 saving on plastic cost me $1,200 in floor refinishing.

That was the day I officially became a Canvas Drop Cloth convert. After a decade in the trenches of home improvement, I’ve realized that while flashy power tools get the glory, your surface protection is what actually saves your reputation—and your wallet.


Why Professional Contractors Swear by Heavy-Duty Canvas

If you walk onto a professional job site, you won’t see much plastic on the floor. You’ll see sea of heavy, off-white fabric. Think of a canvas drop cloth as the “armored vest” for your home’s surfaces.

Unlike plastic, which acts as a non-porous slide-and-slide, canvas is a tightly woven cotton duck fabric. It’s designed to absorb. When paint hits canvas, it stays there. When paint hits plastic, it remains liquid, waiting for you to step in it and track “artistic footprints” all over the client’s expensive Berber carpet.

The Physics of Protection: Weight and Weave

In the world of textiles, we talk about “ounces.” You’ll generally find drop cloths in three flavors:

  • 6 oz (Lightweight): Good for covering furniture from dust, but useless for spills.

  • 8 oz (Medium Duty): The “weekend warrior” special. Decent, but thin.

  • 10 oz to 12 oz (Heavy Duty): This is the gold standard.

A 12 oz canvas drop cloth is thick enough to blunt the impact of a falling hammer and dense enough to hold a significant paint spill without letting it “bleed” through to the substrate below.


The Hidden Costs of “Cheap” Protection

Beginners often view drop cloths as a disposable expense. I view them as an investment asset.

Plastic vs. Canvas: The Great Debate

  • Durability: Plastic tears if you look at it wrong. A high-quality canvas cloth can last 20 years. I still have the first set of 12x15s I bought after that brownstone disaster.

  • Safety: Plastic is a literal deathtrap on stairs. Canvas has a natural “tooth” or friction. It grips the floor and provides a stable surface for your ladder feet.

  • Eco-Friendliness: We’re all trying to reduce waste. Every time you use plastic, it ends up in a landfill. Canvas is washable, reusable, and eventually biodegradable.

Analogy: Using plastic is like wearing a disposable poncho in a hurricane. Sure, you might stay dry for a second, but it’s going to rip and flap around. Canvas is like a high-end Gore-Tex jacket—it’s breathable, rugged, and built to handle the elements.


Mastery Level: Choosing the Right Canvas for the Task

Not all canvas is created equal. When you’re shopping, you need to look at the selvage (the edges) and the seams.

1. The “Buttend” Seam vs. The Double-Stitched Edge

Cheap cloths have raw edges that fray in the washing machine. Look for double-stitched hems. If the edges are fraying, those little threads will find their way into your wet paint finish. Trust me, picking lint out of a fresh coat of semi-gloss is a special kind of purgatory.

2. Sizing Your Success

Don’t just buy a “large” one.

  • Runners (4’ x 12’): These are essential for hallways and protecting “traffic lanes.”

  • Room Covers (12’ x 15’): Perfect for standard bedrooms.

  • The “Rounder”: Harder to find, but great for working under chandeliers or circular tables.


Pro Tips: The Secret Sauce of Surface Maintenance

After 10 years, I’ve developed a few “Golden Rules” for managing your canvas inventory:

  • The “V” Fold: Never just crumple your cloth into a ball. Fold it into a manageable rectangle. This prevents “dust explosions” the next time you whip it out in a clean house.

  • Wash, Don’t Dry: You can wash canvas drop cloths in an industrial machine, but never put them in a high-heat dryer. They will shrink significantly, and the heat can make the fibers brittle.

  • The Rubberized Hack: If you’re working on polished marble or hardwood, look for butyl-backed canvas. It features a thin layer of rubber on the bottom to ensure 100% leak-proof protection and zero slippage.

⚠️ Hidden Warning: The “Wick” Effect

While canvas is absorbent, it is not infinite. If you spill a half-gallon of paint in one spot, move the cloth immediately. If left to sit, the liquid will eventually “wick” through the fibers via capillary action. Canvas buys you time to react; it doesn’t grant you immunity from physics.


Beyond Painting: Creative Uses for Your Canvas

Industrial surface protection isn’t just about paint. In my experience, these cloths are the Swiss Army Knives of home improvement:

  1. Mechanical Buffer: Laying them over a kitchen island when installing a heavy range hood or microwave.

  2. Winter Buffer: Keeping them in the truck to lay down over muddy entryways during rainy-season consultations.

  3. Furniture Shield: During a full-scale demolition, a heavy canvas drape is better than any tarp for stopping flying drywall dust.


The Technical Specs: What to Look for on the Label

When you are at the supply store, don’t just grab the cheapest bag. Check these technical markers:

Feature Beginner Standard Pro Grade
Material Cotton Blend 100% Cotton Duck
Weight 6 oz – 8 oz 10 oz – 12 oz
Stitching Single Overlock Double-Stitched / Reinforced
Absorbency Low (Beads up) High (Soaks in)

Conclusion: Don’t Skimp on the Foundation

In the world of home improvement, the “boring” stuff is usually the most important. A high-quality canvas drop cloth is the foundation of a clean, professional, and stress-free project. It says to your clients—and to yourself—that you value the assets you’re working around as much as the work you’re performing.

Stop buying the plastic rolls. Stop hoping that old bedsheet will stop a lacquer spill. Invest in a set of heavy-duty canvas, and you’ll find that your projects feel more organized, your cleanup is faster, and your floors remain pristine.

What’s your biggest “oops” moment when a surface wasn’t protected? Share your horror stories in the comments below—let’s learn from each other’s stains!