Granite Tile Countertops for Durable Elegance

Source:https://i0.wp.com

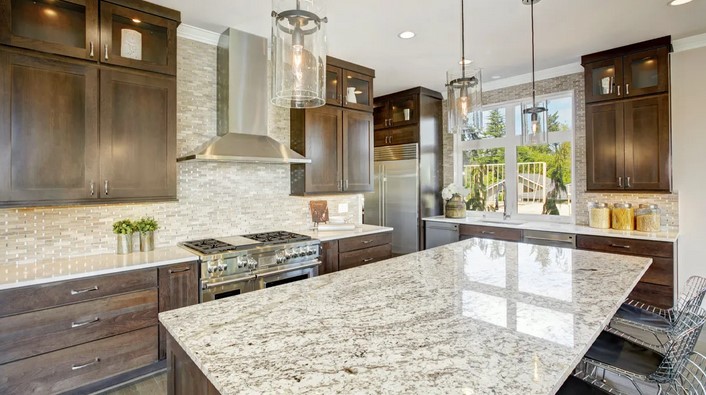
When it comes to designing a kitchen or bathroom, countertops are one of the most important elements of both functionality and aesthetics. They need to be durable enough to withstand daily use while maintaining an elegant and polished appearance. Among the many countertop options available, granite tile countertops for durable elegance have risen to the top as one of the most popular choices for homeowners looking for the perfect combination of beauty, durability, and value. Granite tiles offer the luxurious appeal of natural stone, combined with the versatility and practical benefits of tile installation. This article will explore why granite tile countertops are an excellent choice for your home, the benefits they provide, and how to care for them to ensure they remain as stunning as the day they were installed.

1. Why Choose Granite Tile Countertops?

Granite is one of the most coveted materials in home design, largely due to its natural beauty and strength. While granite slab countertops have been the traditional choice for many years, granite tile countertops are gaining in popularity for a variety of reasons. These countertops are made by arranging granite tiles—cut from the same natural stone used in slabs—into a cohesive surface. The result is a countertop that combines the elegance of granite with the affordability and ease of installation offered by tile.

Granite tiles are available in a wide range of colors, textures, and finishes, allowing homeowners to choose an option that suits their personal style and the overall aesthetic of their kitchen or bathroom. The natural variations in granite ensure that each tile is unique, adding an individualistic touch to your space.

Subheading: Advantages of Granite Tile Countertops

There are several reasons why granite tile countertops are considered a great choice for both kitchens and bathrooms:

  • Durability: Granite is a dense, hard stone that is resistant to scratches, heat, and stains. When installed correctly, granite tiles offer excellent durability, making them ideal for high-traffic areas like kitchens. They can handle hot pots and pans, knives, and other kitchen tools without showing signs of wear.
  • Affordability: While granite slab countertops can be quite expensive, granite tile countertops are often more budget-friendly. The tiles themselves are typically less expensive than a full slab, and the cost of installation can be more affordable, especially if you’re opting for a DIY approach.
  • Easy Maintenance: Granite tiles are easy to clean and maintain. They are resistant to stains, bacteria, and water damage, making them a hygienic choice for kitchen countertops. With a quick wipe-down, your granite tile countertops can look as good as new.
  • Aesthetic Appeal: The natural veining, speckles, and patterns found in granite tiles give each countertop a one-of-a-kind appearance. The variety of colors, from light grays and whites to deep reds and blacks, means you can find a tile that fits perfectly with the color scheme and style of your kitchen or bathroom.
  • Versatility: Granite tile countertops can be used in a wide variety of designs, from modern and sleek to rustic and traditional. The tiles can be laid in different patterns, such as straight, diagonal, or herringbone, allowing you to customize the design to match your personal taste.

2. How to Install Granite Tile Countertops

While granite tile countertops offer a more affordable alternative to granite slabs, the installation process requires precision and careful planning to achieve the desired look and functionality. If you’re considering installing granite tile countertops, it’s important to understand the basic steps involved in the process.

Subheading: Installation Process and Tips

  • Preparation: Before installing granite tiles, it’s crucial to prepare the surface. Your base should be clean, dry, and level. Typically, granite tiles are installed on a plywood or cement board substrate, which provides a strong foundation for the tiles.
  • Tile Cutting: Granite tiles may need to be cut to fit around edges, corners, and sinks. A wet saw with a diamond blade is the best tool for cutting granite tiles, as it ensures clean cuts without damaging the stone.
  • Adhesive Application: Use a strong adhesive, like thin-set mortar, to bond the tiles to the substrate. Apply the adhesive evenly across the surface using a notched trowel, making sure to cover the entire area where the tiles will be placed.
  • Laying the Tiles: Start by placing the granite tiles along the center of the countertop and work your way outward. Leave small gaps between the tiles for grout. You can adjust the positioning as needed, but it’s important to ensure that the tiles are aligned and level as you go.
  • Grouting: After all the tiles are laid and the adhesive has dried, apply grout between the tiles to fill in the gaps. Be sure to choose a grout color that complements your granite tiles. Clean off any excess grout with a damp sponge before it hardens.
  • Sealing: Although granite is naturally resistant to stains, it’s still a good idea to apply a granite sealant after installation. Sealing your countertops helps to further protect them from stains and moisture, ensuring their longevity.

While DIY installation is possible, it’s important to note that granite tile installation requires a certain level of skill, especially when it comes to cutting the tiles and achieving a seamless finish. If you’re not comfortable with the process, it’s best to hire a professional installer to ensure the job is done correctly.

3. Caring for Your Granite Tile Countertops

Granite tile countertops are relatively low maintenance, but proper care is necessary to keep them looking their best for years to come. With a few simple maintenance tasks, you can maintain the durability and beauty of your granite tile countertops.

Subheading: Regular Cleaning and Maintenance Tips

  • Daily Cleaning: To keep your granite tile countertops looking pristine, wipe them down daily with a soft cloth and a gentle, non-abrasive cleaner. Avoid harsh chemicals that could damage the stone. A mixture of mild dish soap and water is usually sufficient for cleaning.
  • Spill Management: While granite is resistant to most stains, it’s important to wipe up spills, especially acidic substances like lemon juice, vinegar, or wine, as soon as possible. These can etch the surface of the granite and cause discoloration.
  • Periodic Sealing: As mentioned earlier, sealing your granite tiles can help protect them from stains and moisture. Depending on the type of granite and the amount of use your countertops receive, you may need to reseal them every 1 to 2 years.
  • Avoid Abrasive Scrubbing: To prevent scratching, avoid using abrasive scrubbers or harsh cleaning tools. Use a soft cloth or sponge for cleaning, and be careful when handling sharp objects like knives to prevent damage.
  • Heat Protection: While granite can handle heat better than many other materials, it’s still a good idea to use trivets or hot pads to protect the surface from extreme temperatures, especially if you are placing a hot pan directly on the countertop.

In conclusion, granite tile countertops for durable elegance provide a stunning and practical option for homeowners seeking both beauty and functionality in their kitchen or bathroom. The natural resilience of granite, combined with the affordability and flexibility of tile installation, makes granite tile countertops a valuable choice for any home. By choosing the right materials, following proper installation techniques, and performing regular maintenance, you can enjoy the lasting beauty and strength of granite tile countertops for many years to come. Whether you are remodeling your kitchen or installing new counters in a bathroom, granite tile offers an elegant, timeless solution that adds value to your home.

Water-Saving Bathroom Fixtures for a Greener Home

Source:https://watersino.net

As environmental concerns continue to rise and water conservation becomes increasingly important, homeowners are exploring various ways to reduce their water usage. One area of the home where significant water savings can be achieved is the bathroom. By upgrading to water-saving bathroom fixtures, you can contribute to both a greener environment and lower utility bills. These fixtures are designed to use less water without compromising performance, making them an ideal choice for eco-conscious homeowners. In this article, we will explore the benefits of water-saving bathroom fixtures, the various options available, and how you can transform your bathroom into an eco-friendly sanctuary.

1. The Benefits of Water-Saving Bathroom Fixtures

Choosing water-saving bathroom fixtures can have a significant impact on your home’s overall water usage. While the immediate benefits are related to conservation, the long-term advantages include financial savings, environmental contributions, and enhanced home efficiency. Here are some key benefits:

Lower Water Bills

One of the most immediate and noticeable advantages of installing water-saving fixtures is a reduction in your water bills. Bathrooms typically account for a large portion of a home’s water usage, especially when considering fixtures like showers, toilets, and faucets. By upgrading to water-efficient versions, you can reduce consumption by a significant margin. For instance, a standard toilet uses about 3.5 to 5 gallons of water per flush, while newer water-saving models use only 1.28 gallons per flush or less. Over time, these savings can really add up, helping to offset the cost of the upgrades.

Environmental Impact

Water is a finite resource, and using it wisely is crucial for preserving the environment. By installing water-saving bathroom fixtures, you play an active role in reducing water waste and contributing to the global effort to conserve resources. According to the U.S. Environmental Protection Agency (EPA), the average family can save more than 13,000 gallons of water per year just by switching to water-efficient appliances in the bathroom. This reduction in water consumption helps lessen the strain on local water supplies, reduces energy consumption for water treatment, and minimizes the energy required to pump, filter, and transport water.

Improved Home Efficiency

Upgrading to water-saving fixtures also makes your home more efficient overall. Low-flow fixtures use advanced technology that provides the same performance as traditional fixtures while consuming less water. This means that you get the best of both worlds—improved efficiency without sacrificing the comfort and convenience you’re accustomed to. Whether it’s a low-flow showerhead or a high-efficiency toilet, these fixtures are designed to work efficiently, making them ideal for homes looking to increase overall performance while decreasing resource usage.

2. Types of Water-Saving Bathroom Fixtures

There are several types of water-saving bathroom fixtures available, each designed to target specific areas of water consumption. Here are some of the most popular options:

Low-Flow Toilets

Traditional toilets use large amounts of water with every flush, which can add up to hundreds of gallons of water per month. Low-flow toilets are designed to reduce the amount of water used per flush without sacrificing performance. The latest models use just 1.28 gallons of water per flush, compared to the older models that use 3.5 to 5 gallons. This simple upgrade can lead to substantial savings on both water and sewer bills.

Many modern low-flow toilets also feature powerful flushing mechanisms, so you don’t need to worry about repeated flushing or poor performance. Some advanced models even come with dual flush options, allowing you to choose between a half-flush and full flush depending on the waste being disposed of.

Water-Efficient Showerheads

The average showerhead uses about 2.5 gallons of water per minute, which can add up quickly if you enjoy long, hot showers. Water-efficient showerheads reduce water consumption by limiting the flow rate, typically to around 1.8 gallons per minute or less. These showerheads use air injection technology or other innovative designs to maintain water pressure while using less water.

Despite using less water, many water-efficient showerheads offer excellent performance, with features such as adjustable spray settings and built-in water pressure boosters. This means you can enjoy a comfortable shower experience while saving water.

Low-Flow Faucets

Bathroom faucets are another area where water-saving features can make a big difference. Traditional faucets use about 2.2 gallons of water per minute, but low-flow faucets can cut that down to 1.5 gallons per minute or less. In addition to reducing water waste, low-flow faucets often come with aerators that mix air into the water stream, making the flow feel more powerful while using less water.

These faucets are available in a variety of designs and finishes to complement your bathroom’s décor, so you don’t have to sacrifice style for sustainability. Whether you’re installing them in the bathroom sink or the vanity area, these faucets can significantly reduce your water usage.

Water-Saving Bathtubs

While bathtubs are not used daily by most people, they can still be a significant source of water consumption when filled to capacity. Water-saving bathtubs are designed with water-efficient features such as smaller depths and better insulation, which reduces the amount of water needed for a comfortable soak. Some bathtubs are also designed with water-recirculation systems, which filter and reuse the water for multiple fills, making them even more efficient.

While these bathtubs may not be ideal for large family households, they can be a good choice for individuals or couples who love to relax in a bath but want to conserve water.

3. Tips for Maximizing Water Conservation in Your Bathroom

In addition to installing water-saving bathroom fixtures, there are other strategies you can employ to further reduce your water usage. Here are some practical tips for maximizing water conservation in your bathroom:

Take Shorter Showers

One of the most effective ways to reduce water consumption is by shortening the length of your showers. By cutting down on your shower time by just a few minutes, you can significantly lower the amount of water you use. Using a water-efficient showerhead can further enhance this effort by limiting the flow rate while maintaining water pressure.

Turn Off the Tap When Brushing Teeth

It’s a small habit that can make a big difference over time. Many people leave the faucet running while brushing their teeth, which wastes gallons of water. Instead, turn off the tap while brushing and only turn it on when you need to rinse.

Fix Leaky Faucets and Toilets

A leaky faucet or toilet can waste hundreds of gallons of water each month. If you notice any leaks in your bathroom, make sure to fix them promptly. Repairing or replacing faulty faucets, pipes, or toilet components can prevent water waste and improve overall water efficiency.

Install a Smart Water Meter

Some modern water-saving systems are equipped with smart technology that allows you to monitor your water usage. Smart water meters can track how much water you’re using, notify you about potential leaks, and provide insights into your daily water consumption. This real-time feedback can help you make adjustments to your habits and further reduce water waste.

Incorporating water-saving bathroom fixtures into your home is a simple and effective way to reduce water consumption, save money, and contribute to a greener environment. Whether you choose low-flow toilets, water-efficient showerheads, or faucet aerators, each upgrade helps to minimize waste while enhancing the performance of your bathroom. With the added benefits of reduced water bills and a smaller environmental footprint, water-saving fixtures are a smart investment for any homeowner looking to improve their sustainability. By taking small, conscious steps towards water conservation, you can enjoy a more eco-friendly home while still maintaining comfort and convenience.

LED Kitchen Lighting for Efficient Illumination

Source:https://cdn.decoist.com

The kitchen is the heart of every home, where meals are prepared, and family and friends often gather. To create a comfortable, functional, and visually appealing space, lighting plays a critical role. Among the various lighting options available, LED kitchen lighting for efficient illumination has become the top choice for many homeowners. Not only does LED lighting offer energy-efficient solutions, but it also provides versatile options to enhance both the ambiance and functionality of your kitchen. In this article, we will explore why LED lighting is ideal for kitchens, discuss different types of LED lighting options, and offer tips on how to maximize the potential of LED lights in your kitchen space.

1. Why LED Kitchen Lighting is Essential

LED kitchen lighting has become the standard choice for modern homes due to its remarkable efficiency, longevity, and versatility. Unlike traditional incandescent or fluorescent lights, LED bulbs consume less energy, produce less heat, and last much longer. When it comes to kitchens, where different tasks such as chopping, cooking, and cleaning require adequate lighting, LED lights offer a practical and sustainable solution.

Subheading: Energy Efficiency and Longevity

One of the key benefits of LED kitchen lighting for efficient illumination is its energy efficiency. LED bulbs use up to 75% less energy compared to traditional incandescent bulbs, which translates to lower electricity bills and a reduced environmental footprint. With the average lifespan of an LED bulb being up to 25,000 hours or more, these lights last significantly longer than halogen or fluorescent lights, reducing the need for frequent replacements. This long lifespan also makes LED lighting a cost-effective option over time.

Additionally, because LED lights produce very little heat compared to incandescent or halogen bulbs, they contribute to a cooler kitchen environment. This is particularly important in the kitchen, where high temperatures from ovens and stoves can make it uncomfortable. LED lights not only save energy but also keep the overall temperature of your kitchen more stable.

2. Types of LED Kitchen Lighting

LED lighting offers a wide range of options to suit various needs and aesthetics in the kitchen. Whether you’re lighting up a workspace, highlighting architectural features, or setting the mood for a cozy dinner, there’s an LED solution that fits your requirements. Here are some of the most popular types of LED lighting suitable for the kitchen:

Subheading: Task, Ambient, and Accent Lighting

  • Task Lighting: Task lighting is crucial in the kitchen, especially in areas where precision is needed, such as food preparation zones, countertops, and workspaces. Under-cabinet LED lights are a popular choice for task lighting, as they direct light onto your work surface without causing glare. They are often installed beneath upper cabinets to illuminate the countertop, making chopping, mixing, and cooking more efficient. LED strip lights are also widely used for task lighting, providing continuous, even illumination.
  • Ambient Lighting: Ambient lighting provides the general illumination needed to light up the entire kitchen. For a bright, evenly lit space, recessed LED downlights are an excellent option. These lights are installed in the ceiling and provide even, non-distracting illumination. LED ceiling lights with dimming options are another great way to create adjustable ambient lighting that can be tailored to different tasks or times of day.
  • Accent Lighting: Accent lighting adds a decorative touch to the kitchen and highlights certain features like a beautiful backsplash, under-shelf storage, or cabinetry. LED strip lights or LED puck lights can be placed in hidden corners to add drama and dimension to the space. You can also use LED track lights to highlight key areas like artwork, open shelving, or plants. Accent lighting helps create mood and interest within the kitchen while complementing the overall design.

3. Maximizing the Benefits of LED Kitchen Lighting

To fully capitalize on the advantages of LED kitchen lighting for efficient illumination, it’s essential to design a lighting scheme that complements both the functional and aesthetic aspects of your kitchen. A well-planned lighting design can make your kitchen brighter, safer, and more enjoyable to work in. Here are some tips for maximizing LED lighting in your kitchen:

Subheading: Layered Lighting Approach

A layered lighting approach is the key to creating a functional and visually appealing kitchen lighting scheme. Instead of relying on one single source of light, combine task, ambient, and accent lighting to create a harmonious and well-lit environment. By using a combination of lighting types, you can ensure that your kitchen is adequately illuminated while also adding depth and interest.

For instance, you can combine under-cabinet LED lights (task lighting) with recessed ceiling lights (ambient lighting) and LED spotlights (accent lighting) to create a balanced and inviting atmosphere. The layered approach allows you to adjust the light levels according to the time of day or the type of activity you’re engaged in.

Subheading: Choosing the Right Color Temperature

The color temperature of your LED lights plays a vital role in setting the mood and functionality of your kitchen. LED lights come in a variety of color temperatures, typically ranging from warm white (2700K) to cool white (5000K). The color temperature you choose will depend on the atmosphere you want to create.

  • Warm White (2700K to 3000K): Ideal for creating a cozy and relaxed atmosphere. This temperature is perfect for accent lighting or dining areas where you want a warm, inviting ambiance.
  • Neutral White (3500K to 4000K): This is the most versatile color temperature and is well-suited for general kitchen lighting. It provides a balanced and natural light that is neither too warm nor too cool, making it ideal for both task and ambient lighting.
  • Cool White (5000K to 6500K): Cool white light mimics daylight and is perfect for task lighting. It provides bright, clear illumination, making it ideal for work areas like countertops, sinks, and cooking zones.

Subheading: Dimming and Control Options

One of the most attractive features of LED kitchen lighting is the ability to control light levels easily. Many LED lights now come with dimming capabilities, allowing you to adjust the light intensity based on your needs. For instance, you may want bright, focused light while cooking, but prefer a softer glow when entertaining guests or having a meal.

Smart LED lighting systems also offer advanced control options, such as voice control through smart speakers or remote control via mobile apps. This level of flexibility makes LED kitchen lighting highly adaptable, giving you complete control over the lighting environment.

In conclusion, LED kitchen lighting for efficient illumination provides the perfect blend of energy efficiency, durability, and aesthetic appeal, making it the ideal choice for modern kitchens. By incorporating a variety of LED lighting options, such as task, ambient, and accent lighting, you can create a kitchen that is not only functional but also visually dynamic. Whether you’re looking to reduce energy costs, enhance your cooking experience, or simply improve the look of your kitchen, LED lights offer a versatile and sustainable solution for every home.

Home Insulation Solutions for Maximum Comfort

Source:https://cdn.prod.website-files.com

Achieving the perfect balance of warmth in winter and coolness in summer is a goal that every homeowner strives for. However, without proper insulation, maintaining a comfortable indoor temperature can become an expensive and challenging endeavor. Home insulation solutions play a crucial role in regulating temperature, reducing energy consumption, and improving overall home comfort. By investing in the right insulation methods, homeowners can create more energy-efficient spaces while also contributing to environmental sustainability. In this article, we will explore various home insulation solutions for maximum comfort, offering practical options and expert advice to help you make informed decisions for your home.

1. Understanding the Importance of Home Insulation

Home insulation involves the process of filling the gaps in a home’s structure—walls, floors, ceilings, and even windows and doors—with materials that resist the flow of heat. Proper insulation helps maintain the desired temperature inside the home, preventing heat loss during winter and minimizing heat gain in summer. With effective insulation, your home becomes more energy-efficient, reducing the need for heating and cooling systems to work overtime, which can result in significant savings on energy bills.

Subheading: Benefits of Home Insulation

Insulation provides numerous benefits, making it an essential component of any home. Here are some key advantages:

  • Energy Efficiency: Proper insulation reduces the need for artificial heating and cooling, which can lead to lower energy consumption and reduced utility bills. By preventing heat from escaping or entering your home, insulation ensures that your HVAC systems are running efficiently.
  • Comfort: Insulation helps create a consistent and comfortable indoor climate. By preventing drafts and cold spots in winter and keeping rooms cooler in summer, insulation ensures that your home remains cozy year-round.
  • Noise Reduction: Insulation also helps to soundproof your home by absorbing sound waves. This is particularly beneficial if you live in a noisy neighborhood or if you want to keep noise levels low between rooms.
  • Environmental Impact: Insulating your home contributes to sustainability by reducing energy consumption and your carbon footprint. By using less energy for heating and cooling, you’re actively lowering your home’s overall environmental impact.

2. Types of Home Insulation Solutions

There are various types of insulation materials and methods available, each suited for specific parts of the home. The choice of insulation depends on factors like the climate in your area, the part of the house being insulated, and your budget. Here are some of the most common home insulation solutions:

Subheading: Common Insulation Materials and Techniques

  • Fiberglass Insulation: One of the most popular and cost-effective types of insulation, fiberglass is made of fine glass fibers and can be used in attics, walls, and floors. It’s available in batts, rolls, or loose-fill form. Fiberglass insulation offers great thermal resistance and helps to reduce both heat transfer and noise.
  • Spray Foam Insulation: Spray foam is a versatile and effective insulation material that expands when applied, filling every gap and crack. It provides excellent air sealing and can be used in difficult-to-reach areas, such as around pipes and in corners. There are two types of spray foam: open-cell and closed-cell, with closed-cell foam providing higher insulation values.
  • Cellulose Insulation: Made from recycled paper products, cellulose insulation is an eco-friendly choice. It’s often blown into attic spaces and wall cavities, offering a high level of thermal resistance and soundproofing. Cellulose is a good option for homes seeking a sustainable, energy-efficient solution.
  • Foam Board Insulation: Foam boards are rigid panels that are ideal for insulating basement walls, exterior walls, and foundations. Foam board insulation provides high thermal resistance and is water-resistant, making it suitable for areas that are prone to moisture.
  • Reflective or Radiant Barrier Insulation: This type of insulation is commonly used in attics to reflect radiant heat away from the home. Made from aluminum foil or similar materials, reflective barriers are especially beneficial in hot climates where cooling is a major concern.
  • Mineral Wool (Rock or Slag Wool): Mineral wool insulation is made from natural or recycled stone materials and is available in batts, rolls, or loose-fill form. It provides good thermal resistance and is fire-resistant, making it a great option for high-heat areas such as around fireplaces or chimneys.
  • Blown-in Insulation: This insulation is made up of loose-fill materials, such as fiberglass, cellulose, or mineral wool, which are blown into cavities in walls, attics, or floors using a special machine. It’s ideal for existing homes that need insulation added to hard-to-reach areas.

3. Choosing the Right Insulation for Your Home

Choosing the right home insulation solutions involves evaluating the specific needs of your space. Not all insulation materials are created equal, and what works for one home may not be suitable for another. Here are some factors to consider when selecting the right insulation for your property:

Subheading: Key Considerations for Choosing Insulation

  • R-Value: The R-value is a measure of an insulation material’s ability to resist heat flow. The higher the R-value, the better the material insulates. The recommended R-value for your home will depend on your climate zone, the part of the home being insulated, and your specific energy efficiency goals. Attics, for example, require a higher R-value than walls.
  • Climate Zone: If you live in a region with harsh winters, you’ll need insulation materials that provide high thermal resistance. On the other hand, if you live in a warmer climate, your insulation needs might focus more on reflecting heat and keeping your home cool.
  • Moisture Resistance: If you’re insulating areas that are prone to moisture, such as basements or crawl spaces, it’s important to choose materials that resist mold and mildew growth. Foam boards, spray foam, and mineral wool are great options for moisture-prone areas.
  • Installation Method: Some insulation materials, like fiberglass batts or foam boards, are easy to install and can be handled by DIY enthusiasts. However, others, such as spray foam or blown-in cellulose, may require professional installation for optimal performance.
  • Environmental Considerations: If sustainability is a priority for you, look for insulation materials that are made from recycled or natural products, such as cellulose, mineral wool, or spray foam with low environmental impact.

In conclusion, home insulation solutions for maximum comfort are a worthwhile investment that can significantly improve your home’s energy efficiency, comfort, and overall quality of life. By understanding the different types of insulation materials, their benefits, and how they can be applied to your home, you can make informed choices to ensure your space remains energy-efficient and comfortable throughout the year. Whether you choose fiberglass, spray foam, or cellulose, selecting the right insulation will help you enjoy a more sustainable and cost-effective living environment while enhancing your comfort and well-being.

Garden Privacy Screens for Secluded Spaces

Source:https://www.thespruce.com

In the hustle and bustle of modern life, a private and tranquil outdoor space can become an oasis of peace and relaxation. However, in many urban or suburban settings, achieving that sense of privacy can be challenging due to close neighbors, busy streets, or a lack of natural barriers. This is where garden privacy screens for secluded spaces come into play. These screens not only serve as functional dividers, but they also add to the aesthetic appeal of your garden. Whether you’re looking to block an unsightly view, create an intimate outdoor retreat, or simply add a touch of greenery, garden privacy screens are the perfect solution to transform your outdoor area into a serene sanctuary. In this article, we will explore various types of privacy screens, their benefits, and tips on how to incorporate them into your garden design.

1. What Are Garden Privacy Screens?

Garden privacy screens are structures designed to block visibility and provide seclusion within an outdoor space. These screens can be made from a wide range of materials, such as wood, metal, bamboo, fabric, or living plants. The key function of a privacy screen is to protect your space from prying eyes while enhancing the overall atmosphere of your garden or patio. While traditional fences are often used for privacy, garden privacy screens are more versatile, allowing you to create specific sections of your garden that are shielded from view.

Subheading: Different Materials for Garden Privacy Screens

There are various materials to choose from when designing garden privacy screens, each offering different benefits and aesthetic qualities:

  • Wooden Screens: One of the most popular options, wooden screens provide a natural and rustic look that blends well with most outdoor settings. You can choose from solid panels, lattice designs, or slatted wood screens, depending on the level of visibility you want to maintain.
  • Metal Screens: For a more modern, industrial look, metal screens are a durable and stylish option. Perforated or laser-cut metal screens can create intricate patterns and allow for partial visibility, adding a contemporary touch to your garden.
  • Bamboo Screens: Bamboo is an eco-friendly and lightweight material that provides a natural and tropical feel to your garden. Bamboo screens are often used in Asian-inspired designs but can work well in any garden setting.
  • Fabric Screens: If you want a temporary or movable option, fabric screens can be hung between posts or pergolas. These screens come in a variety of colors and patterns, allowing you to easily change the look of your garden space.
  • Living Plant Screens: For a truly natural and dynamic privacy solution, living plant screens—such as hedges, vines, or climbing plants—offer the benefits of greenery while providing the seclusion you need. They grow over time and provide both visual and acoustic privacy.

2. Benefits of Garden Privacy Screens

Garden privacy screens offer a wide range of advantages, beyond just providing seclusion. They can improve the functionality and overall ambiance of your outdoor space in several ways.

Subheading: Enhancing Privacy and Security

The primary reason people install privacy screens in their gardens is to create a secluded area where they can relax without being exposed to the view of neighbors, passersby, or busy streets. Garden privacy screens can help block out unwanted attention and make your outdoor space feel more personal. Whether you’re lounging on a patio, dining outside, or enjoying a peaceful moment in your garden, privacy screens create a comfortable and secure environment.

For homes located in densely populated areas or on busy streets, garden privacy screens can be a simple yet effective solution to protect your family and guests from prying eyes, allowing you to feel safe and secure in your outdoor haven.

Subheading: Adding Aesthetic Value

In addition to their functional benefits, garden privacy screens also contribute to the visual appeal of your garden. A well-chosen privacy screen can serve as a focal point in your garden design, drawing attention and creating a sense of structure. For example, a beautifully designed metal or wooden screen can frame a seating area or create a border between different zones within your garden.

Furthermore, if you opt for living plant screens, they can add natural beauty, vibrancy, and texture to your outdoor space. Climbing plants, such as ivy, jasmine, or roses, can create a lush green wall, while flower-covered screens can add seasonal color and fragrance to your garden.

Subheading: Weather and Noise Protection

Garden privacy screens can also provide protection from the elements. For example, a fabric or solid wooden screen can act as a windbreak, shielding your garden from harsh winds and creating a more comfortable environment for outdoor activities. In addition, privacy screens can reduce the impact of noise pollution, especially if you live near a busy street or neighborhood. Plants like bamboo are particularly effective at dampening noise, providing a peaceful atmosphere in your garden.

3. How to Design and Install Garden Privacy Screens

Designing and installing garden privacy screens requires careful planning to ensure they complement the existing design of your garden and meet your privacy needs.

Subheading: Choosing the Right Location

When deciding where to place your privacy screen, consider the areas in your garden that require the most seclusion. If you want to create a secluded dining area, place the screen around the patio or seating area. For a more intimate retreat, consider positioning the screen near a hammock or lounge area.

Additionally, think about how the screen will interact with the rest of your garden design. Will it complement other elements, such as plants, furniture, or pathways? It’s essential to create a balance between privacy and aesthetic appeal, so consider the overall flow of your garden when positioning the screen.

Subheading: Measuring and Planning for Installation

Once you’ve chosen the location and material for your privacy screen, it’s time to measure the area to ensure that the screen fits properly. Take into account the height and width of the screen to ensure it provides the level of privacy you want. If you’re using living plants, be mindful of their growth patterns and make sure they’ll be able to fill the space adequately over time.

For installation, if you’re opting for a solid screen, such as wood or metal, you may need to dig post holes, secure the structure in place, and anchor it to the ground. For living plant screens, consider the type of plants you’ll be using and whether they need additional support structures, like trellises or fences, to grow effectively.

In conclusion, garden privacy screens for secluded spaces are an excellent solution for homeowners looking to enhance the privacy, security, and aesthetics of their outdoor areas. Whether you opt for traditional materials like wood and metal or choose a more natural approach with living plant screens, these versatile dividers can transform your garden into a peaceful, private retreat. By selecting the right materials, positioning the screens strategically, and incorporating them into your overall design, you can create an outdoor oasis that offers both beauty and seclusion.