Rustic Ceiling Beams: Add Charm and Character to Your Home’s Interior

Source:https://www.prisminteriors.ca

When it comes to creating a unique and inviting atmosphere in your home, the details matter. One feature that adds an undeniable touch of warmth, history, and charm to a space is rustic ceiling beams. These architectural elements not only enhance the aesthetic of your interior but also serve as a focal point that ties together the overall design of a room. Whether your home is traditional, contemporary, or rustic, integrating exposed wooden beams into your ceiling can transform a mundane space into a welcoming, sophisticated environment. In this article, we will explore the various ways rustic ceiling beams can elevate your home, the different types available, and tips for incorporating them into your interior design.

1. The Timeless Appeal of Rustic Ceiling Beams

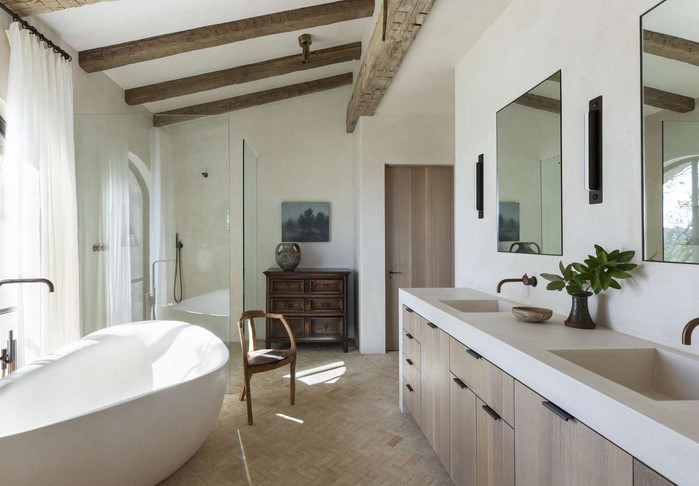
Rustic ceiling beams are more than just functional structural elements; they are a timeless design feature that adds character, texture, and an organic feel to a room. For centuries, exposed beams have been a staple in architecture, particularly in cottages, barns, and homes with a farmhouse or industrial style. Today, these beams are making a major comeback, especially in homes that emphasize natural materials, open spaces, and earthy tones.

Bringing Nature Indoors

The allure of rustic ceiling beams lies in their ability to bring the outdoors inside. Wood, with its rich textures, grain patterns, and natural imperfections, evokes a sense of connection to nature and the natural world. This is particularly effective in modern homes where minimalist or sleek design might otherwise dominate the space. Incorporating rustic beams into your home allows you to soften the edges of contemporary architecture and introduce a natural, grounding element that promotes relaxation and coziness.

The materials used in rustic ceiling beams—whether reclaimed wood, oak, pine, or even weathered barn wood—each tell a story. Every piece of wood has its own unique history and character, whether it’s aged by decades of exposure to the elements or crafted from trees that have withstood years of growth. These unique textures and finishes ensure that no two beams are exactly alike, which enhances the charm and individuality of the space.

Focal Points and Architectural Impact

Another reason why rustic ceiling beams have remained a staple in home design is their ability to serve as a natural focal point. Exposed beams can draw the eye upward, enhancing the room’s height and giving it a sense of openness and grandeur. In large living areas, dining rooms, or open kitchens, rustic beams create an architectural framework that helps define the space and gives it a sense of warmth and permanence.

When designed properly, these beams also create a striking contrast with modern furnishings, allowing them to stand out without feeling out of place. Whether you choose beams that are dark and weathered or lighter, more contemporary finishes, they instantly provide visual interest and texture that can make a room feel more inviting and dynamic.

2. Types of Rustic Ceiling Beams

There are several types of rustic ceiling beams, each with its own style and finish, depending on the desired aesthetic. Whether you’re looking for a traditional, rugged look or a more refined, contemporary appearance, the right choice of beam can completely transform the character of your room.

1. Exposed Reclaimed Wood Beams

Reclaimed wood beams are perhaps the most popular choice for rustic interiors. These beams are often salvaged from old barns, factories, and homes, giving them a rich history and weathered charm that can’t be replicated with new wood. Reclaimed beams may have traces of paint, nail holes, or other imperfections, which enhance their rustic appeal. The patina created by years of exposure to the elements gives the wood a unique, timeworn appearance.

Reclaimed wood beams are ideal for creating a farmhouse or industrial-style interior. Their irregularities add authenticity to the design, making them perfect for a room where character and history are important elements.

2. Faux or Engineered Rustic Beams

If you’re looking for the look of rustic ceiling beams without the weight or cost of solid wood, faux or engineered beams might be the perfect solution. These beams are typically made from lightweight materials like polyurethane or a combination of wood and synthetic materials. They are then designed to look like reclaimed wood or hand-hewn beams.

Faux beams are ideal for homeowners who want to achieve the rustic look without the heavy lifting required for solid wood beams. Additionally, they are more affordable and easier to install, making them a popular choice for both small and large spaces. Faux beams can be painted or stained to match your décor, allowing you to customize them according to your needs.

3. Hand-Hewn Beams

For those who appreciate a more authentic, handcrafted aesthetic, hand-hewn beams offer a beautiful option. These beams are created by hand, using traditional tools such as axes or adzes to shape the wood. The result is a rough-hewn, textured surface that highlights the natural grain and imperfections of the wood.

Hand-hewn beams are typically more expensive due to the labor-intensive process, but they provide a level of craftsmanship and uniqueness that can’t be matched by machine-cut beams. If you’re aiming for a true rustic or farmhouse style, hand-hewn beams can create an incredible focal point in any room.

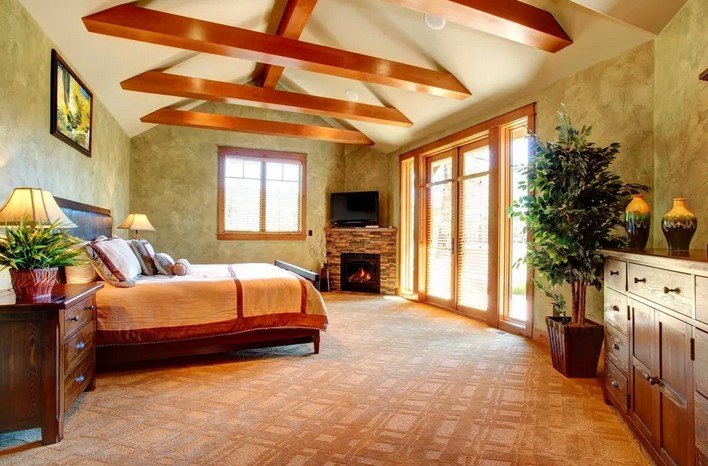
4. Wooden Beams with a Modern Twist

For a more contemporary approach, some homeowners choose wooden beams that are treated to give them a more refined, polished look. These beams might be lightly sanded or finished with a clear coat to enhance the natural color of the wood while still retaining its rustic charm. They may also be combined with metal accents, such as steel brackets or supports, to add an industrial flair to the space.

This type of rustic ceiling beam works well in modern interiors where you want to introduce natural elements but keep a more streamlined, sophisticated design. The blend of rustic wood with sleek, polished metal elements can add a modern twist to traditional wooden beams.

3. How to Incorporate Rustic Ceiling Beams into Your Home

Integrating rustic ceiling beams into your home requires careful consideration of the space, style, and overall design vision. Here are some tips to help you make the most of this striking architectural feature:

1. Consider the Room Size

Exposed beams work best in larger spaces where the ceiling height allows them to be fully appreciated. In rooms with lower ceilings, rustic beams can still add character, but it’s important to be mindful of the proportions. In these spaces, lighter beams or faux beams can help prevent the room from feeling too crowded.

In smaller rooms, consider using beams sparingly or placing them in strategic locations to highlight specific areas, such as above a kitchen island or over a seating area in the living room.

2. Pair Beams with Natural Materials

To enhance the rustic appeal of your ceiling beams, consider pairing them with other natural materials, such as stone, brick, or wood flooring. For instance, a stone fireplace paired with reclaimed wood beams creates a cozy, inviting atmosphere, perfect for living rooms or dens. Natural wood flooring also complements rustic beams, adding to the warmth and character of the space.

If you’re working with a more modern aesthetic, combining rustic beams with sleek, contemporary furniture or polished metal fixtures can create an interesting contrast, blending old-world charm with modern design elements.

3. Choose the Right Finish and Color

The finish and color of the beams will significantly impact the overall look of the room. Darker stains or painted beams can create a more dramatic, rustic look, while lighter wood tones can help keep the space feeling open and airy. If you’re unsure which finish works best, try out a few samples before committing to a final color.

For a more natural look, you can leave the wood unfinished, allowing its natural color and grain to shine through. On the other hand, if you’re looking to add warmth and richness, opt for a darker stain that enhances the wood’s natural beauty.

In conclusion, rustic ceiling beams are a stunning addition to any home, offering not only structural support but also unparalleled charm and character. Whether you choose reclaimed wood beams, faux beams, or hand-hewn pieces, these architectural features help create a cozy, welcoming environment that exudes warmth and timeless appeal. By carefully selecting the right type of beam, finish, and placement, you can transform your home’s interior into a beautifully layered space that tells a unique story. Whether your design preference leans toward the traditional or the contemporary, rustic ceiling beams provide a versatile solution to enhancing the aesthetic of your home, making it more inviting and full of personality.

Rustic Bathroom Vanities: Bring Warmth to Your Bathroom

Source:https://www.thespruce.com

When it comes to bathroom design, few elements create as much charm and warmth as rustic bathroom vanities. These timeless pieces combine natural materials, earthy tones, and vintage-inspired designs to bring a sense of comfort and coziness to your space. Whether you’re updating a small powder room or renovating a spacious master bath, incorporating rustic vanities into your bathroom can transform the overall ambiance into one of rustic elegance. In this article, we will explore the key features and benefits of rustic bathroom vanities, along with tips on how to incorporate them into various bathroom styles, making your space not only functional but also inviting.

1. The Charm of Rustic Bathroom Vanities

Rustic design is all about embracing the beauty of natural materials, raw textures, and earthy color palettes. It’s a style that invokes feelings of warmth and relaxation, often drawing inspiration from rural, farmhouse, or cabin aesthetics. When it comes to rustic bathroom vanities, the focus is on combining practicality with timeless charm.

Rustic bathroom vanities often feature distressed wood, reclaimed timber, and iron hardware, all of which contribute to the raw, organic feel of the vanity. These elements give your bathroom an earthy, cozy atmosphere that’s both stylish and comfortable. The rich textures and rustic appeal of these vanities stand in contrast to sleek, modern finishes, creating a sense of character and history.

Key Features of Rustic Bathroom Vanities:

  1. Natural Wood Finishes: The most defining feature of rustic bathroom vanities is the use of natural wood. Oak, pine, and reclaimed wood are common materials used for vanity construction. These materials are left in their natural state or are gently distressed to enhance the wood grain and create a timeworn look.
  2. Distressed and Weathered Look: Many rustic vanities are intentionally distressed or weathered to give them an aged, vintage appeal. This can be achieved through techniques like sanding, painting, or even exposing the wood to natural elements to simulate years of use.
  3. Iron or Bronze Hardware: Hardware such as handles, knobs, and hinges made from cast iron or bronze are often used to complement the rustic wood and add an industrial or vintage touch to the vanity.
  4. Simple, Functional Design: Rustic bathroom vanities tend to have a more straightforward and functional design. They may feature open shelving, large drawers, or cabinets, offering plenty of storage space while maintaining a minimalist aesthetic. The design tends to prioritize usability while still showcasing the beauty of the wood.
  5. Earthy Tones: Rustic vanities often incorporate warm, earthy tones like browns, tans, and deep reds. These tones create a natural, calming environment, perfect for a bathroom that doubles as a relaxing retreat.

2. Benefits of Rustic Bathroom Vanities

In addition to their aesthetic appeal, rustic bathroom vanities offer several practical benefits that make them a great choice for your bathroom renovation. Here are some of the top advantages:

1. Timeless Appeal

Rustic design is not a passing trend but rather a classic style that has been beloved for generations. Unlike some modern design trends that may lose their popularity over time, rustic bathroom vanities have a timeless quality that can remain stylish for decades. Whether you’re renovating a traditional or contemporary bathroom, rustic vanities are versatile enough to fit seamlessly into various décor styles.

2. Durability and Longevity

Rustic vanities are often crafted from sturdy, high-quality materials such as solid wood and metal, ensuring that they stand the test of time. These durable materials are not only resilient to wear and tear but also become more beautiful with age, as the wood naturally darkens and develops a patina over time. The solid construction of rustic vanities means you won’t have to worry about them easily chipping or breaking.

3. Warm and Inviting Ambiance

There’s something inherently warm and inviting about rustic design. The natural beauty of the wood, paired with the simple yet functional design, creates a bathroom space that feels like a retreat. Whether you’re starting your day with a hot shower or winding down in a warm bath, a rustic vanity adds a touch of coziness to the space, transforming your bathroom into a calming sanctuary.

4. Eco-Friendly Materials

Many rustic vanities are made from reclaimed wood or repurposed materials, making them an environmentally friendly option for homeowners looking to reduce their carbon footprint. By choosing a rustic vanity made from salvaged materials, you’re contributing to sustainability while also embracing the natural beauty of wood that has been given a second life.

5. Increased Home Value

Investing in a rustic vanity can enhance the value of your home, especially if you’re planning to sell it in the future. Potential buyers often appreciate the warmth and character that rustic design adds to a bathroom, and a well-crafted rustic vanity can elevate the overall appeal of your home’s design.

3. How to Incorporate Rustic Bathroom Vanities into Your Bathroom

Now that we’ve explored the advantages of rustic bathroom vanities, let’s discuss how to incorporate them into your bathroom design. Whether your bathroom is large or small, rustic vanities can add warmth and personality, making your space feel more inviting. Here are some tips to consider when adding a rustic vanity to your bathroom:

1. Balance with Modern Elements

If you’re worried that a rustic vanity may clash with your existing modern décor, don’t be! The beauty of rustic design is its ability to blend seamlessly with a variety of other styles. For example, pair your rustic vanity with sleek, modern fixtures like chrome faucets, a frameless mirror, and minimalist lighting. The contrast between the natural wood and modern elements creates a stylish, balanced look that is both contemporary and cozy.

2. Complement with Natural Accents

To enhance the rustic feel of your bathroom, complement your vanity with natural accents such as stone countertops, woven baskets, and ceramic accessories. Neutral-toned towels and linen, as well as wooden shelves or trays, can help tie the entire room together. The goal is to create a space that feels grounded in nature while maintaining functionality and style.

3. Choose the Right Sink

The sink you choose can play a significant role in the overall look of your rustic bathroom vanity. For a more traditional rustic look, opt for a farmhouse sink or a vessel sink made from materials like ceramic or copper. Alternatively, an undermount or drop-in sink in a modern material such as marble or granite can add a refined touch while still complementing the rustic wood.

4. Consider the Size and Layout of Your Bathroom

When selecting a rustic vanity, consider the size and layout of your bathroom. A larger vanity with multiple storage compartments works well in spacious bathrooms, while a smaller single-sink rustic vanity is ideal for more compact spaces. Keep in mind that a vanity with a natural wood finish can visually expand a small bathroom, making it feel more open and airy.

5. Add Vintage or Industrial Touches

To fully embrace the rustic aesthetic, consider adding vintage or industrial elements to your bathroom. This could include industrial-style lighting, old-fashioned mirrors, or iron hardware. Incorporating these elements into the space will help reinforce the rustic charm of your vanity and create a cohesive, stylish design.

Incorporating rustic bathroom vanities into your bathroom design is an excellent way to add warmth, character, and timeless appeal to your space. These vanities, crafted from natural materials like reclaimed wood, metal, and stone, bring an earthy, cozy ambiance to any bathroom. With their durability, aesthetic versatility, and eco-friendly appeal, rustic vanities are not just a design choice, but an investment in quality. By blending rustic charm with modern elements, you can create a bathroom that’s both functional and inviting—a perfect retreat to unwind after a long day. Whether your bathroom is large or small, rustic vanities can provide the perfect solution for creating a warm, welcoming atmosphere that complements your unique style.

DIY Garage Organizers: Maximize Space in Your Garage

Source:https://www.bhg.com

If you’re struggling with clutter in your garage, it’s time to consider implementing DIY garage organizers to reclaim your space. A well-organized garage not only helps you store tools, sports equipment, and seasonal items more efficiently, but it also enhances the functionality of the entire space. Whether you’re an avid DIYer, a car enthusiast, or simply need a place to store household items, organizing your garage can make a world of difference. In this article, we will explore several practical and cost-effective DIY garage organizers, the benefits of garage organization, and how you can transform your garage into a clean, organized, and functional space.

1. Why Garage Organization is Important

Garages are often one of the most neglected spaces in a home, despite being a hub for storage and various activities. Over time, garages become a dumping ground for tools, gardening supplies, sports equipment, and even old furniture. This clutter not only makes it difficult to find what you need, but it can also create hazards and make the garage feel smaller and more chaotic than it really is.

By implementing DIY garage organizers, you can turn your garage into a space that is both functional and accessible. An organized garage not only improves the overall aesthetics of your home but also makes daily tasks much easier. Whether you’re working on a project, looking for a specific tool, or simply need a place to park your car, a well-organized garage will save you time and energy in the long run.

The Benefits of Garage Organization

  1. Maximized Space: Organizing your garage allows you to utilize every inch of available space. With the right organizers, you can store items vertically, on the walls, and even in the ceiling, making your garage feel more spacious and efficient.
  2. Increased Productivity: When everything has its designated place, it’s easier to find the tools or equipment you need. Whether you’re a hobbyist, mechanic, or just trying to keep things in order, an organized space promotes a more productive and stress-free environment.
  3. Safety and Accessibility: A clutter-free garage reduces the risk of accidents, like tripping over tools or knocking over items. Additionally, when items are organized and easily accessible, you can avoid wasting time searching for things or dealing with unnecessary frustration.

2. Popular DIY Garage Organizers for Every Need

The great thing about DIY garage organizers is that you can tailor them to your specific needs and the available space in your garage. Whether you’re looking to store small tools or large equipment, there are plenty of creative ways to maximize your garage’s potential. Here are some popular DIY garage organizer ideas that will help you get your space in order:

1. Pegboards for Tools and Small Items

One of the most versatile and affordable DIY garage organizers is a pegboard. By installing a pegboard on one or more walls, you can create a customizable storage solution for your tools, gardening supplies, and even small containers for screws, nails, or washers. Pegboards allow you to organize items vertically, keeping your garage floor clear and providing easy access to frequently used tools.

  • How to Create It: Mount a large wooden or metal pegboard to the wall, securing it with screws. You can then add hooks, shelves, and baskets as needed to hold tools like hammers, screwdrivers, pliers, and wrenches. For an added touch, you can paint or label each section of the pegboard to designate which tools belong where.

2. Overhead Garage Storage Racks

If you’re running out of floor space but still need a place to store bulky items like seasonal decorations, camping gear, or rarely used tools, consider installing overhead garage storage racks. These systems make use of the unused space above your head, keeping items out of the way but still easily accessible.

  • How to Create It: Install sturdy overhead racks in a section of your garage with high ceilings. You can either build these from wood or purchase pre-made racks that attach to the ceiling beams. These racks work well for storing large bins, boxes, or heavy-duty equipment that you don’t need to access frequently.

3. Wall-Mounted Shelving Units

For those with a bit more room to work with, wall-mounted shelving units are an excellent way to store boxes, bins, and larger equipment without taking up valuable floor space. These units are ideal for keeping items organized and visible, so you don’t have to dig through piles of boxes to find what you’re looking for.

  • How to Create It: Install shelving units along the walls, ensuring they are securely fastened to the studs for maximum weight capacity. Use a mix of open and closed storage options to keep your items organized and tidy. You can also add labels to bins and boxes for easier identification.

4. Rolling Tool Carts

For DIY enthusiasts and mechanics, a rolling tool cart is a game-changer. Not only does it keep tools organized, but it also makes them portable, so you can easily move them around the garage or even outside for projects. A well-designed rolling cart can hold everything from screwdrivers and drills to wrenches and saws, all in one convenient place.

  • How to Create It: Purchase a metal tool cart with wheels or repurpose a rolling kitchen cart. Customize the cart with bins, trays, and dividers to organize your tools by type. Add a top surface for additional workspace and a few hooks for hanging smaller tools like pliers or tape measures.

5. Bucket or Tote Organizers for Smaller Items

Buckets or totes are excellent for storing small items like nails, screws, bolts, or craft supplies. They are portable and easy to stack or store on shelves, making them a simple and affordable option for organizing loose items in your garage.

  • How to Create It: Label each bucket or tote based on its contents (e.g., “screws,” “nails,” “bolts,” etc.). Store them in clear plastic bins or on wall-mounted racks so you can easily access them when needed.

3. Tips for Implementing Your DIY Garage Organizers

Now that you have some ideas for DIY garage organizers, it’s time to put them into action. Here are some tips to make the process of organizing your garage as efficient as possible:

1. Sort and Purge First

Before you start organizing, take the time to sort through your items and get rid of anything you no longer need. Donate, sell, or dispose of old tools, equipment, or seasonal items that are no longer in use. This will not only free up space but also ensure that you are only keeping what’s truly necessary.

2. Maximize Vertical and Overhead Space

One of the most effective ways to maximize space in your garage is to make use of the walls and ceiling. By installing wall-mounted racks, pegboards, or overhead storage systems, you can free up valuable floor space while keeping everything accessible and easy to find.

3. Label Everything

Labeling your bins, boxes, and containers will make it easier to locate items when you need them. This is especially helpful if you have a variety of similar items stored in multiple locations. You can use simple labels with a permanent marker or create custom labels with a label maker.

4. Create Zones for Different Activities

Divide your garage into specific zones based on activity. For example, create a designated space for gardening tools, another for automotive supplies, and another for home improvement tools. This makes it easier to locate items quickly and reduces the chances of clutter building up in random areas.

5. Invest in Quality Materials

While DIY garage organizers can be made with basic materials, it’s essential to invest in durable, high-quality components for your shelving units, tool racks, and storage systems. Good quality materials will ensure your garage organizers hold up over time, even with regular use.

Transforming your cluttered garage into an organized and efficient space is easier than you think with DIY garage organizers. By utilizing vertical space, investing in clever storage solutions like pegboards and rolling carts, and sorting through your belongings, you can maximize the available space in your garage and make it a functional area for work and storage. Whether you’re a seasoned DIYer or just looking for a way to tidy up, these affordable and customizable solutions can help you create a garage that is as organized as it is practical. With a little time and effort, your garage will be a clutter-free haven where everything has its place.

Solar-Powered Pool Heaters: Sustainable Heating for Your Pool

Source:https://www.energy.gov

When it comes to extending your pool season and enjoying warm water all year round, solar-powered pool heaters present an eco-friendly and cost-effective solution. As energy costs continue to rise and environmental concerns become more pressing, many pool owners are turning to solar-powered systems to maintain a comfortable water temperature without the hefty utility bills. Solar pool heating systems harness the power of the sun to heat your pool, making them an ideal choice for those looking to reduce their carbon footprint while enjoying consistent warmth in their pools. In this article, we’ll explore how solar-powered pool heaters work, their benefits, and why they’re becoming an increasingly popular choice for sustainable pool heating.

1. How Solar-Powered Pool Heaters Work

Solar-powered pool heaters are designed to take advantage of the sun’s energy to heat your pool water. The system works by circulating water through solar collectors—large panels or tubes—where the water is heated by the sun before being returned to the pool. This process is simple, efficient, and environmentally friendly, relying on renewable energy instead of electricity or gas to generate heat. Here’s a breakdown of how it works:

Components of a Solar Pool Heating System

A solar-powered pool heating system consists of several key components:

  • Solar Collectors: These are the panels or tubes that absorb sunlight and transfer heat to the water. The most common types are flat-plate collectors or evacuated tube collectors. Flat-plate collectors are large panels that sit on your roof or another sunny area, while evacuated tube collectors are cylindrical and more efficient at collecting sunlight.
  • Pump: The pump circulates water from the pool through the solar collectors. The water is typically filtered before it enters the system to ensure that debris doesn’t clog the collectors.
  • Flow Control Valve: This valve helps regulate the flow of water through the system, ensuring that the water stays at an optimal temperature before it returns to the pool.
  • Controller: A controller unit monitors the temperature of both the pool water and the water in the solar collectors. It determines when the system should activate or shut down, ensuring efficient use of the solar energy.
  • Storage Tank (Optional): Some systems include a storage tank, which can be used to store heated water for later use, ensuring that the pool remains warm during cloudy days or at night.

The Heating Process

The water from the pool is pumped into the solar collectors, where it flows through the tubes or panels. These collectors are typically installed on a roof, deck, or a sunny spot in your yard, where they can absorb maximum sunlight. As the water passes through the collectors, the sun’s energy heats it. The heated water is then returned to the pool, raising the overall temperature of the water.

The process continues as long as the sun is shining, with the system automatically shutting off once the desired temperature is reached. On cloudy or rainy days, the system may not heat the water as effectively, but many systems include a backup heating option (such as gas or electric) to maintain temperature when solar energy is insufficient.

2. The Benefits of Solar-Powered Pool Heaters

There are numerous benefits to installing a solar-powered pool heater. These systems offer significant cost savings, environmental advantages, and enhanced comfort for pool owners. Below are some of the key benefits:

1. Energy Efficiency and Cost Savings

One of the biggest advantages of solar-powered pool heaters is the reduction in energy costs. Unlike traditional gas or electric heaters that require an external power source, solar heaters rely entirely on renewable solar energy, which is free. As a result, once installed, your operational costs are minimal, making it a highly cost-effective option in the long term.

While the initial installation cost of a solar heating system can be higher than that of conventional heaters, the savings on energy bills can quickly make up for the upfront cost. Most pool owners find that their solar-powered pool heater pays for itself within a few years due to the elimination of energy costs.

2. Environmental Sustainability

Solar-powered pool heaters are an eco-friendly alternative to traditional pool heating methods. By using the sun’s renewable energy, you reduce your reliance on fossil fuels, lowering your carbon footprint and contributing to a greener planet. Unlike gas heaters that emit greenhouse gases or electric heaters that may draw power from non-renewable sources, solar heaters are clean, sustainable, and produce no harmful emissions.

Using solar energy for pool heating also helps reduce the environmental impact associated with electricity generation and fossil fuel extraction. By switching to a solar-powered system, pool owners can significantly reduce their overall energy consumption and help mitigate climate change.

3. Long-Lasting and Low Maintenance

Solar-powered pool heaters are built to last. With proper installation and regular maintenance, they can serve for 15-20 years or even longer. The systems have fewer moving parts compared to gas or electric heaters, reducing the likelihood of mechanical failure and the need for costly repairs.

Maintenance typically involves cleaning the collectors to ensure they are free of debris and checking for any signs of wear. This is relatively simple and inexpensive compared to the ongoing maintenance required for gas or electric heaters, which often require professional servicing.

4. Consistent Pool Heating

Solar-powered pool heaters can provide a steady, consistent temperature for your pool, especially during sunny days when solar energy is abundant. The system works efficiently to maintain a comfortable pool temperature without the fluctuations often associated with traditional heating methods. On particularly sunny days, solar pool heaters can even provide excess heat, allowing you to enjoy a warm swim late into the season.

In addition, many solar pool heating systems are designed to work in conjunction with automatic pool covers, helping retain the heat overnight or during cooler weather. This combination ensures that the pool stays at the optimal temperature with minimal energy loss.

3. Factors to Consider When Choosing Solar-Powered Pool Heaters

While solar-powered pool heaters offer many advantages, it’s important to consider several factors to ensure you select the right system for your pool. Here are a few things to keep in mind when deciding on a solar pool heater:

1. Size and Pool Type

The size of your pool is an essential factor in choosing a solar heater. Larger pools will require larger or more solar collectors to heat the water effectively. It’s important to work with a professional to calculate the appropriate collector area needed for your pool. A general guideline is that the solar collector area should be equal to about 50% to 100% of the surface area of your pool.

Additionally, the type of pool you have—whether in-ground or above-ground—can affect the installation and system requirements. In-ground pools typically need larger systems due to their greater water volume, while above-ground pools may require smaller setups.

2. Climate and Location

Your geographic location and local climate play a significant role in how effective a solar-powered pool heater will be. Areas with abundant sunlight, such as those in the southern United States or tropical climates, are ideal for solar pool heating systems. If you live in a region with frequent cloud cover or long winters, you might need to supplement the solar system with a backup heating option, such as gas or electric heating.

3. Roof Space and Installation Considerations

Since solar collectors are typically mounted on the roof, it’s important to assess the available roof space and its orientation to the sun. The collectors should be installed in an area that receives maximum sunlight throughout the day, ideally facing south for optimal efficiency.

It’s also crucial to consider the structural integrity of your roof, especially if you’re installing large or multiple solar panels. A professional installer will evaluate your roof and determine the best configuration for your system.

Incorporating solar-powered pool heaters into your backyard is an excellent way to achieve sustainable, cost-effective heating for your pool. By harnessing the power of the sun, you can enjoy warm water year-round without worrying about high energy bills or environmental impact. With minimal maintenance, long-lasting durability, and impressive energy savings, solar-powered pool heaters offer a practical and eco-friendly solution for any pool owner. As renewable energy continues to grow in popularity, solar pool heaters stand out as an ideal choice for those looking to combine comfort, efficiency, and sustainability in their pool heating system.

Outdoor Garden Arches: Add Elegance and Charm to Your Yard

Source:https://classicnursery.com

If you’re looking for a simple yet effective way to elevate the look of your garden, outdoor garden arches might be the perfect solution. These charming structures not only add a touch of elegance to your outdoor space but also serve as a beautiful focal point. Whether used to frame a walkway, support climbing plants, or create a serene entryway, garden arches can transform your yard into a picturesque retreat. In this article, we’ll explore the different types of outdoor garden arches, their benefits, and how to choose the right one for your landscape design.

1. The Beauty and Functionality of Outdoor Garden Arches

An outdoor garden arch is more than just a decorative piece. It’s a versatile addition to your garden that enhances both the aesthetic appeal and functionality of your outdoor space. By incorporating a garden arch, you create an inviting entrance or provide a structural element that supports the growth of climbing plants. Here are some of the key reasons why garden arches are so popular:

Aesthetic Appeal

The beauty of an outdoor garden arch lies in its simplicity and the way it blends into the natural environment. Whether made of wood, metal, or other materials, garden arches create a sophisticated visual element that adds depth and structure to your yard. As they are typically positioned at the entrance to a garden, pathway, or patio, they serve as an elegant frame for the scenery, inviting guests to step into a tranquil space. With the right design, garden arches can evoke a sense of romance or whimsy, making them perfect for a wide range of garden styles—whether traditional, contemporary, or rustic.

In addition, many arches are designed to be adorned with climbing plants such as roses, ivy, or wisteria, adding layers of texture and color throughout the seasons. The mix of natural elements with the structural arch creates a stunning visual contrast that can turn any part of your garden into a focal point.

Supporting Growth and Privacy

Garden arches also offer practical benefits, particularly when it comes to supporting climbing plants. As vines and flowers grow up the structure, they create a lush, green canopy or wall that adds privacy to certain areas of your yard. This is especially useful if you have a garden near a neighbor’s property or wish to section off specific areas for personal use, like a cozy seating nook or a garden retreat. Climbing plants like honeysuckle, jasmine, and clematis thrive when supported by garden arches, providing both beauty and functionality in a single design.

In addition, garden arches can guide the growth of plants in a way that promotes healthier blooms. By directing vines upward and across the arch, you create more space for the plants to spread out without overwhelming other parts of your garden. This helps maintain a well-organized and tidy appearance, allowing your outdoor space to look more manicured and appealing.

Creating Pathways and Entries

One of the most common uses for outdoor garden arches is to create inviting pathways and entryways. Whether placed over a gate, walkway, or driveway, an arch can serve as a dramatic entrance that beckons visitors to explore your garden. By framing the passageway, the arch defines the transition between different sections of your outdoor space, adding an element of surprise and elegance.

In some cases, garden arches can also be used to create “secret” gardens or outdoor rooms, where the arch serves as the portal to a secluded area. This is particularly effective for larger gardens, where you want to lead visitors down winding paths to discover hidden treasures, like a secluded bench or a pond.

2. Choosing the Right Outdoor Garden Arch for Your Yard

When it comes to selecting the perfect outdoor garden arch for your space, there are several factors to consider. These include the material of the arch, its design, the overall style of your garden, and how you plan to use the arch. Here are some things to keep in mind when choosing the ideal garden arch for your yard:

Materials: Wood, Metal, or Vinyl?

The material of the garden arch plays a significant role in both its appearance and durability. Here’s a breakdown of the most popular options:

  • Wood: Wooden arches, typically made from cedar or redwood, offer a classic, rustic appearance that blends well with natural surroundings. Wood can be treated with stains or paints to complement your garden’s color palette, and it works particularly well in traditional, cottage-style, or Mediterranean gardens. However, wood requires regular maintenance, such as sealing or staining, to protect it from the elements.
  • Metal: Metal garden arches, often made from wrought iron or steel, offer a more elegant and contemporary feel. They tend to be more durable and require less maintenance than wood. The sturdy construction of metal arches makes them ideal for supporting heavy climbing plants. They are also perfect for gardens with a more formal, structured design, as their sleek lines and ornate details add a sense of refinement.
  • Vinyl: Vinyl garden arches are lightweight, low-maintenance, and resistant to the elements. They typically come in a variety of colors and can mimic the look of wood or metal. While they may not have the same timeless appeal as wooden or metal arches, vinyl is an excellent option if you prefer a more modern, hassle-free choice. It’s also a great option if you’re on a budget.

Design and Style

The design of the garden arch should complement the overall style of your yard. Arches come in various designs, ranging from simple, minimalist arches to more elaborate, ornate models with decorative scrollwork. Some popular styles include:

  • Traditional Arches: These arches have clean lines and simple structures, often with rounded or pointed tops. They are versatile and can fit into virtually any garden style.
  • Romantic Arches: Featuring intricate metalwork or wood lattice, these arches can add a touch of romance to your garden, particularly when draped with climbing roses or vines.
  • Modern Arches: Sleek, geometric arches made from metal or vinyl are perfect for contemporary gardens. These arches often have clean lines and can make a bold statement as a centerpiece.

Size and Placement

Before purchasing a garden arch, it’s important to consider the size of the structure in relation to your yard. Larger arches work well in expansive gardens and can serve as dramatic focal points, while smaller arches are better suited for smaller spaces. It’s also essential to think about where you plan to place the arch. Will it be used as an entryway, or will it frame a pathway? Choosing the right placement ensures that your arch has the desired effect and enhances the overall flow of your garden design.

3. Installing and Maintaining Your Outdoor Garden Arch

Installing an outdoor garden arch is a relatively straightforward process, but it does require some planning. Here’s a quick guide to help you get started:

Installation

  1. Prepare the Ground: Choose a level location for the arch, ensuring that the area is free of obstructions. Mark where the posts will go and dig holes for the foundation.
  2. Set the Posts: If your arch comes with posts, make sure they are securely anchored in the ground. For stability, consider using concrete or gravel to set the posts.
  3. Attach the Arch: Once the posts are in place, attach the arch to the posts according to the manufacturer’s instructions. This step may involve securing bolts or screws to ensure the structure is stable.
  4. Add Climbing Plants: After installation, you can start training climbing plants to grow on the arch. Use twine or plant ties to encourage plants like roses, wisteria, or clematis to climb the structure.

Maintenance

Maintaining your garden arch depends on the material you’ve chosen. Wooden arches may need periodic staining or sealing to protect them from rot, while metal arches may require rust treatment. Vinyl arches, being low-maintenance, only need occasional cleaning with soapy water to keep them looking fresh.

It’s also essential to check the stability of the arch regularly, especially after heavy storms or extreme weather conditions. Make sure the structure remains anchored and secure to avoid any accidents.

Outdoor garden arches are an excellent way to add elegance, charm, and functionality to your yard. Whether you’re looking to create a beautiful focal point, enhance the growth of your climbing plants, or simply frame a pathway with style, outdoor garden arches can transform any space into a welcoming and visually stunning retreat. By choosing the right materials, design, and placement, you can ensure that your garden arch complements your outdoor living space for years to come. Whether you prefer a rustic wooden design, a sleek metal structure, or a maintenance-free vinyl option, there’s an outdoor garden arch that can bring your vision to life and enhance the beauty of your garden.