Welcome to Thrifted Treasures! If you’re looking for budget-friendly decor ideas, you’ve come to the right place. Here, we’ll show you how to transform thrift store finds into beautiful, unique pieces of home decor. We’ll provide step-by-step instructions for a variety of projects, from upcycling furniture to creating wall art. With a little creativity and a few simple supplies, you can create stunning decor pieces that won’t break the bank. So let’s get started and see what treasures you can find!
How to Transform Thrift Store Finds into Unique Home Decor
Transforming thrift store finds into unique home decor can be a fun and cost-effective way to add a personal touch to any living space. With a few simple steps, it is possible to create a one-of-a-kind look that will be sure to impress.
The first step is to assess the thrift store item and determine what type of transformation is desired. Consider the size, shape, and material of the item and decide how it can be altered to fit the desired aesthetic. For example, a wooden chair can be painted, reupholstered, or distressed to create a unique look.
Once the desired transformation has been determined, the next step is to gather the necessary supplies. Depending on the project, this may include paint, fabric, sandpaper, and other materials. It is important to make sure that the supplies are of good quality and appropriate for the project.
The third step is to begin the transformation process. This may involve sanding, painting, or reupholstering the item. It is important to take the time to do the job properly, as this will ensure that the finished product looks its best.
Finally, the last step is to accessorize the item. This can be done by adding decorative elements such as throw pillows, rugs, or artwork. This will help to create a unique look that will be sure to impress.
By following these steps, it is possible to transform thrift store finds into unique home decor. With a little creativity and effort, it is possible to create a one-of-a-kind look that will be sure to impress.
Creative Ways to Upcycle Thrifted Treasures into One-of-a-Kind Pieces
Upcycling is a great way to give new life to thrifted treasures and create one-of-a-kind pieces. With a little creativity and some basic tools, it is possible to transform thrifted items into unique and stylish pieces. Here are some creative ways to upcycle thrifted treasures into one-of-a-kind pieces.
1. Repurpose furniture. Furniture is a great item to upcycle. An old dresser can be transformed into a unique storage piece with a fresh coat of paint and new hardware. An old chair can be reupholstered with a new fabric to give it a modern look.
2. Create art. Thrifted items can be used to create unique art pieces. An old frame can be repainted and used to display a favorite photograph or painting. An old window can be turned into a chalkboard or a message board.
3. Transform clothing. Clothing can be upcycled into something new and stylish. An old dress can be turned into a skirt or a top. An old shirt can be transformed into a pillow or a tote bag.
4. Make jewelry. Thrifted items can be used to make unique jewelry pieces. An old necklace can be repurposed into a bracelet or earrings. An old brooch can be turned into a pendant.
5. Upcycle accessories. Accessories can be upcycled into something new and stylish. An old belt can be turned into a necklace or a bracelet. An old scarf can be transformed into a headband or a purse.
Upcycling thrifted treasures is a great way to give new life to old items and create one-of-a-kind pieces. With a little creativity and some basic tools, it is possible to transform thrifted items into unique and stylish pieces.Thrifted Treasures is a great resource for anyone looking to add a unique and budget-friendly touch to their home decor. With a little creativity and some thrift store finds, you can create beautiful and unique pieces that will add character and charm to any room. Whether you’re looking for a quick and easy project or something more involved, Thrifted Treasures has something for everyone. So, if you’re looking for a way to spruce up your home without breaking the bank, give Thrifted Treasures a try!
The Perfect White: Choosing the Best White Paint for Your Home is a comprehensive guide to selecting the perfect white paint for your home. Whether you are looking to create a bright and airy atmosphere or a cozy and inviting space, this guide will help you find the perfect white paint to achieve your desired look. With tips on how to choose the right shade of white, how to apply the paint, and how to maintain it, this guide will provide you with all the information you need to make the best decision for your home.
How to Choose the Perfect White Paint for Your Home: Tips and Tricks for Finding the Best Shade
When it comes to choosing the perfect white paint for your home, there are a few tips and tricks that can help you find the best shade. White paint is a classic choice for any home, as it can create a bright and airy atmosphere. However, with so many shades of white to choose from, it can be difficult to decide which one is right for your space. Here are some tips and tricks for finding the perfect white paint for your home.
First, consider the size of the room. If the room is small, a bright white can make it appear larger. If the room is large, a softer white can help create a cozy atmosphere. Additionally, consider the amount of natural light the room receives. If the room is well-lit, a bright white can help reflect the light and make the room appear brighter. If the room is darker, a softer white can help create a warm and inviting atmosphere.
Second, consider the other colors in the room. If the room has a lot of bold colors, a softer white can help balance out the space. If the room is mostly neutral, a bright white can help create a modern and contemporary look. Additionally, consider the color of the furniture and accessories in the room. If the furniture and accessories are mostly dark, a bright white can help create contrast. If the furniture and accessories are mostly light, a softer white can help create a cohesive look.
Third, consider the type of finish you want. If you want a matte finish, look for a flat or eggshell finish. If you want a glossy finish, look for a semi-gloss or high-gloss finish. Additionally, consider the type of paint you want. If you want a durable paint, look for a paint with a higher sheen. If you want a paint that is easy to clean, look for a paint with a low sheen.
Finally, consider the type of paint you want. If you want a paint that is easy to apply, look for a paint with a low VOC content. If you want a paint that is long-lasting, look for a paint with a high VOC content. Additionally, consider the type of primer you want. If you want a primer that will help the paint adhere better, look for a primer with a high adhesion rating.
By following these tips and tricks, you can find the perfect white paint for your home. With so many shades of white to choose from, it can be difficult to decide which one is right for your space. However, by considering the size of the room, the other colors in the room, the type of finish you want, and the type of paint and primer you want, you can find the perfect white paint for your home.
The Pros and Cons of Different Types of White Paint: What to Consider Before Making Your Decision
When it comes to choosing the right white paint for a project, there are a variety of options available. Each type of white paint has its own unique characteristics and advantages, as well as drawbacks. Before making a decision, it is important to consider the pros and cons of each type of white paint.
One of the most popular types of white paint is latex paint. Latex paint is easy to apply, dries quickly, and is available in a variety of finishes. It is also relatively inexpensive and can be easily cleaned up with soap and water. However, latex paint is not as durable as other types of paint and may require more frequent touch-ups.
Another type of white paint is oil-based paint. Oil-based paint is more durable than latex paint and is available in a variety of finishes. It is also more resistant to fading and chipping. However, oil-based paint is more difficult to apply and takes longer to dry. It is also more expensive and requires the use of solvents for clean-up.
A third type of white paint is enamel paint. Enamel paint is highly durable and is available in a variety of finishes. It is also resistant to fading and chipping. However, enamel paint is more difficult to apply and takes longer to dry. It is also more expensive and requires the use of solvents for clean-up.
Finally, there is chalk paint. Chalk paint is easy to apply and dries quickly. It is also relatively inexpensive and can be easily cleaned up with soap and water. However, chalk paint is not as durable as other types of paint and may require more frequent touch-ups.
When choosing the right white paint for a project, it is important to consider the pros and cons of each type of white paint. Each type of paint has its own unique characteristics and advantages, as well as drawbacks. By taking the time to consider the pros and cons of each type of white paint, you can make an informed decision that will best suit your needs.The Perfect White: Choosing the Best White Paint for Your Home is an invaluable resource for anyone looking to find the perfect white paint for their home. With its comprehensive guide to the different types of white paint, helpful tips on how to choose the right shade, and advice on how to apply the paint, this book is sure to help anyone find the perfect white paint for their home. Whether you’re looking for a bright, crisp white or a more subtle, muted shade, The Perfect White: Choosing the Best White Paint for Your Home has the information you need to make the right choice.
Eco-friendly driveways are becoming increasingly popular as homeowners look for ways to reduce their environmental impact. Recycled asphalt driveways are a great option for those looking to reduce their carbon footprint while still enjoying the benefits of a durable and attractive driveway. This article will provide an overview of the ins and outs of recycled asphalt driveways, including the benefits, installation process, and maintenance requirements. We’ll also discuss the environmental impact of recycled asphalt driveways and how they compare to other driveway materials. With this information, you’ll be able to make an informed decision about whether a recycled asphalt driveway is the right choice for your home.
The Benefits of Installing a Recycled Asphalt Driveway: Learn How to Reduce Your Carbon Footprint
Recycled asphalt driveways are becoming increasingly popular due to their environmental benefits. By installing a recycled asphalt driveway, homeowners can reduce their carbon footprint and help protect the environment. This article will discuss the benefits of installing a recycled asphalt driveway and how it can help reduce your carbon footprint.
One of the primary benefits of installing a recycled asphalt driveway is that it is made from recycled materials. Asphalt is a petroleum-based product, and when it is recycled, it reduces the amount of petroleum that is used in the production of new asphalt. This helps to reduce the amount of carbon dioxide that is released into the atmosphere. Additionally, recycled asphalt is often made from materials that would otherwise be discarded, such as old pavement or roofing shingles. This helps to reduce the amount of waste that is sent to landfills.
Another benefit of installing a recycled asphalt driveway is that it is more durable than traditional asphalt. Recycled asphalt is made from materials that have already been exposed to the elements, so it is more resistant to cracking and other damage. This means that it will last longer and require less maintenance over time. Additionally, recycled asphalt is often more affordable than traditional asphalt, making it a cost-effective option for homeowners.
Finally, installing a recycled asphalt driveway can help reduce your carbon footprint in other ways. For example, recycled asphalt is often made from materials that are more energy-efficient than traditional asphalt. This means that it requires less energy to produce, which reduces the amount of carbon dioxide that is released into the atmosphere. Additionally, recycled asphalt is often made from materials that are more reflective than traditional asphalt, which helps to reduce the amount of heat that is absorbed by the pavement. This helps to reduce the amount of energy that is needed to cool the pavement, which further reduces your carbon footprint.
In conclusion, installing a recycled asphalt driveway can help reduce your carbon footprint and help protect the environment. By using recycled materials, you can reduce the amount of petroleum that is used in the production of new asphalt and reduce the amount of waste that is sent to landfills. Additionally, recycled asphalt is often more durable and cost-effective than traditional asphalt, and it can help reduce your energy consumption by being more energy-efficient and reflective. By taking advantage of these benefits, you can help reduce your carbon footprint and help protect the environment.
How to Choose the Right Recycled Asphalt Driveway for Your Home: Tips for Making an Eco-Friendly Choice
Making an eco-friendly choice for your driveway is an important decision that can have a lasting impact on the environment. Recycled asphalt driveways are a great option for homeowners looking to reduce their environmental footprint. Not only are they more sustainable than traditional asphalt driveways, but they are also more cost-effective and durable. Here are some tips to help you choose the right recycled asphalt driveway for your home.
1. Consider the Climate: Different climates require different types of asphalt. In colder climates, a thicker asphalt mix is recommended to prevent cracking and damage from freezing temperatures. In warmer climates, a thinner asphalt mix is recommended to prevent cracking and damage from extreme heat.
2. Consider the Traffic: The amount of traffic your driveway will receive should be taken into consideration when choosing a recycled asphalt driveway. If your driveway will be used frequently, a thicker asphalt mix is recommended to ensure durability and longevity.
3. Consider the Cost: Recycled asphalt driveways are typically more cost-effective than traditional asphalt driveways. However, the cost of installation and maintenance should also be taken into consideration.
4. Consider the Maintenance: Recycled asphalt driveways require regular maintenance to ensure they remain in good condition. This includes sealing the driveway every two to three years and filling any cracks or potholes as soon as they appear.
By following these tips, you can make an informed decision when choosing the right recycled asphalt driveway for your home. Not only will you be making an eco-friendly choice, but you will also be investing in a durable and cost-effective solution for your driveway.Eco-friendly driveways are becoming increasingly popular as more people become aware of the environmental benefits of recycled asphalt. Recycled asphalt driveways are cost-effective, durable, and aesthetically pleasing. They are also easy to maintain and can last for decades with proper care. With all of these benefits, it is no wonder that recycled asphalt driveways are becoming a popular choice for homeowners looking to reduce their environmental impact.
Welcome to Fence Finesse, a gallery of pictures of fences for design inspiration. Whether you are looking for a fence to enhance the look of your home or business, or just want to get some ideas for your own fence project, this gallery has something for everyone. From classic wooden picket fences to modern metal designs, you’ll find a variety of styles and materials to choose from. We also feature a selection of unique and creative fence designs that will add a touch of personality to your outdoor space. So take a look around and find the perfect fence for your needs.
Get Creative with Fence Finesse: A Gallery of Unique Fence Designs for Your Home
Fences are an essential part of any home, providing both security and privacy. But they don’t have to be boring. With a little creativity, you can create a unique fence design that will add character and charm to your home. Here, we present a gallery of unique fence designs that will inspire you to think outside the box when it comes to fencing.
The first design is a modern take on the classic picket fence. This design features alternating panels of wood and metal, creating a contemporary look that is both stylish and secure. The metal panels provide a sleek, modern look, while the wood panels add a touch of warmth and texture.
The second design is a combination of wood and stone. This design features a wooden frame with stone panels in between. The stone panels provide a rustic, natural look, while the wooden frame adds a touch of sophistication. This design is perfect for a home with a modern, yet rustic aesthetic.
The third design is a combination of wood and glass. This design features a wooden frame with glass panels in between. The glass panels provide a modern, contemporary look, while the wooden frame adds a touch of warmth and texture. This design is perfect for a home with a modern, yet cozy aesthetic.
The fourth design is a combination of metal and wood. This design features a metal frame with wooden panels in between. The metal frame provides a sleek, modern look, while the wooden panels add a touch of warmth and texture. This design is perfect for a home with a modern, yet industrial aesthetic.
Finally, the fifth design is a combination of brick and wood. This design features a brick frame with wooden panels in between. The brick frame provides a classic, timeless look, while the wooden panels add a touch of warmth and texture. This design is perfect for a home with a traditional, yet modern aesthetic.
No matter what your style, there is a unique fence design that will fit your home perfectly. With a little creativity, you can create a fence that is both stylish and secure. So get creative and explore the possibilities!
Get Inspired with Fence Finesse: A Collection of Beautiful Fence Ideas to Enhance Your Outdoor Space
Fences are an essential part of any outdoor space, providing both privacy and security. But they can also be a source of beauty and inspiration. Fence Finesse is a collection of beautiful fence ideas to enhance your outdoor space.
From classic picket fences to modern metal designs, there are a variety of options to choose from. Whether you’re looking for a traditional look or something more contemporary, Fence Finesse has something for everyone.
For a classic look, consider a white picket fence. This timeless design is perfect for creating a cozy, cottage-style atmosphere. For a more modern look, try a metal fence with geometric shapes and patterns. This type of fence is perfect for creating a sleek, contemporary look.
If you’re looking for something a bit more unique, consider a bamboo fence. This type of fence is perfect for creating a tropical, exotic atmosphere. Or, if you’re looking for something a bit more rustic, try a wooden fence with a natural finish. This type of fence is perfect for creating a warm, inviting atmosphere.
No matter what type of fence you choose, Fence Finesse has something to inspire you. With a variety of styles and materials to choose from, you’re sure to find the perfect fence to enhance your outdoor space. So get inspired and start creating the perfect outdoor oasis today!Fence Finesse: A Gallery of Pictures of Fences for Design Inspiration is a great resource for anyone looking for inspiration for their next fence project. With a wide variety of styles, materials, and designs, Fence Finesse has something for everyone. Whether you’re looking for a classic picket fence or a modern metal fence, Fence Finesse has the perfect design for you. With its easy-to-navigate website and helpful customer service, Fence Finesse is the perfect place to find the perfect fence for your home.
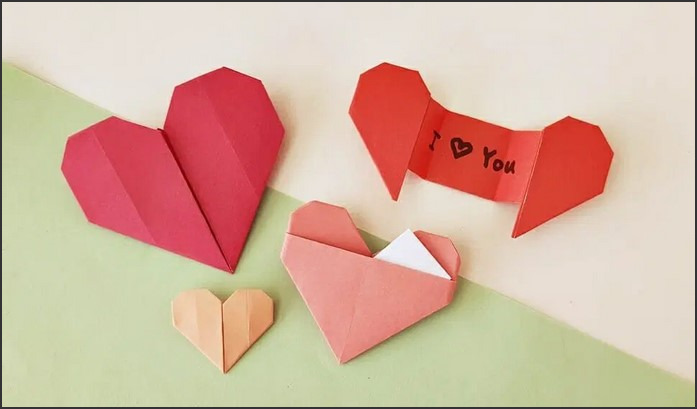
Origami Elegance is a unique way to create a special gift for someone special. With just a few simple steps, you can create an origami heart envelope that is perfect for any special occasion. Whether it’s a birthday, anniversary, or just to show someone you care, this origami heart envelope is sure to make a lasting impression. With its intricate design and beautiful colors, this origami heart envelope is sure to be a hit. So, let’s get started and learn how to make this special origami heart envelope!
Step-by-Step Guide to Crafting an Origami Heart Envelope for Special Occasions
Origami is a traditional Japanese art form that involves folding paper into intricate shapes and designs. It is a popular craft activity for special occasions, such as Valentine’s Day, anniversaries, and birthdays. One of the most popular origami projects is the origami heart envelope, which is a great way to give a special gift or card to someone you love. This step-by-step guide will show you how to craft an origami heart envelope for any special occasion.
Materials Needed:
• Square sheet of paper
• Scissors
• Glue
Instructions:
1. Begin by folding the square sheet of paper in half diagonally. Unfold the paper and then fold it in half the other way. Unfold the paper again.
2. Fold the top two corners of the paper down to the center crease. Unfold the paper.
3. Fold the bottom two corners of the paper up to the center crease. Unfold the paper.
4. Fold the top two corners of the paper down to the center crease again. Unfold the paper.
5. Fold the bottom two corners of the paper up to the center crease again. Unfold the paper.
6. Fold the top two corners of the paper down to the center crease a third time. Unfold the paper.
7. Fold the bottom two corners of the paper up to the center crease a third time. Unfold the paper.
8. Fold the top two corners of the paper down to the center crease a fourth time. Unfold the paper.
9. Fold the bottom two corners of the paper up to the center crease a fourth time. Unfold the paper.
10. Fold the top two corners of the paper down to the center crease a fifth time. Unfold the paper.
11. Fold the bottom two corners of the paper up to the center crease a fifth time. Unfold the paper.
12. Fold the top two corners of the paper down to the center crease a sixth time. Unfold the paper.
13. Fold the bottom two corners of the paper up to the center crease a sixth time. Unfold the paper.
14. Fold the top two corners of the paper down to the center crease a seventh time. Unfold the paper.
15. Fold the bottom two corners of the paper up to the center crease a seventh time. Unfold the paper.
16. Fold the top two corners of the paper down to the center crease an eighth time. Unfold the paper.
17. Fold the bottom two corners of the paper up to the center crease an eighth time. Unfold the paper.
18. Fold the top two corners of the paper down to the center crease a ninth time. Unfold the paper.
19. Fold the bottom two corners of the paper up to the center crease a ninth time. Unfold the paper.
20. Fold the top two corners of the paper down to the center crease a tenth time. Unfold the paper.
21. Fold the bottom two corners of the paper up to the center crease a tenth time. Unfold the paper.
22. Fold the top two corners of the paper down to the center crease an eleventh time. Unfold the paper.
23. Fold the bottom two corners of the paper up to the center crease an eleventh time. Unfold the paper.
24. Fold the top two corners of the paper down to the center crease a twelfth time. Unfold the paper.
25. Fold the bottom two corners of the paper up to the center crease a twelfth time. Unfold the paper.
26. Fold the top two corners of the paper down to the center crease a thirteenth time. Unfold the paper.
27. Fold the bottom two corners of the paper up to the center crease a thirteenth time. Unfold the paper.
28. Fold the top two corners of the paper down to the center crease a fourteenth time. Unfold the paper.
29. Fold the bottom two corners of the paper up to the center crease a fourteenth time. Unfold the paper.
30. Fold the top two corners of the paper down to the center crease a fifteenth time. Unfold the paper.
31. Fold the bottom two corners of the paper up to the center crease a fifteenth time. Unfold the paper.
32. Fold the top two corners of the paper down to the center crease a sixteenth time. Unfold the paper.
33. Fold the bottom two corners of the paper up to the center crease a sixteenth time. Unfold the paper.
34. Fold the top two corners of the paper down to the center crease a seventeenth time. Unfold the paper.
35. Fold the bottom two corners of the paper up to the center crease a seventeenth time. Unfold the paper.
36. Fold the top two corners of the paper down to the center crease an eighteenth time. Unfold the paper.
37. Fold the bottom two corners of the paper up to the center crease an eighteenth time. Unfold the paper.
38. Fold the top two corners of the paper down to the center crease a nineteenth time. Unfold the paper.
39. Fold the bottom two corners of the paper up to the center crease a nineteenth time. Unfold the paper.
40. Fold the top two corners of the paper down to the center crease a twentieth time. Unfold the paper.
41. Fold the bottom two corners of the paper up to the center crease a twentieth time. Unfold the paper.
42. Fold the top two corners of the paper down to the center crease a twenty-first time. Unfold the paper.
43. Fold the bottom two corners of the paper up to the center crease a twenty-first time. Unfold the paper.
44. Fold the top two corners of the paper down to the center crease a twenty-second time. Unfold the paper.
45. Fold the bottom two corners of the paper up to the center crease a twenty-second time. Unfold the paper.
46. Fold the top two corners of the paper down to the center crease a twenty-third time. Unfold the paper.
47. Fold the bottom two corners of the paper up to the center crease a twenty-third time. Unfold the paper.
48. Fold the top two corners of the paper down to the center crease a twenty-fourth time. Unfold the paper.
49. Fold the bottom two corners of the paper up to the center crease a twenty-fourth time. Unfold the paper.
50. Cut along the center crease to create two triangles.
How to Make an Origami Heart Envelope for a Special Gift: Tips and Tricks for Crafting Elegant Envelopes
Crafting an origami heart envelope is a great way to add a special touch to a gift. This simple yet elegant envelope is sure to make the recipient feel extra special. With a few simple steps, you can create a beautiful envelope that will make your gift stand out. Here are some tips and tricks for crafting an origami heart envelope.
First, you will need to gather the necessary materials. You will need a square piece of paper, scissors, and a ruler. You can use any type of paper you like, but cardstock or construction paper works best.
Next, you will need to measure and cut the paper. Measure the paper to be four inches by four inches. Then, cut the paper along the lines you have drawn.
Once you have the paper cut, you will need to fold it in half. Make sure the edges are even and the paper is folded in half lengthwise. Then, fold the paper in half again, this time widthwise.
Now, you will need to make the heart shape. Start by folding the top corner of the paper down to the bottom corner. Then, fold the left corner of the paper to the right corner. Finally, fold the top corner of the paper down to the bottom corner again.
Once you have the heart shape, you will need to make the envelope. Start by folding the top of the heart down to the bottom. Then, fold the left side of the heart to the right side. Finally, fold the top of the heart down to the bottom again.
Now, you will need to secure the envelope. You can use a piece of tape or a glue stick to secure the envelope. Make sure the edges are sealed tightly.
Finally, you can decorate the envelope. You can use markers, stickers, or other decorations to make the envelope look extra special.
By following these simple steps, you can create an origami heart envelope for a special gift. This elegant envelope is sure to make the recipient feel extra special. With a few simple materials and a bit of creativity, you can craft a beautiful envelope that will make your gift stand out.Origami Elegance: Creating an Origami Heart Envelope for Special Occasions is a great way to add a special touch to any special occasion. It is a simple and fun craft that can be enjoyed by all ages. With a few simple steps, you can create a beautiful and unique origami heart envelope that will be sure to impress your friends and family. Whether you are looking for a unique way to give a gift or just want to add a special touch to a special occasion, origami heart envelopes are a great way to do so.