Frame Your Memories: How to Make Picture Frames for Personalized Decor

Frame Your Memories is a comprehensive guide to creating beautiful, personalized picture frames for your home. Whether you’re a beginner or an experienced crafter, this guide will provide you with all the information you need to make stunning frames for your favorite photos and artwork. From selecting the right materials to learning the basics of frame construction, this guide will help you create frames that will last for years to come. With detailed instructions and helpful tips, you’ll be able to create frames that are both stylish and functional. So, if you’re looking for a way to add a personal touch to your home decor, Frame Your Memories is the perfect guide for you.

DIY Picture Frames: A Step-by-Step Guide to Crafting Custom Frames for Your Home Decor

Picture frames are a great way to add a personal touch to your home decor. Whether you’re looking to display a cherished family photo or a piece of artwork, crafting your own custom frames can be a fun and rewarding project. With a few simple tools and materials, you can create beautiful frames that will last for years to come.

This step-by-step guide will walk you through the process of crafting your own DIY picture frames.

Step 1: Gather Your Materials

Before you begin, you’ll need to gather the necessary materials. You’ll need a piece of wood for the frame, a saw, a drill, screws, nails, glue, and a finish of your choice. You’ll also need a miter box and saw if you plan to make mitered corners.

Step 2: Cut the Wood

Once you have all of your materials, you’ll need to cut the wood for the frame. Measure the size of the artwork or photo you’ll be framing and cut the wood to the appropriate size. If you’re making mitered corners, use the miter box and saw to cut the wood at a 45-degree angle.

Step 3: Assemble the Frame

Once the wood is cut, you’ll need to assemble the frame. Use the drill to attach the pieces of wood together with screws or nails. If you’re using mitered corners, you’ll need to use glue to secure them in place.

Step 4: Add the Finish

Once the frame is assembled, you’ll need to add a finish. You can use paint, stain, or varnish to give the frame a unique look. Allow the finish to dry completely before moving on to the next step.

Step 5: Attach the Artwork or Photo

Once the frame is finished, you’ll need to attach the artwork or photo. Use a hammer and nails to secure the artwork or photo to the frame.

Step 6: Hang the Frame

The final step is to hang the frame. Use a hammer and nails to secure the frame to the wall.

By following these steps, you can easily craft your own custom picture frames. With a few simple tools and materials, you can create beautiful frames that will last for years to come.

Creative Ways to Display Your Memories: Tips for Incorporating Picture Frames into Your Home Design

Creating a home that reflects your memories and experiences is a great way to make your living space feel more personal and inviting. Incorporating picture frames into your home design is an easy and creative way to display your memories and make your home more meaningful. Here are some tips for incorporating picture frames into your home design:

1. Choose a Focal Point: When incorporating picture frames into your home design, it’s important to choose a focal point. This could be a wall, a mantel, or a shelf. This will help create a cohesive look and ensure that your frames are displayed in an aesthetically pleasing way.

2. Mix and Match: Don’t be afraid to mix and match different frame styles and sizes. This will create visual interest and make your display more dynamic.

3. Hang in Groups: Hanging frames in groups of three or more will create a more impactful display. This will also help create a sense of balance and symmetry.

4. Use Color: Incorporating color into your frame display is a great way to add a pop of personality to your home. Choose frames in colors that complement your existing home decor.

5. Add Accessories: Adding accessories such as candles, plants, or books can help create a more inviting atmosphere. This will also help tie the frames into the rest of your home design.

By following these tips, you can easily incorporate picture frames into your home design and create a meaningful display of your memories.Frame Your Memories is an excellent resource for anyone looking to create personalized picture frames for their home decor. With easy-to-follow instructions and helpful tips, this guide provides all the information needed to make beautiful frames that will last for years to come. Whether you are a beginner or an experienced crafter, Frame Your Memories will help you create the perfect frame for your special memories.

Gratitude Galore: Thanksgiving Name Cards for a Personal Touch

Gratitude Galore: Thanksgiving Name Cards for a Personal Touch is a great way to add a special touch to your Thanksgiving celebration. These name cards are perfect for adding a personal touch to your Thanksgiving dinner table. They come in a variety of colors and designs, so you can find the perfect one to match your Thanksgiving decor. With these name cards, you can easily add a special touch to your Thanksgiving dinner and show your guests how much you appreciate them.

How to Create Thanksgiving Name Cards for a Personal Touch: Tips and Ideas for Crafting the Perfect Card.

Thanksgiving is a time for family and friends to come together and celebrate the season of gratitude. Adding a personal touch to the festivities can make the holiday even more special. One way to do this is to create Thanksgiving name cards for each guest. With a few simple supplies and a bit of creativity, you can craft the perfect card to make your guests feel welcome and appreciated.

To get started, you’ll need some cardstock, scissors, a pen, and a few other craft supplies. You can find cardstock in a variety of colors and patterns at your local craft store. Choose a design that reflects the theme of your Thanksgiving celebration. Once you have your cardstock, cut it into the desired size and shape. You can use a template or create your own design.

Next, use a pen to write each guest’s name on the card. You can also add a special message or quote to make the card even more personal. If you’re feeling creative, you can use rubber stamps, stickers, or other embellishments to decorate the card.

Finally, you can add a special touch by attaching a small gift or token of appreciation to the card. This could be a piece of candy, a small plant, or a handwritten note. Whatever you choose, it will be sure to make your guests feel special.

Creating Thanksgiving name cards is a great way to add a personal touch to your holiday celebration. With a few simple supplies and a bit of creativity, you can craft the perfect card to make your guests feel welcome and appreciated.

Showing Gratitude Through Thanksgiving Name Cards: Ideas for Expressing Appreciation to Your Guests

Thanksgiving is a time to show gratitude and appreciation for the people in our lives. One way to express this sentiment is through the use of Thanksgiving name cards. These cards can be used to welcome guests to the table and to show them how much they are appreciated. Here are some ideas for creating Thanksgiving name cards that will help you express your gratitude to your guests.

1. Include a personalized message. A personalized message on each card is a great way to show your guests how much you appreciate them. Consider writing a short note of thanks or a quote that expresses your gratitude.

2. Use a creative design. Get creative with the design of your Thanksgiving name cards. Consider using a festive color scheme or incorporating seasonal elements such as leaves, pumpkins, or turkeys.

3. Include a special gift. Include a small gift with each card, such as a candle, a packet of seeds, or a packet of tea. This is a great way to show your guests how much you care.

4. Make it interactive. Make your Thanksgiving name cards interactive by including a game or activity for your guests to do. This will help to create a fun and festive atmosphere at the table.

By using these ideas, you can create Thanksgiving name cards that will help you express your gratitude to your guests. Showing your appreciation through these cards will help to make your Thanksgiving celebration even more special.Gratitude Galore: Thanksgiving Name Cards for a Personal Touch is a great way to add a personal touch to your Thanksgiving celebration. Not only do these cards provide a unique way to show your appreciation for your guests, but they also make a great keepsake for years to come. With a variety of designs and colors to choose from, you can easily find the perfect card to match your Thanksgiving theme. Whether you are hosting a large gathering or a small family dinner, these cards will help make your Thanksgiving celebration even more special.

Concrete Clarity: Calculating Concrete Cost per Square Foot for Projects

Concrete Clarity is a powerful tool for calculating the cost of concrete projects. It provides an easy-to-use interface that allows users to quickly and accurately calculate the cost of concrete projects per square foot. With Concrete Clarity, users can quickly and accurately estimate the cost of their concrete projects, saving time and money. Concrete Clarity also provides detailed reports that can be used to compare different projects and make informed decisions. With its intuitive design and powerful features, Concrete Clarity is the perfect tool for any concrete project.

How to Estimate Concrete Cost Per Square Foot for Your Next Project

Accurately estimating the cost of concrete for a project can be a difficult task. However, with the right information and a few simple calculations, it is possible to estimate the cost of concrete per square foot for your next project.

First, you will need to determine the total square footage of the area that needs to be covered with concrete. This can be done by measuring the length and width of the area and then multiplying the two numbers together.

Next, you will need to determine the type of concrete that you will need for the project. Different types of concrete have different costs per square foot. For example, a basic concrete mix may cost around $3.50 per square foot, while a more complex mix may cost around $6.00 per square foot.

Once you have determined the type of concrete you need, you will need to calculate the total cost of the project. To do this, you will need to multiply the total square footage of the area by the cost per square foot of the concrete. For example, if the total square footage of the area is 500 square feet and the cost per square foot of the concrete is $3.50, then the total cost of the project would be $1,750.

Finally, you will need to factor in any additional costs that may be associated with the project. These costs may include labor, delivery, and other materials. Once you have added these costs to the total cost of the project, you will have an accurate estimate of the cost of concrete per square foot for your next project.

Understanding the Factors that Impact Concrete Cost Per Square Foot for Your Project

Concrete is a versatile and durable material that is used in a variety of construction projects. However, the cost of concrete can vary significantly depending on the size and scope of the project. Understanding the factors that impact the cost of concrete per square foot can help you plan and budget for your project more effectively.

The first factor that affects the cost of concrete per square foot is the type of concrete used. Different types of concrete have different properties and require different amounts of materials and labor to produce. For example, ready-mix concrete is typically more expensive than traditional concrete because it is pre-mixed and ready to use. Additionally, the type of aggregate used in the concrete mix can also affect the cost.

The second factor that affects the cost of concrete per square foot is the size of the project. Larger projects require more materials and labor, which can increase the cost. Additionally, the complexity of the project can also affect the cost. Projects that require intricate designs or complex forms may require more labor and materials, resulting in higher costs.

The third factor that affects the cost of concrete per square foot is the location of the project. Projects located in areas with higher labor costs or higher material costs will typically be more expensive than projects located in areas with lower costs. Additionally, the availability of materials in the area can also affect the cost.

Finally, the fourth factor that affects the cost of concrete per square foot is the time frame of the project. Projects that require a shorter timeline may require more labor and materials, resulting in higher costs. Additionally, projects that require a longer timeline may require fewer materials and labor, resulting in lower costs.

By understanding the factors that impact the cost of concrete per square foot, you can better plan and budget for your project. Knowing the type of concrete, size of the project, location, and timeline of the project can help you estimate the cost of your project more accurately.Concrete Clarity is a great tool for calculating the cost of concrete projects per square foot. It is easy to use and provides accurate estimates for the cost of concrete projects. It is a great resource for contractors, architects, and homeowners who need to accurately estimate the cost of their concrete projects. With Concrete Clarity, you can be sure that you are getting the most accurate cost estimates for your concrete projects.

Capture the Moment: Create Your Own Photo Booth for Special Events

Capture the Moment: Create Your Own Photo Booth for Special Events is a comprehensive guide to creating your own photo booth for special events. This guide will provide you with all the information you need to create a fun and memorable photo booth experience for your guests. From choosing the right equipment to setting up the booth and taking the photos, this guide will walk you through the entire process. With this guide, you can create a unique and personalized photo booth experience that will make your special event even more special.

How to Create a DIY Photo Booth for Your Next Special Event

Creating a DIY photo booth for your next special event is a great way to add a unique and fun element to the festivities. With a few simple supplies and a bit of creativity, you can create a memorable experience for your guests. Here are some tips for creating a DIY photo booth for your next special event.

First, decide on the type of backdrop you would like to use. You can use a variety of materials, such as fabric, paper, or even a wall mural. Choose a backdrop that will complement the theme of your event and create a fun atmosphere.

Next, you will need to gather the necessary supplies. You will need a camera, a tripod, a printer, and a variety of props. Props can include hats, glasses, wigs, and other fun items. You may also want to consider purchasing a photo booth kit, which includes all the necessary supplies.

Once you have all the supplies, you can begin setting up the photo booth. Place the backdrop in a designated area and set up the camera and tripod. Make sure the camera is positioned at the right height and angle to capture the best shots.

Next, you will need to create a photo booth sign. This sign should include instructions for guests on how to use the photo booth and any other relevant information. You can also include a hashtag or other social media information to encourage guests to share their photos online.

Finally, you will need to print out the photos. You can use a variety of printing options, such as a home printer or a professional printing service. Once the photos are printed, you can display them in a designated area or hand them out to guests as a keepsake.

Creating a DIY photo booth for your next special event is a great way to add a unique and fun element to the festivities. With a few simple supplies and a bit of creativity, you can create a memorable experience for your guests.

Tips for Making the Most of Your DIY Photo Booth at Your Next Special Event

1. Choose a Location: When selecting a location for your DIY photo booth, consider the size of the space and the amount of natural light available. Make sure the area is large enough to accommodate your guests and the props you plan to use.

2. Gather Props: Props are essential for a successful DIY photo booth. Gather items such as hats, glasses, wigs, and other fun accessories to make your photos more interesting.

3. Set Up a Backdrop: A backdrop is essential for creating a professional-looking photo booth. Choose a backdrop that complements the theme of your event and is large enough to fit all of your guests.

4. Use a Camera with a Self-Timer: To ensure everyone can get in the photo, use a camera with a self-timer. This will allow you to take group photos without having to ask someone to take the photo for you.

5. Have Fun: The most important tip for making the most of your DIY photo booth is to have fun! Encourage your guests to get creative with their poses and props.

6. Print Photos: To make your DIY photo booth even more memorable, print out the photos and give them to your guests as a keepsake. This will help them remember the fun they had at your event.Capture the Moment: Create Your Own Photo Booth for Special Events is a great way to add a unique and fun element to any special event. It is an easy and affordable way to create lasting memories for your guests. With a few simple supplies and a little creativity, you can create a photo booth that will be the talk of the party. Whether you are hosting a wedding, birthday party, or corporate event, a photo booth is sure to be a hit.

Dreamy Canopy: Creating a Tulle Canopy for Whimsical Bedroom Decor

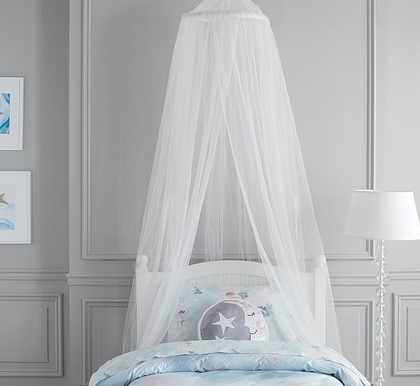
Dreamy Canopy is a unique and creative way to add a touch of whimsy to any bedroom. With a few simple steps, you can create a beautiful tulle canopy that will transform your bedroom into a magical and dreamy space. Whether you’re looking for a romantic touch or a fun and playful atmosphere, a tulle canopy is the perfect way to add a touch of personality to your bedroom. With this guide, you’ll learn how to create a beautiful and unique canopy that will make your bedroom look like something out of a fairytale.

How to Create a Dreamy Canopy with Tulle for a Whimsical Bedroom Look

Creating a dreamy canopy with tulle for a whimsical bedroom look is a simple and cost-effective way to add a touch of whimsy to any bedroom. Tulle is a lightweight, sheer fabric that is available in a variety of colors and textures, making it an ideal choice for creating a canopy. With a few simple steps, you can create a beautiful and unique canopy that will transform your bedroom into a magical and inviting space.

First, you will need to measure the area where you want to hang the canopy. Measure the length and width of the area and then add an extra two feet to each measurement. This will give you enough fabric to create a full canopy. Once you have the measurements, purchase enough tulle fabric to cover the area. You can find tulle fabric in a variety of colors and textures, so choose the one that best suits your bedroom’s aesthetic.

Next, you will need to hang the tulle fabric from the ceiling. You can use a curtain rod or a tension rod to hang the fabric. If you are using a curtain rod, make sure to hang it at least two feet above the bed. If you are using a tension rod, make sure to secure it firmly in place.

Once the fabric is hung, you can begin to create the canopy. Start by gathering the fabric at the top of the rod and tying it off with a ribbon or string. Then, gather the fabric at the bottom of the rod and tie it off with a ribbon or string. Finally, gather the fabric in the middle of the rod and tie it off with a ribbon or string. This will create a beautiful and whimsical canopy.

Finally, you can add some finishing touches to your canopy. You can hang fairy lights or paper lanterns from the canopy to create a dreamy and romantic atmosphere. You can also add some sheer curtains to the sides of the canopy to add a touch of privacy.

Creating a dreamy canopy with tulle for a whimsical bedroom look is a simple and cost-effective way to add a touch of whimsy to any bedroom. With a few simple steps, you can create a beautiful and unique canopy that will transform your bedroom into a magical and inviting space.

DIY Ideas for Adding a Magical Touch to Your Bedroom with a Tulle Canopy

Creating a magical atmosphere in your bedroom can be achieved with the addition of a tulle canopy. This simple and elegant decoration can transform a room into a dreamy and inviting space. Here are some ideas for adding a magical touch to your bedroom with a tulle canopy.

1. Hang a Tulle Canopy Over the Bed. A tulle canopy hung over the bed is a classic way to add a magical touch to your bedroom. Choose a sheer, lightweight fabric in a color that complements your room’s décor. Hang the canopy from the ceiling with hooks or a rod, and drape it around the bed for a romantic and whimsical look.

2. Create a Tulle Canopy Tent. For a more playful look, create a tulle canopy tent in the corner of your bedroom. Hang a rod from the ceiling and drape the tulle fabric over it to create a cozy and inviting space. Add some fairy lights or other decorations to make it even more magical.

3. Hang a Tulle Canopy Over a Window. If you have a window in your bedroom, you can hang a tulle canopy over it to create a dreamy atmosphere. Choose a sheer fabric in a light color to let in natural light while still providing privacy.

4. Add a Tulle Canopy to a Reading Nook. If you have a reading nook in your bedroom, you can add a tulle canopy to make it even more inviting. Hang the canopy from the ceiling and drape it around the nook for a cozy and magical atmosphere.

These are just a few ideas for adding a magical touch to your bedroom with a tulle canopy. With a little creativity, you can create a dreamy and inviting space that will make you feel like you’re in a fairytale.Dreamy Canopy is a great way to add a touch of whimsy and romance to any bedroom. It is easy to install and can be customized to fit any space. With its sheer fabric and light-catching sparkles, it creates a magical atmosphere that will make any bedroom feel like a dream. Whether you are looking for a romantic touch or a fun and playful atmosphere, Dreamy Canopy is the perfect way to add a touch of whimsy to your bedroom decor.